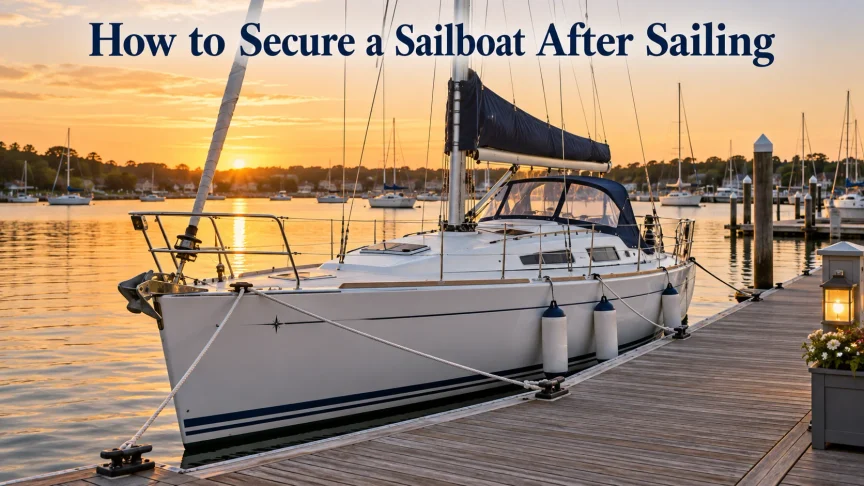
Returning to the dock or picking up a mooring does not end the sailing day. The boat may have stopped moving through the water, but wind, tide, wakes, weather and onboard systems will continue to affect it after the crew leaves.
A properly secured sailboat should remain unattended without damaging itself, the dock or neighbouring boats. Its equipment and systems should also be protected and ready for next time.
This repeatable routine teaches general seamanship but does not replace the owner’s manual, marina rules or vessel-specific checklist.
Quick Summary
To secure a sailboat after sailing:
- Stabilize the boat.
- Set the final lines and fenders.
- Reassess forecast, tide, wake and berth.
- Secure sails, rigging and gear.
- Shut down and inspect machinery.
- Configure onboard systems for that boat.
- Secure the cabin and reset safety equipment.
- Walk around, step away and look back.
Remember:
SECURE → PROTECT → SHUT DOWN → CHECK → VERIFY
At every stage, ask:
Could the boat safely stay here without me?
What You Will Learn
By the end of this lesson, you should be able to arrange lines and fenders for an unattended stay, anticipate changing conditions, protect sails and equipment, check machinery and onboard systems, identify problems requiring attention, and verify that the boat is safe to leave.
Before continuing, review the jobs performed by bow, stern and spring lines in Sailboat Lines Explained. Securing the boat begins with controlling how it can move while unattended.
The Sail Is Not Over When the Boat Touches the Dock
Docking brings the boat into the berth and establishes initial control. Securing the boat prepares it to remain there after the crew has gone.
The first line ashore may be ideal for stopping the boat but poorly placed for an overnight stay. Fenders may have been positioned for the approach rather than the final berth. The engine may still be needed while lines are reorganized. A sail that appears furled may have a loose corner that can shake free in stronger wind.
The controlled approach in How to Dock a Sailboat ends with the boat alongside, but the process continues because the lines and fenders must now protect the boat for hours or days rather than minutes. If the boat is on a mooring, use the inspection and attachment principles in How to Use a Mooring Buoy before completing the remaining shutdown.
After you leave, tide, wind and wake can change; lines may stretch or chafe; fenders can move; sails can work loose; rain can enter; and leaks or electrical loads can develop into larger problems.
A beginner sees a boat that has stopped. A developing skipper asks, “What could change after I leave?”
Step 1 — Stabilize the Boat Before Starting the Shutdown
Once the boat is alongside, do not scatter the crew into unrelated cleanup jobs. First confirm that the boat is under control.
The engine may need to remain available while the lines are adjusted. Crew should stay at their positions until the boat cannot surge, swing away or contact the dock.
Confirm:
- Is the boat in the intended position?
- Are enough lines attached to prevent uncontrolled movement?
- Are they secured to fittings intended for mooring loads?
- Are the fenders between the hull and the structure?
- Is anyone still holding a loaded line by hand?
- Is any line near the propeller while the engine is running?
- Can everyone move safely between boat and dock?
Never wrap a line around a hand, stand inside a loop or place fingers between a loaded line and a cleat. Load can increase suddenly when wind, current or wake moves the boat.
Only after the boat is stable should the full shutdown begin.
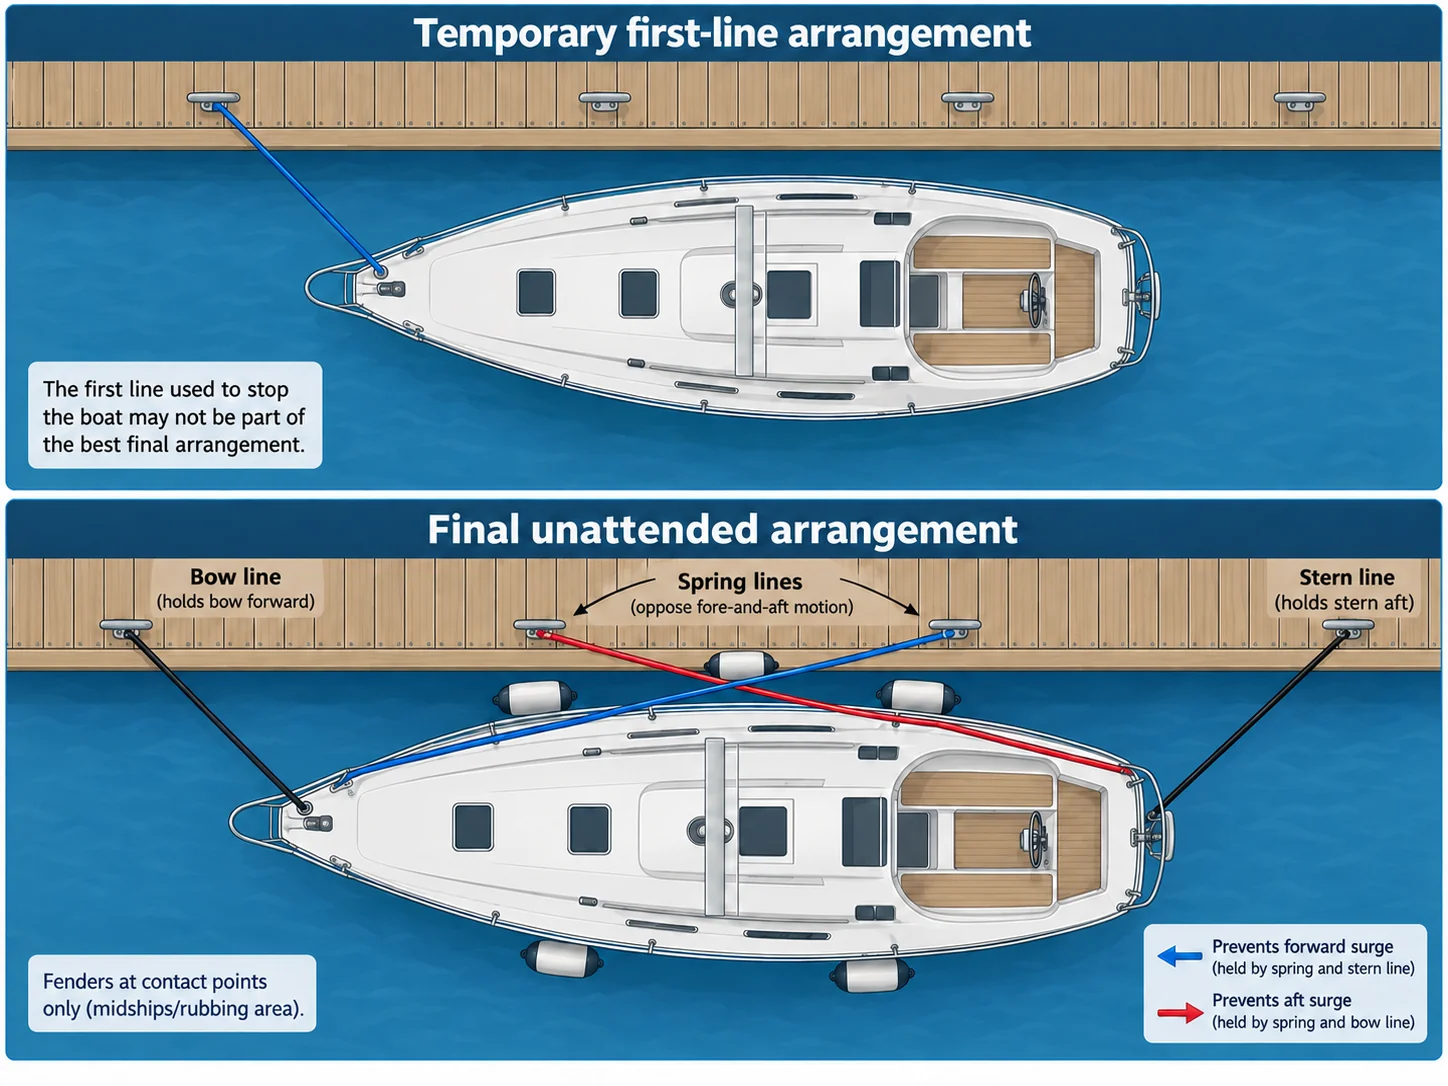
The first line used to stop the boat may not be part of the best final arrangement.
Step 2 — Arrange the Lines for an Unattended Stay
Dock lines work as a system. Their purpose is not to freeze the boat in one exact position. They limit movement while allowing the boat to respond safely to normal changes in wind, water level and wake.
Bow and stern lines help control their respective ends. Spring lines limit fore-and-aft movement; two led in opposing directions restrain surging both ways. Naming conventions vary, so focus on the movement each line prevents.
Use cleats, bollards, rings or pilings intended to carry mooring loads. Do not assume a railing or stanchion is strong enough. Lead each line without pressing against fragile equipment, sawing across a sharp edge or creating a dockside trip hazard.
Inspect chocks, fairleads and dock edges. Repeated movement can damage one small area even when the rest of the line looks sound. Adjust the lead or add suitable chafe protection.
A proper cleat hitch should be secure, compact and releasable. If the line functions or knot remain uncertain, revisit Five Foundational Sailing Knots before relying on them to secure an unattended boat.
Gently move the boat within its lines. Notice which line loads and whether any part of the hull can reach the dock, a piling or another boat.
Step 3 — Allow Movement Without Allowing Damage
“Tight” and “secure” are not synonyms.
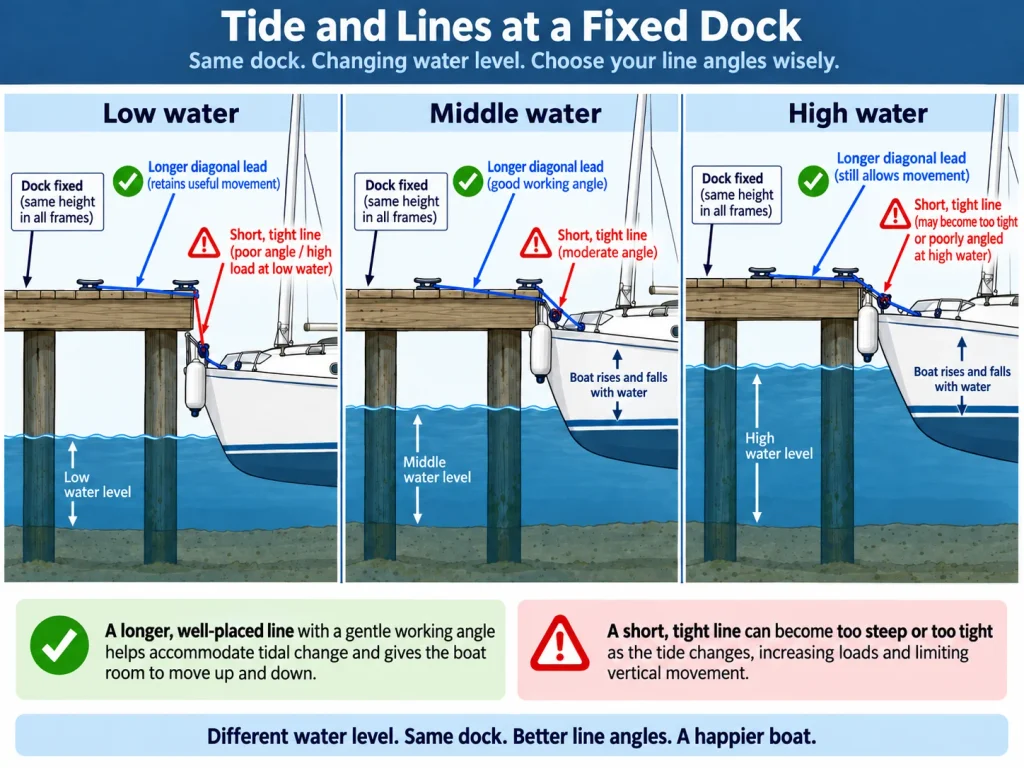
Bar-tight lines can create high loads and restrict vertical movement at a fixed dock. Overly loose lines let the boat build momentum and may allow it to strike the dock, a piling or another vessel.
The goal is controlled movement within safe limits.
At a floating dock, dock and boat normally rise and fall together, although wake, stretch and berth geometry still matter. At a fixed dock or piling, water level changes relative to the attachment. Longer diagonal leads usually provide more tidal allowance than short, steep ones, but the correct setup depends on the boat and berth.
Use How to Read Tide Tables to determine both the present level and the expected direction and size of change. Then test every line mentally:
- What happens if the boat rises?
- What happens if the boat falls?
- Can the boat move vertically without reaching anything horizontally?
There is no universal safe amount of slack.
Step 4 — Reposition the Fenders
Fenders work only when they remain between the hull and the object it may contact. Reassess their number, size, height and position after setting the final lines; the boat may now sit farther forward or aft than it did during the approach.
Ask:
- Where will contact occur if the wind pushes the boat toward the dock?
- Could the bow or stern move beyond the protected area?
- Can a fender roll upward, squeeze out or catch under an edge?
- Does a piling require protection in a different location?
- Could fore-and-aft surging carry the hull past a fender?
Use enough suitably sized fenders to cover the likely contact zone. An unattended boat needs them secured where contact may occur.
Step 5 — Secure for the Conditions That Are Coming
Do not secure the boat only for the conditions visible now. Consider:
- forecast wind strength and direction;
- an expected wind shift or frontal passage;
- tidal range and current;
- passing-vessel wake;
- fetch and wave exposure;
- rain, snow or freezing conditions; and
- unusual marina or harbour activity.
The Sailing Weather for Beginners lesson explains how to use the marine forecast instead of relying on the sky above the marina. Transport Canada’s pleasure-craft maintenance guidance likewise emphasizes checking the forecast, local hazards and vessel condition.
Imagine the boat looks comfortable at 1600. An 8-knot wind pushes it gently away from the dock. Overnight, the forecast calls for 20–25 knots from the opposite direction, and high tide will occur at 0200.
The dock-side fenders may become critical overnight, higher water may change line angles, and repeated motion may create chafe. Secure for what is expected, not merely for what is happening now.
Skipper Thinking — Forecast the Boat’s Movement
Use the SailboatZone thinking sequence:
SCAN → COMPARE → PRIORITIZE → ACT → REASSESS
Scan the boat and conditions. Compare the present with the forecast and normal setup. Prioritize the change most likely to cause harm. Act on the relevant line, fender or protection. Reassess to ensure the correction did not create another problem.
Scenario: A boat is at low tide beside a fixed dock. The bow and stern lines are short, and the water will rise one metre overnight.
Decide which leads will steepen, whether a line could restrict vertical movement, how the leads could be improved, how a floating dock would differ, and whether the adjusted boat could reach anything.
Step 6 — Secure Sails, Rigging and Loose Gear
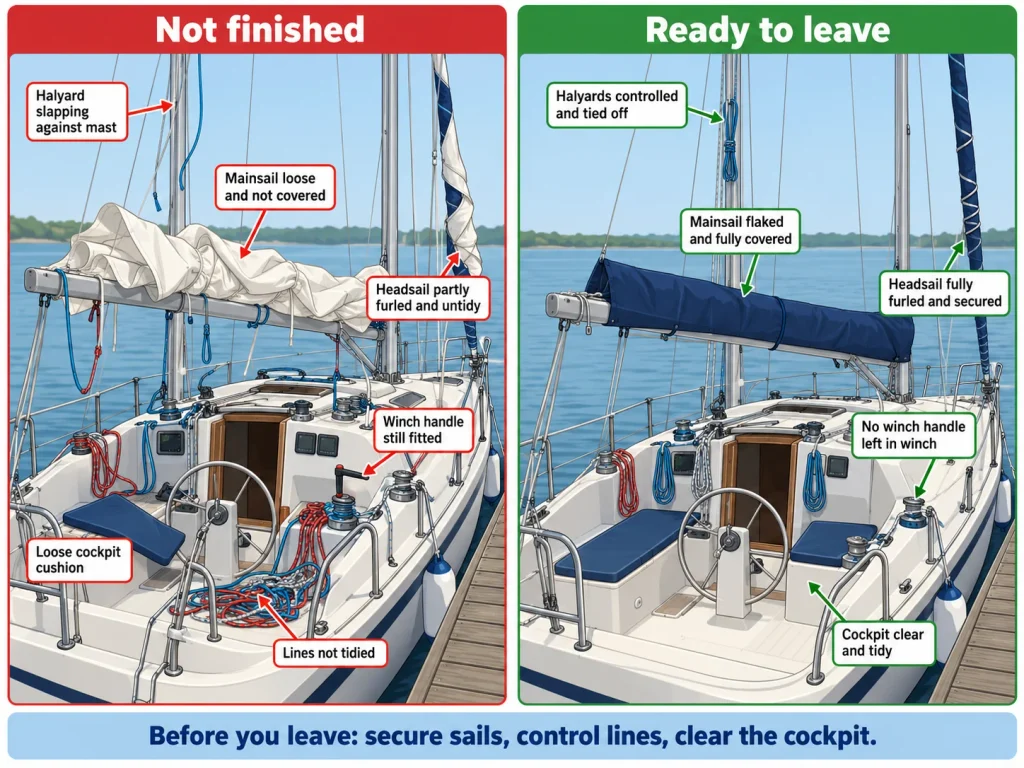
A sail exposed to wind can flog, chafe or partly unfurl. Lower the mainsail fully, flake or gather it, add sail ties where appropriate, fit the cover and confirm that no section can pull free.
Furl a roller-furling headsail completely according to its procedure while controlling both sheet and furling line. Secure the lines and look aloft for an exposed corner near the head, tack or clew. Lower, gather and stow a hank-on or removable headsail as required.
The techniques are explained in How to Hoist, Lower, Furl and Change Sails. Here, the skipper’s job is to verify that every sail is protected and incapable of flogging free.
Secure halyards, sheets, furling lines, reefing lines and other controls. Keep shackles from damaging the mast, line ends out of the water and coils clear of drains. Remove winch handles unless the boat’s procedure says otherwise, and apply the load-handling principles in How to Use a Sailboat Winch Safely.
Sweep the deck and cockpit for loose gear, open lockers and unsecured covers. Stow anything that can blow away, wash overboard, suffer weather damage or block a path or drain.
Step 7 — Shut Down and Inspect the Machinery
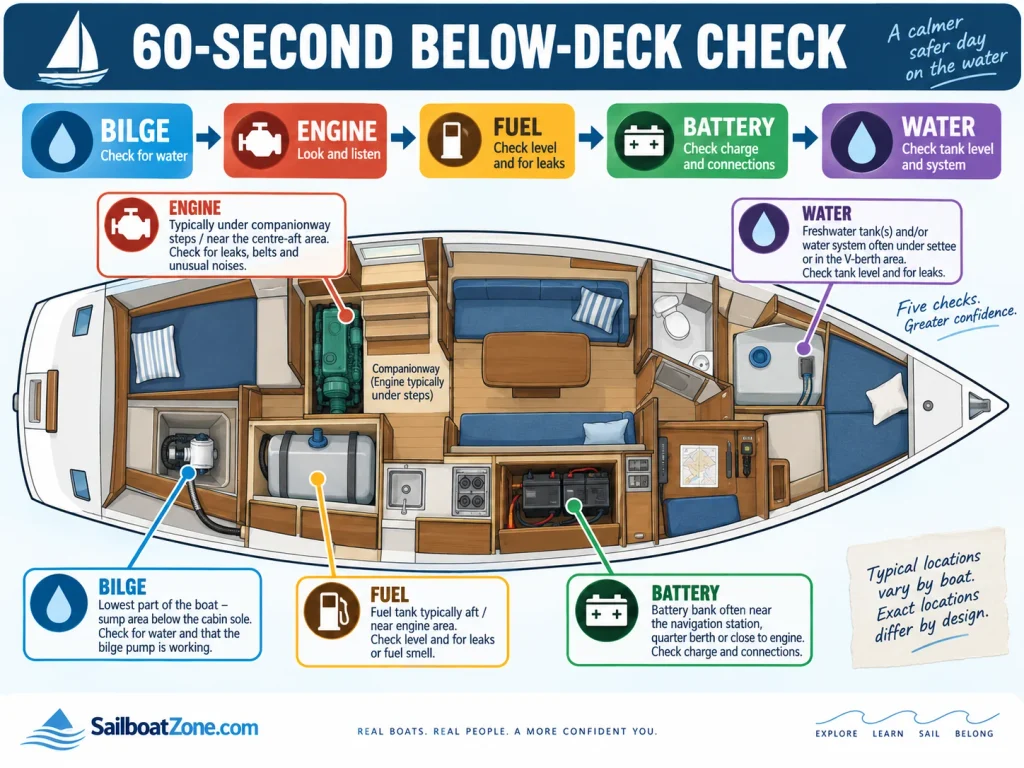
Follow the engine manufacturer’s instructions and the boat’s checklist. Diesel and gasoline shutdown systems differ, and even engines using the same fuel may have different controls.
Use the correct stop control, confirm shutdown, then check for:
- fuel, oil, coolant or water leakage;
- unusual heat;
- a new sound or smell;
- a warning light or alarm; or
- loose or shifted equipment.
Compare the bilge and machinery space with their normal condition. Unexpected water deserves investigation; an automatic pump manages water but does not explain its source.
Gasoline, propane and butane vapours are heavier than air and can collect in low parts of a boat. Transport Canada warns that these vapours can be difficult to remove and highly explosive. If you smell fuel or suspect a leak, do not operate an unprotected electrical switch or start an engine. Keep people clear and follow the vessel’s emergency procedure or obtain qualified assistance.
The Transport Canada Safe Boating Guide also recommends marine-designed fuel-burning equipment, proper ventilation and qualified installation and service.
Before leaving, ask:
What changed since the boat left the dock this morning?
If the answer is unclear, slow down and investigate.
Step 8 — Configure Onboard Systems Deliberately
“Turn everything off and close everything” sounds safe, but applied blindly it can create new hazards.
Electrical power. Turn off unnecessary loads, but follow the boat’s checklist for circuits meant to remain energized, which may include a bilge pump, alarm, monitor, charger or refrigerator. Never copy another vessel’s battery-switch position.
Shore power. Inspect the cable and connectors for obvious damage, heat or discolouration. Keep connections dry and out of the water, provide strain relief and avoid a dockside trip hazard. Connection and disconnection procedures depend on the installation and marina; follow both sets of instructions. A hot, damaged, wet or improvised connection requires qualified attention.
Seacocks and through-hulls. Many procedures close selected non-essential below-waterline seacocks when unattended, but not every valve serves the same purpose. Identify each valve and use the boat’s normal configuration. If a cooling-water intake is closed, the checklist must prevent an engine start before it is reopened. Report seized or leaking valves.
Water, fuel and cooking systems. Set water pumps, pressure systems, fuel valves, heads, holding tanks and LPG systems according to the vessel’s checklist and manufacturer instructions. Never leave an open-flame appliance operating unattended. Transport Canada advises that propane and butane systems be designed for marine use, properly ventilated and installed or serviced by a qualified technician.
Know what must remain on, what must be shut, and why.
Step 9 — Leave the Cabin Safe, Clean and Ready
Check that:
- cooking appliances are off;
- fuel supplies are in their required shutdown condition;
- taps and water pumps are configured correctly;
- food and rubbish are removed or stored properly;
- wet gear is set out to dry as appropriate;
- lockers and floorboards are secure;
- hatches and ports suit the expected weather;
- companionway boards and locks are fitted; and
- valuables and removable electronics are handled appropriately.
Ventilation can reduce condensation, but an open hatch may admit rain. Use installed vents and the boat’s normal arrangement rather than sealing every opening automatically.
Remove rubbish and contain any oil or fuel leak. Do not intentionally pump contaminated bilge water into the marina. Transport Canada’s boat-owner guidance states that owners are responsible for maintaining their vessels and may bear cleanup or repair costs when a boat causes pollution or damage.
Check whether safety equipment was used, moved, soaked, damaged or depleted. Dry PFDs, recharge the VHF, replace supplies and report missing or expired equipment.
Step 10 — Walk Around, Step Away and Look Back
A repeatable route reduces omissions:
BOW → PORT SIDE → COCKPIT → STARBOARD SIDE → CABIN → SYSTEMS → DOCK → FINAL LOOK
Check:
- line attachment, lead and chafe;
- fender height and protected area;
- sail ties, covers and furling;
- halyards, sheets and loose equipment;
- lockers, hatches, ports and drains;
- bilge and machinery condition;
- electrical panel and shore-power cable;
- unusual heel, list or waterline position;
- leaks, smells or sounds;
- spacing from structures and neighbouring boats;
- dockside trip hazards; and
- locks and security.
If you correct something, recheck the parts of the system affected by the change.
Then step away and turn around. From outside, look for unusual list, poor spacing, an ineffective fender, a loose sail or a bad line lead. If possible, watch one small wind or wake cycle: do the lines share the work, do fenders remain in place, and can the hull reach anything?
Make the final look a ritual:
Stop. Turn around. Look at the whole boat.
A Practical End-of-Sail Checklist
Use this as a memory aid, then adapt it to the vessel.
- Stabilize: Keep the crew focused until the boat is controlled.
- Secure: Set final lines or confirm the mooring attachment.
- Test: Check movement, clearance, tidal allowance and chafe.
- Protect: Reposition fenders for the final arrangement.
- Anticipate: Review wind, weather, tide, current and wake.
- Stow: Secure sails, rigging and loose gear.
- Shut down: Follow the correct engine procedure.
- Inspect: Check the bilge, fuel and machinery spaces.
- Configure: Set electrical, shore-power, water, fuel, LPG and seacock systems according to the boat.
- Secure the cabin: Address appliances, rubbish, ventilation, hatches and locks.
- Reset: Dry, replace, recharge, record or report safety equipment and defects.
- Verify: Walk around, step away and look back.
Common Beginner Mistakes
“We’re tied up, so we’re done.” The arrival setup may not protect the boat through changing conditions.
Making every line extremely tight. This can remove useful movement and create excessive loads, especially beside a fixed dock.
Forgetting effective springs. The boat may surge forward and aft even though both ends appear tied.
Leaving fenders where they landed during docking. The final line arrangement may move the boat away from the protected zone.
Ignoring chafe. One small contact point can damage an otherwise sound line.
Leaving a sail partly furled or a halyard slapping. Wind can increase wear, noise and the chance of a sail coming loose.
Leaving lines or gear overboard, underfoot or over drains. Tidy must also be safe and functional.
Turning off every electrical circuit. This may disable a system intended to remain energized.
Closing valves without knowing their purpose. The next engine start can be damaged if a cooling intake remains closed.
Ignoring abnormal bilge water or fuel smell. These are changes to investigate, not items to hide or postpone.
Securing for present rather than forecast conditions. Tomorrow’s wind or tide may create the largest load.
Leaving without looking back. Many whole-boat problems are easiest to see from the dock.
Different Boats Need Different Shutdowns
The details vary. A day sailor may focus on sails, gear, covers and dock or trailer security. A cruising boat needs a systems checklist. Charter crews must follow company procedures and report faults. Shared-boat users must restore gear and record defects. An owner should document normal switch and valve positions, known chafe points and seasonal concerns.
Universal seamanship means leaving each boat in its own known, safe unattended configuration.
Skipper Thinking — What Changed Today?
A checklist catches routine omissions. Skipper Thinking catches the problem the checklist did not predict.
Work through five categories:
Boat: Did anything break, leak, chafe, jam, overheat or behave differently?
Crew: Was safety equipment used? Was gear moved? Did someone notice an abnormal sound, smell or warning?
Environment: What will the wind, weather and water level do after you leave?
Berth: What moves, what remains fixed and what can the boat reach?
Next sail: What could surprise the next skipper?
Suppose you find a loose halyard, partly furled headsail, cabin light left on, more bilge water than usual, a chafing stern line, a high fender and an open hatch.
Do not treat them as equal boxes. Prioritize immediate safety and damage risks, investigate abnormal water or fuel evidence, correct what you understand, and obtain qualified help when the cause or remedy is beyond your competence. Then repeat the relevant checks.
Three Practice Scenarios
Rising tide: A boat sits at a fixed dock on short lines. Which leads steepen as water rises, and how would a floating dock differ?
Wind reversal: Wind now pushes the boat away but will push it toward the dock overnight. Which fenders, lines and chafe points matter?
Shared boat: PFDs are damp, the VHF was used and the engine briefly showed a warning. What must be dried, charged or reported?
The goal is not to memorize one perfect setup. It is to practise observing, anticipating, deciding and verifying.
Knowledge Check
Answer without looking back.
- Why is docking different from securing a boat?
- What movement do spring lines especially limit?
- Why can short, tight lines be dangerous at a fixed dock?
- Why are fenders checked after the final lines are set?
- What future conditions should be considered before leaving?
- Why is “turn everything off” poor universal advice?
- What should an unexpected increase in bilge water trigger?
- Why must used or damaged safety gear be dealt with before leaving?
- What question turns a checklist into Skipper Thinking?
- Why step away and look back at the whole boat?
If an answer depends on the word “always,” ask whether it is truly universal or belongs in the vessel-specific checklist.
Frequently Asked Questions
How tight should dock lines be? Tight enough to limit harmful movement, but not so tight that the boat cannot respond to wakes or changing water level.
Do I need two spring lines? Opposing springs commonly limit movement in both directions, but the arrangement depends on the berth and strongpoints.
Should fenders remain out? At a dock, they normally remain at likely contact points. A moored boat has different needs.
Should I turn off the battery switch?
Follow the boat’s electrical procedure. Some circuits may need to remain energized even when other loads are off.
Should every seacock be closed?
Follow the vessel’s identified unattended configuration. Many non-essential below-waterline seacocks are closed, but a blind “close everything” rule can create another hazard.
What if I find more bilge water than usual?
Investigate the source. If you cannot identify and control it, obtain help before leaving the boat unattended.
Key Takeaways
- Secure for what may happen later, not only for what is happening now.
- Dock lines work as a system; springs limit important fore-and-aft movement.
- Safe line arrangements allow controlled movement without allowing contact or extreme loading.
- Reposition fenders after setting the final lines.
- Protect sails, rigging and loose gear from wind, water and chafe.
- Follow vessel-specific engine, electrical, shore-power, fuel, LPG, water and seacock procedures.
- Never ignore abnormal bilge water, a fuel smell, damage or warning indication.
- Restore safety equipment and report defects before the next sail.
- Finish with a repeatable walk-around and a final look back.
Final Skipper Thinking Challenge
You are holding your car keys on the dock. The boat has four lines attached, but it can only surge until the bow reaches a piling. The mainsail is covered, but one sail tie is loose. The forecast wind will reverse overnight. One fender protects amidships, while the stern has none. The bilge contains more water than it did before departure. A designed cabin vent remains open. The automatic bilge-pump circuit remains on, as required by the boat’s checklist.
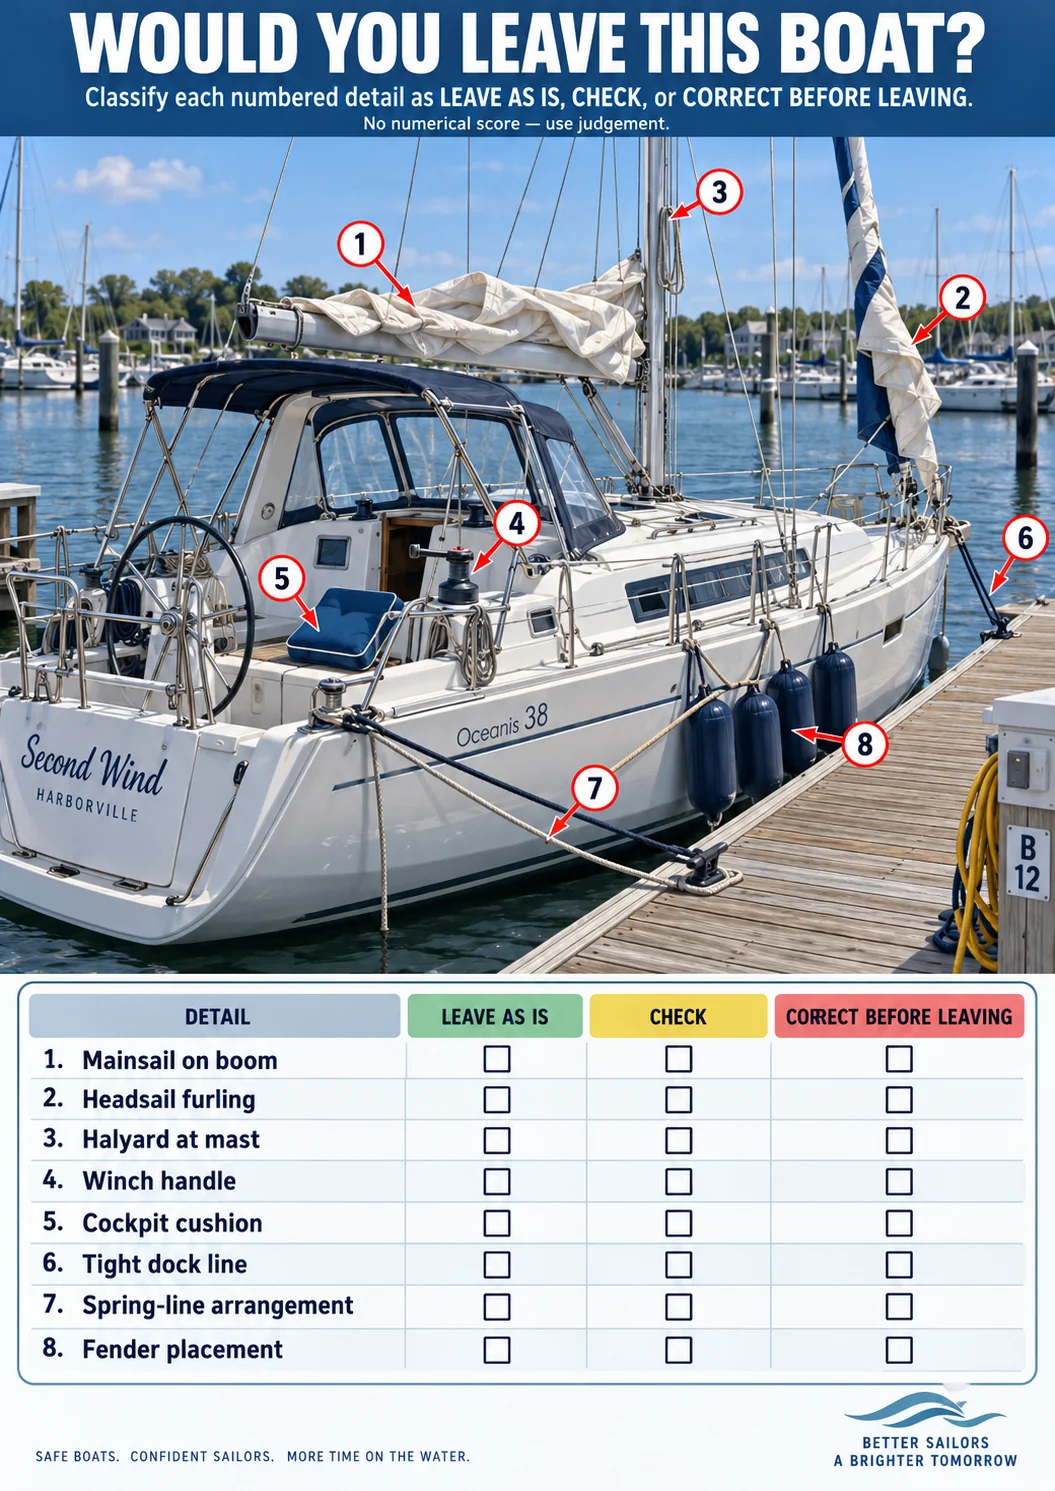
Classify each observation:
- LEAVE AS IS
- CHECK
- CORRECT BEFORE LEAVING
Then decide:
- Which issue could cause the first physical damage?
- Which requires investigation rather than a cosmetic fix?
- Which two details may be correct even though they look suspicious?
- What must change before you repeat the final walk-around?
A sound answer identifies excessive surging, missing stern protection, the loose sail tie and abnormal bilge water as concerns. The open designed vent and energized bilge-pump circuit may be correct for this boat. The wind reversal requires the entire setup to be reconsidered.
This whole-boat judgement is the mindset developed in the Independent Skipper Capstone: observe, anticipate, make a conservative decision and verify the result.
Final Quiz
Choose the best answer.
- The boat has just come alongside on one temporary line. What happens next? A. Everyone begins packing immediately
B. Confirm control, then establish the final lines and fenders
C. Remove the fenders
D. Pull the temporary line bar-tight and leave - What is the main purpose of opposing spring lines? A. Hold fenders vertically
B. Limit fore-and-aft movement
C. Support the mast
D. Replace every other dock line - What is the concern with short, tight lines at a fixed dock when water rises? A. They may restrict vertical movement and develop excessive load
B. They make the fenders heavier
C. They always push the boat away
D. They cause the sails to unfurl - When should fenders receive their final check? A. Before entering the harbour only
B. After the final lines establish where the boat can move
C. After they have been removed
D. Only when wind exceeds 20 knots - Present wind holds the boat away from the dock, but overnight wind will reverse. What is best? A. Leave the calm setup unchanged
B. Remove the unused fenders
C. Reassess fenders, line loads and chafe for the forecast direction
D. Eliminate all boat movement - Which electrical statement is most accurate? A. Every circuit must be off
B. The selector must remain on BOTH
C. Unnecessary loads go off; designated circuits follow the boat’s procedure
D. Electrical settings do not matter after sailing - You find more bilge water than before departure. What should you do? A. Leave because the pump will handle it
B. Investigate the source and obtain help if it cannot be controlled
C. Turn off the bilge pump
D. Add clean water to compare the colour - Which is the best overall sequence? A. Secure → Protect → Shut Down → Check → Verify
B. Shut Down → Leave → Secure → Check → Protect
C. Protect → Leave → Secure → Verify → Shut Down
D. Check → Leave → Protect → Secure → Shut Down - A VHF was used, two PFDs are wet and an engine warning appeared. What is the best handover? A. Put everything away without comment
B. Recharge the VHF, dry the PFDs, and record or report the warning
C. Leave everything loose in the cockpit
D. Reset the warning and close every valve - Why is the final look back useful?
A. It proves the boat cannot move
B. It replaces the walk-around.
C It reveals
Quiz Answer Key
- B. Establish stable control before reorganizing for the unattended stay.
- B. Opposing springs limit surging in both fore-and-aft directions.
- A. Fixed attachment points do not rise with the boat, so short lines can develop steep angles and high loads.
- B. The final line arrangement determines the movement and contact area that need protection.
- C. Secure for forecast conditions, not only for the light load visible now.
- C. Systems differ; remove unnecessary loads without disabling circuits intended to remain powered.
- B. Abnormal water is evidence of a change that requires investigation.
- A. Control the boat, protect it, configure systems, inspect the result and verify the whole setup.
- B. Restore safety equipment and communicate a machinery warning rather than hiding or resetting it.
- C. Distance provides a whole-boat perspective that can reveal problems not obvious onboard.
Scoring Guide
9–10 correct — Strong understanding. Practise the full routine under an experienced skipper until it becomes consistent.
7–8 correct — Good foundation. Review line movement, changing conditions and vessel-specific system configuration.
5–6 correct — Developing understanding. Revisit the line, bilge, forecast and electrical or seacock sections before applying the routine.
0–4 correct — Review before taking responsibility. Read the lesson again and complete the checklist alongside an experienced skipper.
Remember
Securing a sailboat is the final seamanship phase of the trip:
SECURE the boat against uncontrolled movement.
PROTECT the hull, sails, rigging and equipment.
SHUT DOWN machinery and systems according to the boat.
CHECK for changes, leaks, damage and missing equipment.
VERIFY the result with a walk-around and final look back.
The sail is finished only when the boat is safe for what comes next.
Continue the Course
Securing the boat completes the sailing cycle: prepare, depart, sail, return, dock and leave the vessel safe. The next lesson turns to organizing people as deliberately as you now organize the boat—assigning roles, communicating clearly and helping a crew work as one team.