
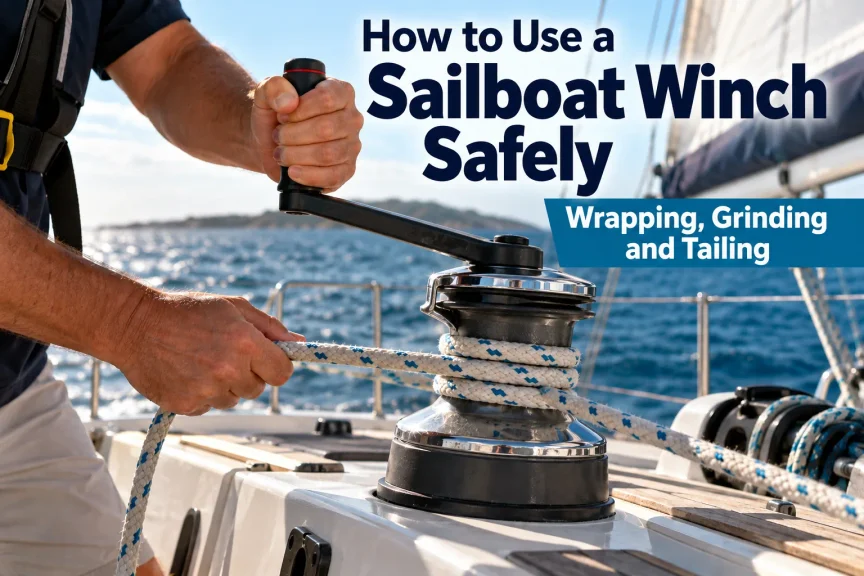
A sailboat winch looks simple: a metal drum, a handle and a line wrapped around it. Yet that compact piece of deck hardware can help a sailor control loads that would be difficult—or unsafe—to manage with bare hands alone.
That is exactly why learning how to use a sailboat winch is an important step for a beginner. The winch gives you leverage and control, but it does not make the load disappear. A jib sheet can still be carrying substantial force. A halyard can still tighten suddenly. A line that slips, jams or releases unexpectedly can move fast.
Fortunately, safe winch handling is not complicated once you understand what the equipment is doing. The goal is not to become the strongest person in the cockpit. Instead, it is to use friction, mechanical advantage, timing and communication so the equipment does the hard work.
This lesson builds on Sailboat Lines Explained — review how sheets, halyards and control lines are named and used, Essential Sailing Knots — reinforce secure line handling, and Sailboat Rigging — connect winches to the boat’s running rigging. Later, these skills will become especially useful when you hoist sails, trim the jib, tack, reef and dock.
What a Sailboat Winch Actually Does
First, think about a jib sheet on a breezy day. The wind fills the sail and pulls hard on the sheet. If you simply grab the line and pull, your hands and arms must oppose much of that load directly. As the wind increases, that quickly becomes difficult.
A winch changes the problem in two ways. The turns of line around the drum create friction, so the person holding the free end—the tail—does not have to resist the entire load directly. Then the winch handle and internal gearing provide mechanical advantage, allowing the drum to pull line in under increasing load.
For example, during a tack you may be able to pull several feet of slack jib sheet in quickly by hand. As the new jib fills, however, the load rises. That is when the winch becomes especially useful for the final trim.
The important idea is this: the winch controls the force; it does not remove it. Therefore, treat every loaded line as though it may move if control is lost.
Parts of a Sailboat Winch
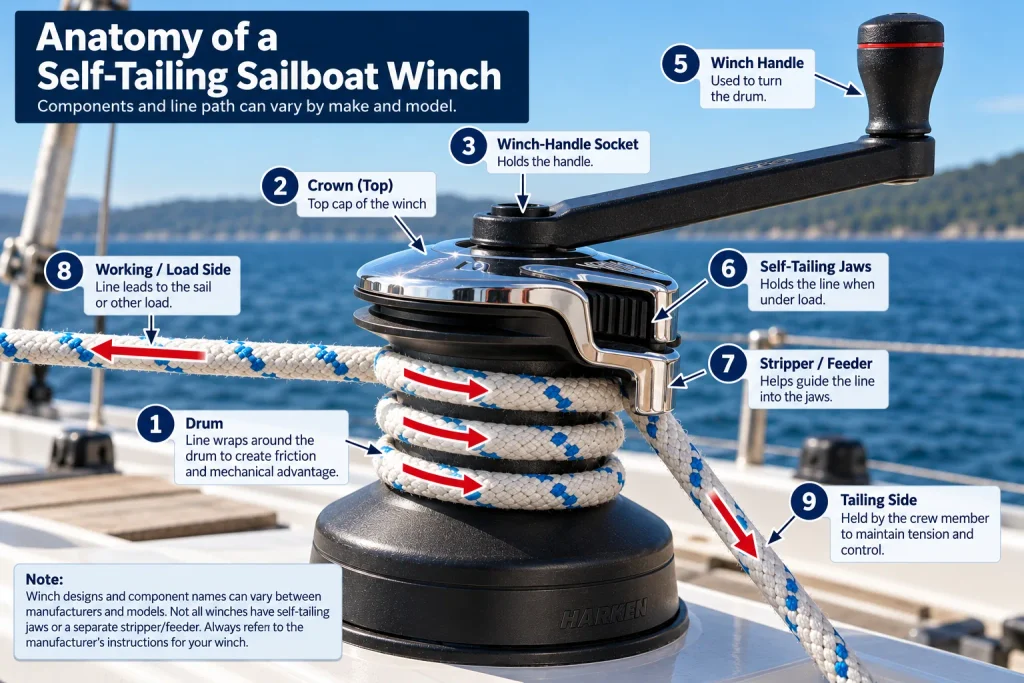
Most cockpit winches share the same basic features. The drum is the cylindrical surface around which the line is wrapped. At the top is the crown or top of the winch, usually with a socket for the winch handle. The handle turns the winch through its internal gearing.
On a self-tailing winch, jaws near the top grip the tail while a stripper or feeder guides the line off the drum and into the jaws. Not every winch has this feature.
The line itself has two sides that matter. The working or loaded side leads toward the sail or other load. The tailing side is the free end that the crew controls. Keeping those two sides mentally separate will make every later step easier.
The Safety Habit to Learn Before You Touch the Winch
Before loading a line, look at the entire system. Where does the working side lead? Where will the tail go? Is anyone standing in a loop of line? Could loose clothing, jewelry or long hair reach the drum? If the line suddenly releases, where could it travel?
Likewise, keep fingers away from the turns on the drum whenever the line is loaded. Never try to pull a trapped loaded turn out with your fingers. If something begins to look wrong, stopping early is usually much easier than fixing a heavily loaded problem later.
For equipment-specific details, Lewmar’s EVO winch instructions show how operating direction and self-tailing arrangements can vary by model, which is why the instructions for the winch actually fitted to your boat should take priority.
How to Wrap a Sailboat Winch Correctly
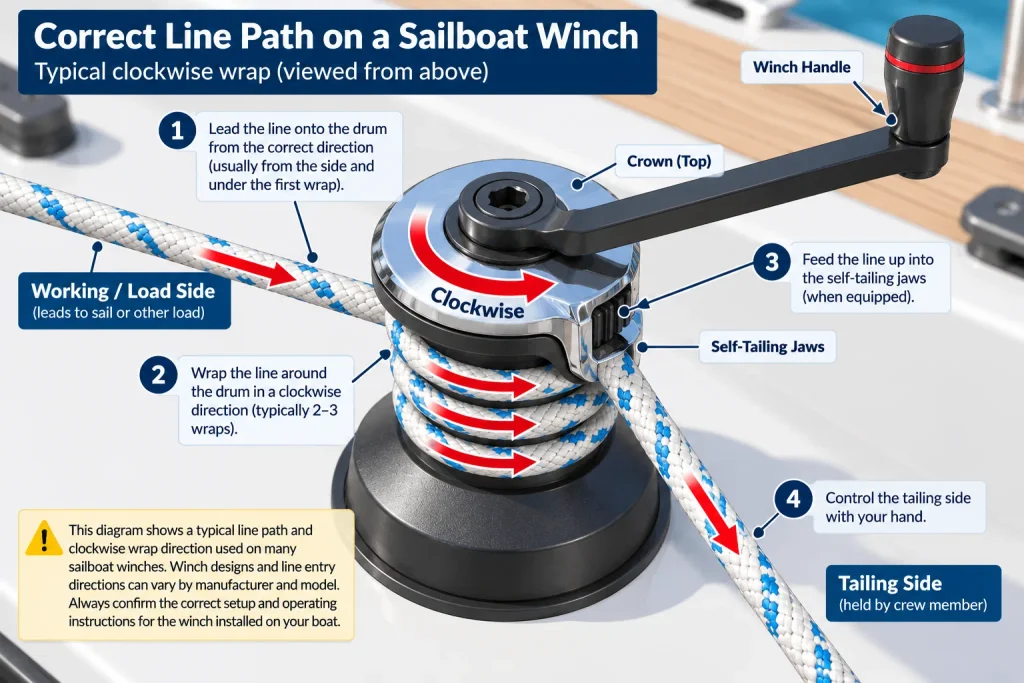
A winch only works properly when the line is led onto the drum in the direction intended for that installation and the turns remain orderly. Many conventional manual sailboat winches are loaded clockwise around the drum when viewed from above. However, do not treat that as a universal rule: confirm the line lead, drum operation and manufacturer instructions for the actual winch aboard your boat before using it.
Start by leading the working line cleanly to the winch. Then place the first turn around the lower part of the drum and continue upward with additional turns. The wraps should sit beside one another rather than crossing over each other.
How Many Wraps Should You Use?
Beginners often want a fixed number: two wraps, three wraps, four wraps. A number feels reassuring. However, there is no single wrap count that can safely be applied to every winch, line and load. Start with the minimum required by the manufacturer of the winch aboard your boat, then follow its guidance as load increases. For example, Lewmar specifies at least three turns on the drum for its EVO/Wavespring self-tailing winches and advises additional turns for very high loads. Other equipment may have different requirements.
Therefore, learn both the manufacturer’s requirement and the underlying principle. The turns create friction between the line and drum. Too little friction can leave the tailer fighting excessive load or allow the line to slip. On the other hand, blindly piling extra turns onto a poorly organized drum is not good technique; crossed or crowded turns can contribute to riding turns and overrides.
The goal is a neat stack of turns that gives the tailer control without creating unnecessary congestion on the drum.
Grinding and Tailing: Two Different Jobs
Once the line is loaded correctly, two actions work together. Grinding means turning the winch handle so the drum pulls line in. Tailing means controlling and taking up the free end of the line as it comes around the drum.
On a crewed boat, one sailor may grind while another tails. The grinder provides the turning effort. Meanwhile, the tailer keeps useful tension on the tail so the wraps grip the drum and the incoming line remains controlled.
This teamwork becomes particularly obvious while trimming a jib. The tailer first pulls in loose sheet quickly by hand while the load is light. As the sail fills and the sheet becomes harder to pull, the grinder begins turning the handle. The tailer continues taking in the line coming off the drum.
The two sailors should communicate before the load changes. A simple “ready?” and “ready” is more useful than silently assuming the other person knows what is about to happen.
Safe Hand Position Matters More Than Speed
A beginner may be tempted to reach close to the winch to guide the line. Avoid that habit. The loaded turns belong on the drum; your hands belong on the controlled tail, clear of the pinch area.
Because loads can change quickly, do not wrap the tail around your hand, wrist or body. Keep spare line organized so it cannot catch a foot or another crew member. Likewise, stand where you can work without being pulled off balance if the line moves.
Speed is useful during a manoeuvre, but control comes first. A crew that takes one extra second to communicate and keep the wraps clean is usually more effective than a crew that rushes into a jam.
Using a Self-Tailing Winch
A self-tailing winch combines the drum with jaws that hold the tail. After the correct turns are on the drum, the line is led through the stripper or feeder and into the self-tailing jaws according to that winch’s design.
This allows one person to grind without continuously holding the tail by hand. However, self-tailing does not make the winch automatic or remove the load. You still need clean wraps, correct line routing, appropriate line diameter and awareness of what the sail and line are doing.
How to Use a Winch Handle
The winch handle turns the internal mechanism that rotates the drum. Insert the handle fully into the socket before applying force. Some handles lock into the socket; others do not. Therefore, learn which type is aboard before the manoeuvre begins.
Many manual sailboat winches have more than one speed. On many two-speed models, reversing the direction in which you rotate the handle selects the other gear. One gear favours faster line retrieval, while the other provides greater mechanical advantage as the load increases. However, the starting direction and gear arrangement are model-specific. Harken directs users to the manual for the particular winch, and Lewmar publishes different handle directions for different models. Therefore, learn the winch aboard your boat rather than memorizing one universal rotation rule.
Think of it like bicycle gearing. When the load is light, speed is useful. As resistance increases, a lower gear lets you continue pulling with more leverage.
Lewmar’s operating instructions illustrate why beginners should not memorize one universal handle direction: one-speed and two-speed models can respond differently depending on the winch design.
Keep control of the handle while grinding. Do not leave it wobbling loosely in the socket or where it can become a trip, impact or snagging hazard. When the handle is no longer required, remove and stow it appropriately for the boat and situation.
Harken’s winch-handle safety information also warns that improper use can cause injury and specifically advises suitable clothing so loose fabric cannot become entangled in the winch.
How to Ease a Loaded Line Safely
Taking line in gets much of the attention, but easing a loaded sheet safely is just as important. Easing means allowing line to move out while maintaining control.
Imagine a jib sheet under strong load on a conventional manual winch. If you simply remove all friction and let go, the line can run rapidly, the sail can snap outward and the tail can whip through the cockpit. Instead, control the tail and maintain appropriate turns on the drum so friction regulates how quickly the line moves. Do not assume that reversing a conventional winch handle is the normal way to ease a sheet; specialized or powered winches can operate differently, so follow the instructions for the equipment aboard.
First, tell the crew you are about to ease. Next, establish a secure grip on the tail while keeping your hands away from the loaded turns. Then ease the tail progressively while maintaining enough friction on the drum to control the load. Remove or reduce turns only as the situation and the winch manufacturer’s instructions allow; never dump all friction simply to make the line run faster.
As a result, the drum continues doing much of the work. Your job is to meter the line out rather than trying to hold the full sail load directly.
Never Put Your Fingers Into Loaded Turns
This rule deserves repetition because the mistake can happen instinctively. Suppose one turn begins to ride over another. Your first reaction may be to reach toward the drum and straighten it.
Do not put your fingers into a loaded tangle. The line can tighten with enormous speed and force. Instead, stop adding load and communicate with the crew. The safe recovery may require reducing, transferring or otherwise controlling the load before the line can be reorganized.
Exactly how that is done depends on the boat, the line involved and the equipment available. Therefore, this is a situation where understanding the system matters more than memorizing a clever trick.
What Is a Riding Turn or Winch Override?
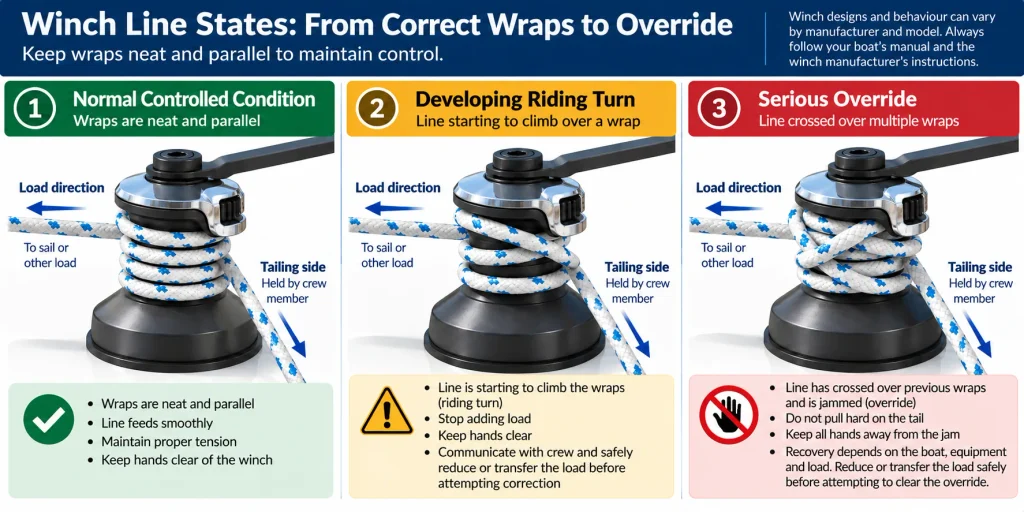
A riding turn occurs when one wrap crosses over and traps another. If the problem develops further, the line can form an override—a jam in which loaded turns lock the line against the drum.
Overrides often begin with poor line lead, loose or disorganized tailing, crossed wraps, or a sudden change in load. Once the line is trapped, grinding harder may simply tighten the jam.
That is why early recognition matters. If the wraps stop feeding cleanly, the tail behaves strangely or one turn starts climbing over another, stop and look before adding more force.
Common Beginner Winch Mistakes
Most winch problems do not begin dramatically. They begin with small errors that are allowed to continue.
Too few wraps can leave the tailer fighting more load than necessary. Crossed wraps can develop into a riding turn. Losing tension on the tail can allow the wraps to slip or become disorganized. Likewise, placing fingers near the drum creates an unnecessary pinch and entanglement hazard.
Another common mistake is grinding when the tailer is not ready. The grinder sees that the sheet needs to come in and starts cranking. Meanwhile, the tailer is still organizing the line. The result can be a messy drum and a frustrated crew.
Easing too quickly creates the opposite problem. The line runs faster than intended, and the sail or boom may move suddenly. Finally, continuing to grind when something clearly feels wrong can turn a minor problem into a heavily loaded jam.
The cure for all of these mistakes is not greater strength. It is earlier awareness.
A Complete Beginner Winch Sequence
When you first start sailing, it helps to have one simple mental sequence. Use this until the individual steps become natural.
Assess → Wrap → Control Tail → Communicate → Grind → Monitor Load → Stop → Secure or Self-Tail → Ease Under Control
Assess: Look at the line, load, crew position and path of the tail. Make sure nobody is standing in a loop and nothing can be drawn into the winch.
Wrap: Lead the line cleanly around the drum in the correct direction for the installation. Use enough orderly turns to create control.
Control Tail: Keep the free end organized and under useful tension. Never wrap it around your hand.
Communicate: Confirm that the person grinding, tailing or steering knows what is about to happen.
Grind: Use the handle when hand pulling is no longer appropriate or sufficient. Change gear as the winch design allows and the load increases.
Monitor Load: Watch the sail, line and drum. Listen and feel. If the wraps begin crossing or the load changes unexpectedly, respond before the problem grows.
Stop: When the desired trim or position is reached, stop grinding. Do not keep applying force simply because the handle will still turn.
Secure or Self-Tail: Use the boat’s intended method to hold the line. On a self-tailing winch, make sure the line is correctly seated in the jaws.
Ease Under Control: When the line needs to go out again, communicate first and meter it out using the friction of the drum.
Skipper Thinking: The Jib Sheet Is Starting to Go Wrong
You are tailing the new jib sheet during a tack. At first, the sheet comes in quickly. Then the jib fills and the load rises. You notice the tail beginning to slip in your hands. At the same time, one wrap on the drum starts climbing over another.
The grinder asks, “More?” and reaches to continue cranking.
What should happen next?
Ask yourself: What has changed? Where is the load now? Where are your hands? Is the line still feeding cleanly? Would more grinding solve the problem—or tighten it? What does the grinder need to know immediately?
The developing riding turn is the key warning. Instead of continuing blindly, stop adding load and communicate clearly. Keep hands away from the loaded wraps. Maintain whatever safe control of the tail you can without putting yourself in the line of force. Then determine how the load can be reduced or transferred using the boat’s equipment and the direction of the skipper or experienced crew.
The important lesson is not a single override-clearing trick. It is recognizing that the situation has changed from normal trimming to problem management.
A developing skipper learns to notice that change early.
Where This Skill Fits in Your Sailing
Winch handling is not an isolated cockpit trick. You will use the same ideas repeatedly as your sailing skills develop.
When you learn Sail Trim (use winches to make controlled sheet adjustments), you will feel how load changes as sails are trimmed. During Reefing (apply safe loaded-line handling while reducing sail), winch control becomes part of managing the boat in stronger wind. Even Docking (connect line-load awareness to controlled line handling near the dock) benefits from the same habit of thinking about force before grabbing a line.
The equipment changes. The central question does not: Where is the load, and what will happen if this line moves?
Winch Safety Quick Guide
A future downloadable Winch Safety Quick Guide can condense this lesson into an on-the-water reference: check the line lead, make clean wraps, control the tail, communicate before changing load, keep hands clear, ease progressively, watch for riding turns and stop when the system no longer looks right.
That is the kind of checklist worth reviewing at the dock before practising under sail. It can later become part of the SailboatZone On-the-Water Checklist Pack without replacing the deeper understanding developed in this lesson.
Knowledge Check
Before moving on, see whether you can explain these ideas without looking back.
1. Why does wrapping a line around a winch drum make a heavy load easier to control?
2. What is the difference between grinding and tailing?
3. Why should your fingers remain away from loaded turns on the drum?
4. What is the goal when easing a loaded line?
5. Does a self-tailing winch eliminate the need for drum wraps and attention to the load?
6. What visual clue suggests a riding turn may be developing?
7. If the line begins jamming while the load increases, why can continuing to grind make matters worse?
Knowledge Check Answers
1. The wraps create friction between the line and drum, reducing how much load the tailer must hold directly; the winch can then add mechanical advantage when line is ground in.
2. Grinding turns the winch handle; tailing controls and takes up the free end of the line.
3. Loaded turns can tighten or move suddenly, creating severe pinch or entanglement hazards.
4. To let line out at the required rate while maintaining control through friction on the drum.
5. No. The self-tailer holds the tail, but correct wraps, line routing, load awareness and safe operation still matter.
6. One wrap begins crossing, climbing over or trapping another instead of feeding neatly.
7. Additional force can tighten the crossed turns and lock the line more firmly.
Summary
A sailboat winch is a force-management tool. The wraps around the drum create friction, while the handle and gearing provide mechanical advantage. Together, they allow sailors to control sheets, halyards and other loaded lines that may be difficult to handle directly.
However, the safest sailors never confuse mechanical advantage with the absence of danger. They keep wraps neat, control the tail, communicate before loads change and keep fingers away from loaded turns. They also recognize that easing deserves just as much attention as grinding.
When something begins to go wrong, more force is not automatically the answer. A riding turn or override is a signal to stop, protect hands and bodies, communicate and regain control of the load before attempting a recovery.
Key Takeaways
• A winch helps control heavy line loads through friction and mechanical advantage.
• Keep wraps orderly and use the correct line path for the winch and installation.
• Grinding turns the winch; tailing controls the line leaving the drum.
• Self-tailing winches reduce the need for a separate tailer but do not remove the load or the need for attention.
• Ease loaded lines progressively rather than dumping the load.
• Keep fingers, clothing, jewelry and hair away from moving or loaded winch parts.
• A crossed wrap is an early warning. Stop before it becomes a heavily loaded override.
• If something feels wrong, do not simply grind harder. Reassess the system and the load.
Quiz
1. What is the main reason a line becomes easier to control after it is wrapped around a winch drum?
A. The line becomes shorter
B. Friction between the line and drum helps resist the load
C. The sail produces less force
D. The winch locks the line automatically
2. What is the tailer’s primary job?
A. Steer the boat
B. Hold the winch handle
C. Control and take up the free end of the line
D. Move the loaded wraps by hand
3. What should you do if a loaded wrap begins crossing over another?
A. Push it down with your fingers
B. Grind faster
C. Stop adding load and assess the problem
D. Remove every wrap immediately
4. Why are multiple winch speeds useful?
A. They allow a choice between faster line retrieval and greater mechanical advantage
B. They change the wind direction
C. They prevent all overrides
D. They eliminate the need to tail
5. What is the safest general approach to easing a heavily loaded sheet?
A. Remove all wraps and let go
B. Keep control of the tail and use drum friction to meter the line out
C. Hold the loaded side directly with both hands
D. Put the handle in the winch and spin it backward as fast as possible
6. Which statement about self-tailing winches is correct?
A. They make wraps unnecessary
B. They remove all load from the sheet
C. They can hold the tail while the winch is operated, but still require correct loading and attention
D. They cannot develop overrides
7. Why should a winch handle be removed or stowed when appropriate?
A. It makes the winch lighter
B. A loose or protruding handle can become a hazard
C. It prevents the sail from luffing
D. It increases line friction
8. During two-person operation, when should the grinder begin applying more force?
A. Whenever they feel like it
B. Before the tailer touches the line
C. After the crew is coordinated and the tail is being controlled
D. Only after the line has crossed itself
9. What is the best response when an override is becoming more heavily loaded?
A. Put fingers under the trapped turn
B. Keep grinding until it clears
C. Stop, communicate and determine how to control or reduce the load safely
D. Cut the line immediately in every situation
10. What is the most useful question to ask before handling any heavily loaded line?
A. How fast can I pull it?
B. Where is the load, and what will happen if the line moves?
C. How shiny is the winch?
D. How many knots can the boat sail?
Quiz Answer Key
1. B — Drum friction helps the sailor control the load.
2. C — The tailer controls and takes up the free end.
3. C — Stop adding force and assess before the riding turn becomes worse.
4. A — Different gearing balances retrieval speed against mechanical advantage.
5. B — Controlled easing uses the tail and drum friction to regulate movement.
6. C — Self-tailing helps hold the tail but does not replace correct technique.
7. B — An unattended handle can create an impact, snagging or trip hazard.
8. C — Grinding and tailing should be coordinated.
9. C — A loaded override is a problem-management situation, not a cue to add force.
10. B — Understanding where the force is and what may move is the foundation of safe line handling.
Scoring Guide
9–10 correct: Excellent. You understand the core winch-handling principles and are ready to practise them under supervision on the boat.
7–8 correct: Good foundation. Review the sections on controlled easing, hand safety and riding turns before practising under heavier loads.
5–6 correct: Developing. Re-read the complete beginner winch sequence and make sure you can explain grinding, tailing and load control in your own words.
0–4 correct: Review the lesson before handling a loaded winch. Focus first on friction, safe hand position, communication and what to do when the wraps stop feeding cleanly.