

Any Google search for “knot” comes up with an almost endless list of knots that can be learned. To say this is can be overwhelming is an understatement. Even narrowing your search to “sailing knots” is not really of any help. There are so many knots to be learned, it can be confusing to know where to start. Besides, knots are great to know, but you also need to know when and how to use each knot. This guide is meant to sift through the non-essential (but still useful) knots and give you the foundational knots that you will use daily while you are sailing. What’s more is, you will know why and how to apply these knots.
The top 5 foundational sailing knots are the Bowline, the Sheet Bend, Figure 8 Knot, the Reef Knot, and the Cleat Hitch.
-
The Bowline
Pronounced bow-linn, this knot has a hundreds year long history. And with very good reason. Once you have learned this knot, and practiced and practiced until it becomes second nature, you will certainly use it in applications far beyond sailing.
OK, so why this knot? What’s so great about the bowline?
The bowline has 2 unique characteristics that set it up as perfectly suitable for the rigors of sailing. First, once a Bowline is tied, it can take maximum rope load and will not slip. Second, when not under tension or load, it is very simple and reliable to untie. The bowline will never bind or lock in so tight that it can’t be untied easily. The bowline is amazing. You secure your tender to the stern of your boat with a bowline, enjoy a day of cruising with it trailing obediently behind you, and when you get to your anchorage, the knot that has been under pressure all day literally falls apart in your hand when you “unlock” it. Not many other knots can do this.
On a sailboat, the bowline has several specific uses. First it is used to tie the sheets to the foresail clew. This application is perfect because the tension on the clew is quite extreme. Bowline knots are also essential for securing your tender, as mentioned above. Forces at work on that knot defy belief at times, and without fail the bowline is as easy to untie as though there were no load on it at all. Be sure to check the overall condition of your tender’s painter. The bowline will far outlast the reliability of any ropes, and your point of failure will very rarely be the Bowline.
Practice is essential for completing the bowline correctly. Incorrect bowlines are a real problem and should not be put under any load. Always ensure your bowline is tied correctly, and that you are able to do this the first time you attempt it, when the time comes. Want a non-example? This a bit embarrassing but it is best demonstrated by an anecdote that solidified the importance of practicing the bowline concept early on in my sailing days.
In my early days as a bosun, I was tasked with a sail change. My skipper had decided that there was too much wind and ordered a storm jib in place of the genoa. As the bosun, I was tasked with instructing new sailors on my boat, and this was an excellent teachable moment. With two crew accompanying me, I doused the jib, got it into the bag and went below. We swapped the genoa in the bag for the storm jib and headed up the hatch with it. Everything went smoothly right up until it was time to tie the sheets to the clew. I can’t understand to this day what happened, but I had enormous problems getting a bowline tied. The first few times you can just laugh it off and excuse yourself because you’re rusty, but after several more attempts, and missing the mark every time, I began to feel the pressure. My skipper doubled the pressure on me by calling out “You about done up there? What’s the hold up?”
In the end, my crew who had been quietly watching from the side offered to take a turn, and in no time the sheets were ready to go. …unlike me, they had been practicing.
Below is a basic graphic on the steps in tying a bowline.
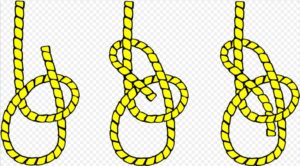
How to tie a bowline (bow-linn) knot:
-
The Sheet Bend
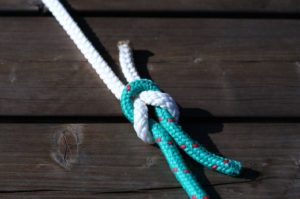
This knot is also one of those knots that is simple to tie and untie. The sheet bend is the knot you use when you have two different gauges or makes of rope and you need to join
them together. If you’ve ever tried tying two different types or thicknesses of ropes together, you will have found that they slip and pull through. This is because the different thicknesses of the rope do not have the same grip and binding power as two identical ropes. You certainly can get two ropes to link together reliably using whatever knot you come up with on the fly, but the trick is to tie a knot that you are able to untie simply and quickly untie.
The sheet bend was an essential knot for me the last time I went sailing. I was in a sketchy anchorage with lots wave action and a fairly steady wind of about 10knots. The daylight was failing and I had no option but to set anchor and hope conditions settled down (as the locals said they usually do). I decided to tie a stern line to shore once my anchor was set, however, upon thorough inspection of every locker on my boat, I realized I had forgotten my 300ft spool of nylon line. Time to improvise.
I had all kinds of spare ropes aboard, however they were a wide variety of gauges, and I knew that I could piece together enough of it to make a reliable sternline. Me and another crew member (no names of course) began the time consuming process of tying the ends of some 15 – 20 shorter length ropes together. In hindsight, I had too much faith in my crew member, and did not inspect all of his knots. I used only sheet bend knots for my portion, but he used a variety of mishmash mini rats nests and granny knots – or so it seemed. When the line was trotted out to shore, it took almost no time for the ropes to begin releasing. I hauled in all the line and inspected it. As I re-did the knots myself, I noticed that all of the sheet bend knots I tied were holding fast. The half of the stern line that my crewman tied had knots that were questionable at best. ALL had to be totally redone using the sheet bend. And let me tell you, untying all the knots that hadn’t released under load was very difficult, very frustrating, and very time consuming.
When this mini career was completed, when the ropes had been linked properly, and the boat was stern tied to my satisfaction, there were no further issues with the stern line. It lasted the night, and in the morning, all ropes were separated easily and stowed away.
-
Stopper Knot or Figure 8 knot
This knot has a specific use, like most knots. There are no stories or anecdotes that include a stopper knot. Not from me anyway. The stopper knot is used to tie to the end of a rope or line to keep it from slipping out of a cleat. I use this knot at the end of my sheets because it keeps the rope where I can find it every time; right on the cleat. As a skipper you need to be aware of this kind of stuff. When you need the port/starboard sheet in hand, you know exactly where to go for it.
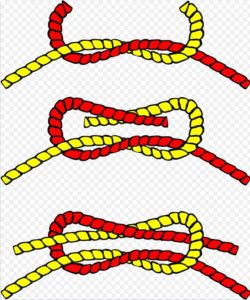
The stopper knot, also known as the figure 8 knot, is one of those knots that is also easy to untie. I think you’re seeing a trend here among the knots listed. It has to be easy to tie and untie. Below is a graphic on what the knot looks like before you tighten it up.
As the name suggests, the lump that this knot makes at the end of your rope will keep it from totally slipping out of a cleat. It will also contain a fraying rope end until you can whip it or cut the fray off.
-
The Reef Knot
The reef knot is also a critical knot to know for sailing. This knot gets its name presumably from the concept of reefing a sail. Reefing a sail requires a knot that can hold down the parts of the sail that you do not want to fill. This knot is reliable in holding ropes in place or in tying down things that you want to stay put. It is the knot that most people use in tying their shoes, if that offers some context. It is not a knot that should be put under serious load, as there are better choices above for those jobs.
The reef knot is only called as such, if it is tied correctly. An incorrect reef knot is called a granny knot. A granny knot will lock tight, is exceedingly difficult to untie, and is a great way to permanently fix a knot in a rope. This is not desirable for on a sailboat. However, tied correctly, the reef knot, like all of the other useful knots in this article, is quick and easy to untie.
How to tie the Reef Knot of Square Knot
-
The cleat hitch
The cleat hitch is another clever knot which is put to use every single day of sailing. Regardless of whether it’s a motoring day, or the greatest sailing day of your life. This is more of a hitch, and not really a knot per se, and like the knots above, is meant to be reliable under load, and above all, easy to untie.
The cleat hitch has two main uses. The first use is when you are tying up the boat to the wharf or to another boat. Because it is called the cleat hitch, obviously a cleat of some sort is going to be involved. Always start the process of tying this knot by wrapping the rope a full turn around the base of the cleat. After that, cross the rope over the top of the cleat. You will be making what looks like a figure 8. Once you have at least one complete figure 8, tuck the loose end under the last wrap. A proper cleat hitch will have two parallel ropes under the last crossing.