

Raising a sail looks simple from the dock: pull a halyard and the sail goes up. Lowering one looks even easier: release the halyard and the sail comes down.
On a real sailboat, however, good sail handling is less about strength and more about preparation and control. A twisted halyard, a sheet wrapped around a fitting, a sail fed incorrectly into a foil, or a clutch opened at the wrong moment can turn a routine job into confusion surprisingly quickly.
Fortunately, the basic habits are straightforward. Before you move a sail, identify what you are moving, trace the lines that control it, prepare the boat and crew, and make sure every loaded line will remain under control.
This lesson walks through that complete workflow. You will learn how to prepare and hoist a mainsail, handle hank-on and foil-fed headsails, lower sails under control, use a roller-furling headsail, make a basic headsail change, recognize developing problems, and coordinate the crew.
The exact hardware varies from boat to boat. Therefore, treat the sequences in this lesson as seamanship principles, not universal operating instructions. Learn the arrangement on the boat you actually sail and follow the sail, rigging, and equipment manufacturers’ instructions.
What Sail Handling Actually Involves
Several sail-handling jobs are easy to lump together, but they are not the same.
Hoisting and lowering means moving a sail up or down using a halyard. A conventional mainsail is normally hoisted up the mast and lowered again when it is no longer needed. A hank-on headsail works in a similar way.
Furling and unfurling means rolling a sail around a foil, stay, mast, or boom. In this lesson, we will concentrate on the common roller-furling headsail. Instead of lowering the sail every time, you roll it around the forestay foil for storage and unroll it when you want to use it.
Reefing means reducing sail area while continuing to sail. Although a roller-furling headsail can often be partially furled to reduce area, mainsail reefing is a separate skill. See the SailboatZone lesson How to Reef a Sailboat for the full procedure.
Changing sails means removing one sail and replacing it with another. For example, a boat with hank-on headsails may change from a larger genoa to a smaller jib as the wind builds.
The common thread is control. Whether the sail is travelling up, down, in, or out, somebody needs to know which line is loaded, which line is moving, and what happens next.
Identify the Sail and Attachment System First
Before touching a halyard, look at the sail and how it is attached.
A typical mainsail has a head at the top, a tack at the forward lower corner, and a clew at the aft lower corner. Its luff may be connected to the mast with slides or slugs, or a bolt rope may feed into a groove. Other systems exist as well.
A headsail sits forward of the mast. A hank-on jib uses individual hanks clipped to the forestay. A foil-fed headsail has a luff tape that feeds into a groove in a foil around the forestay. A roller-furling headsail normally uses a foil too, but the foil rotates so the sail can wrap around it.
If terms such as halyard, sheet, tack, clew, mast, forestay, or running rigging are still unfamiliar, review Parts of a Sailboat: Complete Beginner’s Guide before continuing. SailboatZone’s Sailboat Lines Explained and Sailboat Rigging Explained lessons also build the line-and-rigging vocabulary used here.
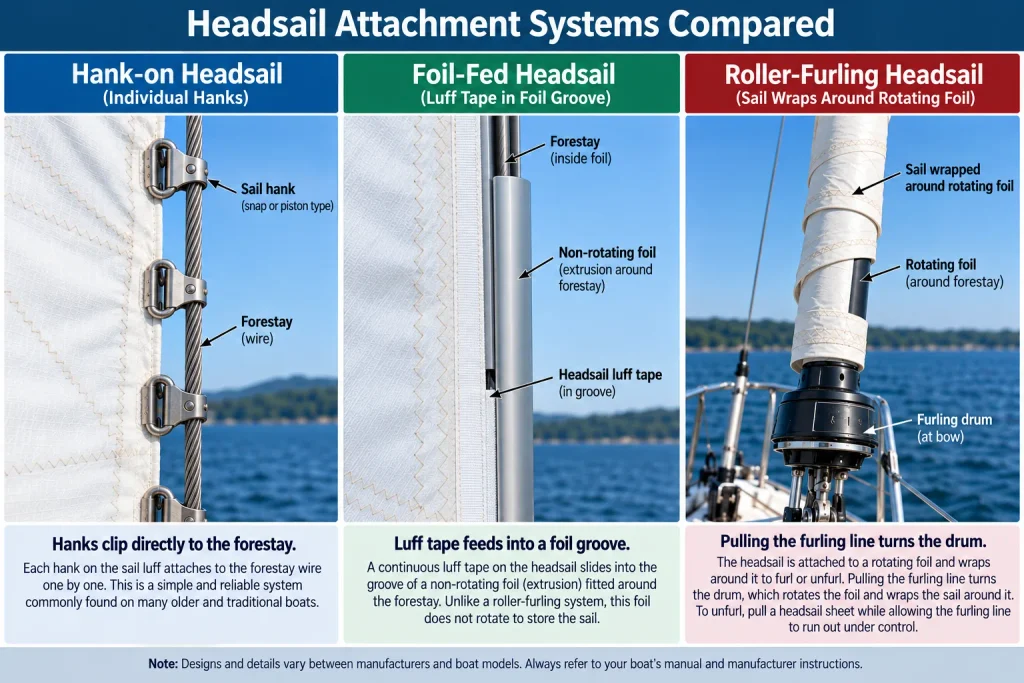
Preparing a Sail Before Hoisting
First, identify the correct sail. Next, identify its halyard and physically trace that halyard as far as you reasonably can. Check that it runs cleanly, is not crossed around another line, and is not caught behind a spreader, lazy jack, shroud, or other fitting.
Then prepare the sail itself. Confirm which corner is the head, tack, and clew. Attach the halyard correctly. Prepare the sheets and make sure they lead to the correct side of the boat without wrapping around lifelines, stanchions, shrouds, or deck hardware. Check that hanks, slides, slugs, or luff tape are ready to feed in the correct order.
If you are preparing the mainsail, also check what supports the boom. Depending on the boat, that may be a topping lift, rigid vang, or another arrangement. Know what is holding the boom up before releasing or changing mainsail controls.
Loose sailcloth also needs control. A sail lying on deck can blow overboard or become a slippery surface underfoot. Therefore, keep it gathered and contained until it is ready to move.
A useful beginner rule is:
Trace the line before you load the line.
That ten-second habit prevents an impressive number of mistakes.
Prepare the Boat and Crew for the Hoist
Sail handling is partly a line-handling job and partly a boat-control job. A sail that is heavily loaded by the wind will be harder to hoist, lower, or control.
For a typical mainsail hoist, the helmsman normally steers so the mainsail can rise with little wind pressure on it, often with the boat headed approximately into the wind. However, the correct setup depends on the boat, sea room, traffic, sea state, and rig. The goal is not to chase a compass heading; it is to reduce unnecessary sail load while keeping the boat safely controlled.
Before starting, assign roles. One person may control the halyard while another watches the sail and feeds slides or luff tape. Meanwhile, the helm keeps the boat in a useful orientation.
Use simple commands: “Ready to hoist?” “Ready.” “Hoisting.” “Hold.” “Stop.”
The important part is not the exact vocabulary. It is that everyone knows what is about to happen before a loaded line begins moving.
How to Hoist a Mainsail
Once the boat, sail, and crew are ready, begin the mainsail hoist deliberately.
First, check that controls which could restrict the sail or boom from rising normally are eased or configured as required for your boat. For example, the mainsheet, vang, or reefing lines on some systems may need attention before a full mainsail hoist. Do not blindly release everything; identify what each control does, confirm what supports the boom, and follow the arrangement used on that boat.
Next, begin taking up the mainsail halyard. Watch the sail rather than staring only at the rope in your hands. Slides or slugs should enter and travel smoothly. A bolt rope should feed cleanly into its groove. Battens, sailcloth, and reefing hardware should remain clear of lazy jacks, spreaders, and other snag points.
Early in the hoist, much of the halyard can often be taken in by hand. As the sail approaches full height and the load increases, a winch may be used if the boat is designed that way. If you are not confident with wraps, self-tailers, clutches, or safe hand position, review How to Use a Sailboat Winch Safely before loading the winch.
Most importantly, pay attention to resistance.
A sail that suddenly becomes much harder to hoist is telling you something. A slide may be jammed. A reefing line may be tight. A halyard may be crossed. The sail may be caught in a lazy jack. Instead of grinding harder on the winch, stop and investigate.
Once the sail reaches its proper hoist, apply the halyard tension appropriate to the sail and conditions, then secure the halyard using the boat’s normal clutch, cleat, or other system. Finally, check the sail from tack to head and confirm that the line is secure.
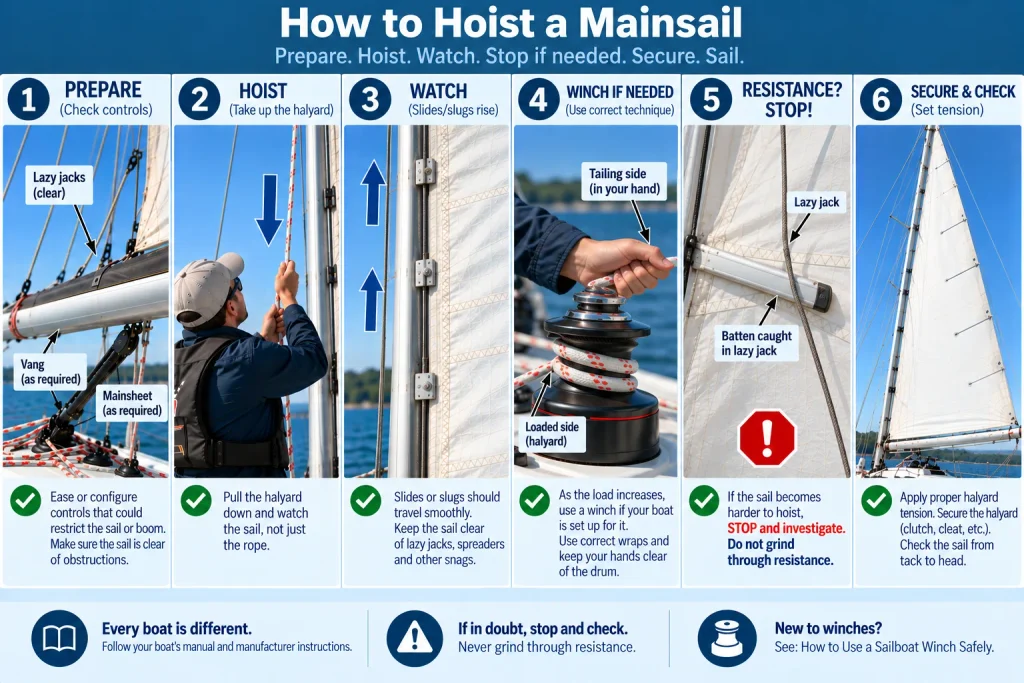
How to Hoist a Hank-On Headsail
A hank-on headsail is wonderfully easy to understand because you can see nearly the entire attachment system.
Orient the sail on deck with the luff along the forestay. Attach the tack at the correct fitting, then clip the hanks to the stay in sequence. Check that the sail has not been twisted between hanks.
Next, attach and lead the sheets. Connect the halyard to the head and trace it upward to confirm it is clear. Keep the sail gathered on deck so a gust cannot fill it prematurely.
When the boat and crew are ready, hoist while another crew member watches the sail. The hanks should travel up the stay without binding. Meanwhile, keep the sheets controlled enough that they cannot whip around the foredeck or snag equipment.
How to Hoist a Foil-Fed Headsail
A foil-fed headsail requires more coordination because the sail’s luff tape must enter a narrow feeder or groove.
First, identify the correct groove and feed point for the particular system. Insert the luff tape carefully. One person then feeds the sail while another takes up the halyard.
If the foil is part of a roller-furling system, also verify the tack connection, halyard swivel, feeder, and other sail attachments required by that furler. Their position and setup are equipment-specific, so follow the manufacturer’s instructions for the installed system.
The feeder’s job is not to force the sail into the groove. Instead, guide the luff so it enters at a clean angle. If the sail bunches, folds sharply, or stops feeding, call “Hold” and correct the problem before continuing.
This is a good example of why brute force is poor seamanship. A powerful winch can easily apply more force than a small plastic feeder, sailcloth edge, or jammed fitting was designed to tolerate.
Halyard Control Matters as Much as Pulling
Beginners naturally focus on getting the sail up. Experienced crew also think about what the halyard itself is doing.
Keep the working part of the line organized. Do not stand in coils. Keep fingers clear of winches, blocks, clutches, and pinch points. If the halyard is led through a clutch, know whether the clutch is open or closed before loading or releasing it.
Likewise, communicate before changing the state of a loaded line. “Opening the clutch” is useful information. Silently opening it while another person is handling the sail is not.
If a winch is required, use the safe line path, wrap direction, and tailing technique appropriate to that winch. The SailboatZone winch lesson covers those details rather than repeating them here.
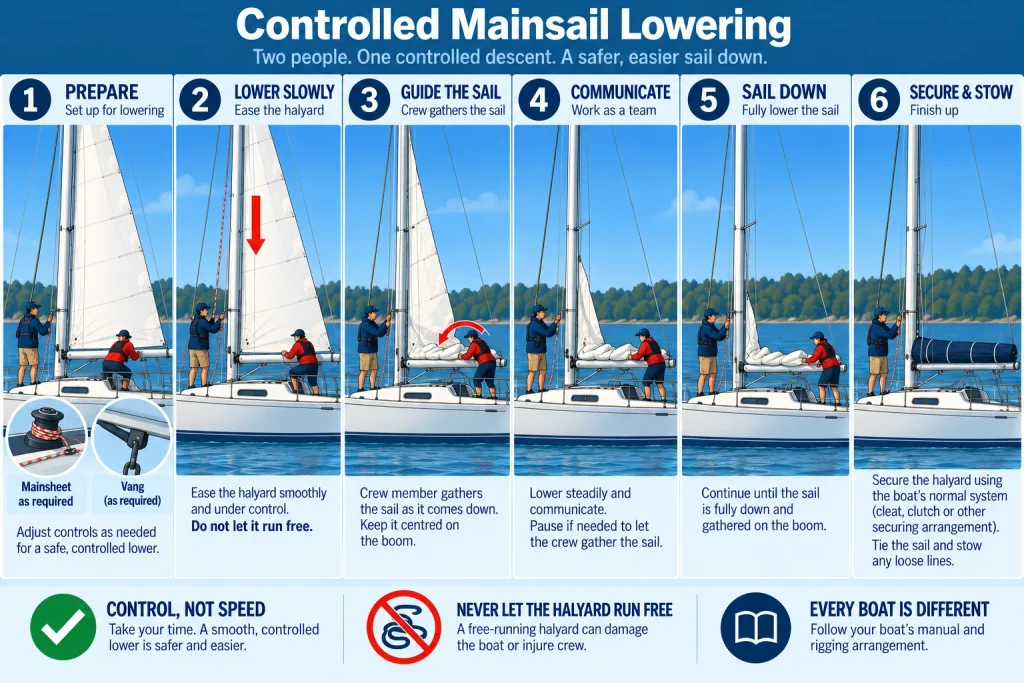
How to Lower a Sail Under Control
Lowering is not the opposite of hoisting in one dangerous sense: gravity is now helping.
Before releasing the halyard, prepare the boat, receiving area, and crew. Reduce unnecessary load on the sail. Make sure somebody is ready to gather the sail and keep it aboard.
Then take control of the halyard before opening its clutch or removing it from a cleat. Ease it progressively so the sail descends at a useful speed. Meanwhile, the person at the sail gathers cloth and watches slides, hanks, or luff tape.
Never assume that releasing a clutch, cleat, or halyard will produce a controlled result.
If the sail stops coming down, do not simply yank harder from below or dump more halyard. Identify what is holding it. Once the sail is down, secure the halyard so it cannot disappear aloft or flog against the mast.
Roller Furling: What the System Does
Roller furling changes the workflow because the headsail can remain attached to the forestay when it is not being used.
A typical system has a rotating foil around the forestay, a drum near deck level, a furling line wound on the drum, and a headsail attached to the foil. Pulling the furling line rotates the foil and rolls the sail in. Pulling a sheet while allowing the furling line to run out rotates the system the other way and deploys the sail.
That relationship is the key idea: one line is doing the work while the other is controlling the movement.
Partially rolling the sail can also reduce exposed sail area on systems designed for reefing. However, partially furling a headsail is not the same as removing it, and the sail shape and permitted use depend on the sail and furling system.
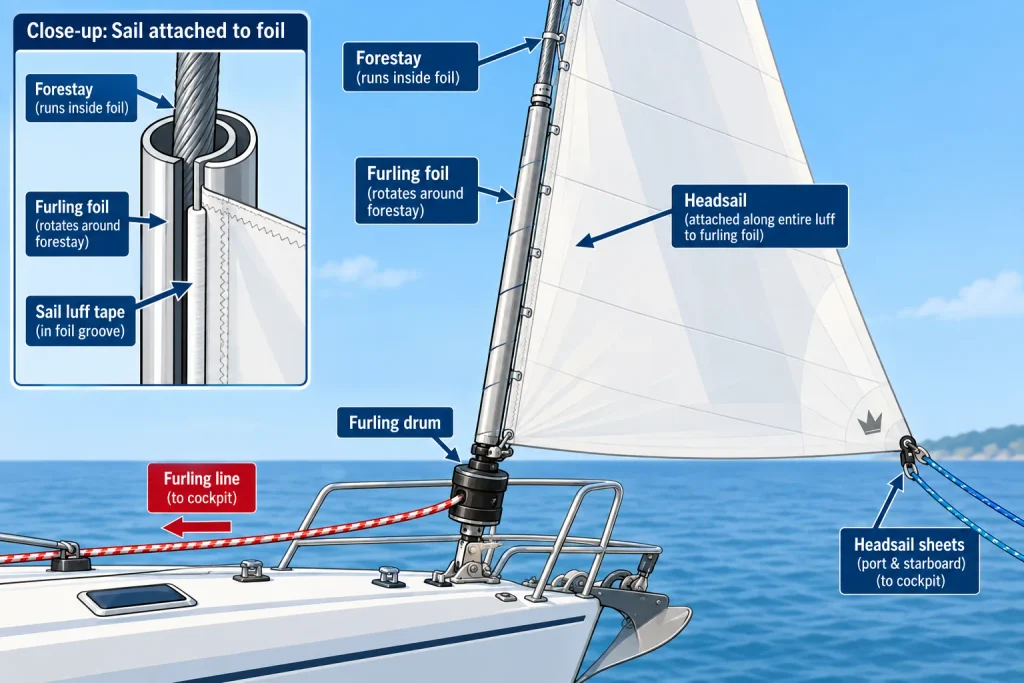
How to Unfurl a Roller-Furling Headsail Safely
First, inspect the furling line. It should run cleanly from the drum through its leads to the cockpit or operating position. Check the sheets as well, especially around shrouds, lifelines, deck fittings, and the anchor.
Next, prepare the sheet that will become the working sheet. Maintain control of the furling line rather than simply uncleating it and letting it fly.
Pull the working sheet while easing the furling line under control. The sail should unroll progressively. Meanwhile, watch the sail, drum, and sheets for abnormal movement.
As the sail reaches the desired size, stop easing the furling line and secure it as required by the system. Then trim the sheet normally.
If the system suddenly becomes difficult to turn, stop. Harken’s furling guidance specifically warns that halyard wraps can prevent furling or unfurling and that a jammed unit should not simply be forced. Follow the instructions for the furling equipment installed on your boat.
How to Furl a Roller-Furling Headsail Safely
Furling reverses the relationship between the two lines.
First, reduce the sail’s load appropriately while maintaining safe control of the boat. Then pull the furling line while easing the working sheet. Do not completely abandon the sheet. A small amount of controlled sheet tension helps the sail roll more neatly around the foil instead of flogging wildly.
Continue watching the sail as it wraps. The roll should develop progressively rather than bunching strangely at one height. Once the sail is fully furled, many systems are normally rolled far enough for the sheets to make one or more securing wraps around the furled sail. The exact number of wraps and securing method depend on the installation and manufacturer. Finally, secure the furling line and manage the sheets so the sail cannot flog or accidentally unfurl.
Because furlers differ in drum capacity, halyard geometry, line routing, and operating limits, sailors should follow the instructions for their specific equipment; Seldén’s Furlex technical support materials are a good example of manufacturer-specific guidance.
Common Roller-Furling Problems Beginners Should Recognize
A roller furler should not require a wrestling match.
A furling-line override occurs when turns of line cross or trap one another on the drum. The line may also pile unevenly, leaving too little drum capacity to complete the operation.
A halyard wrap is not merely an inconvenience. The headsail halyard can begin wrapping around the forestay or foil as the furler rotates, potentially damaging the halyard, foil, or forestay and, in a serious case, threatening the rig. Stop furling immediately if the halyard begins rotating around the stay. Manufacturer instructions often specify important halyard lead geometry precisely to prevent this problem.
Other warning signs include tangled sheets, excessive resistance, a loose or uneven furl, a sail that will not fully roll away, or a furled sail that begins opening unexpectedly.
The beginner response is not advanced repair. It is disciplined recognition:
STOP → KEEP CONTROL → IDENTIFY WHAT IS LOADED → FIND THE CAUSE → CORRECT IT ONLY WHEN SAFE
If the cause is unclear, keep hands away from loaded and moving parts and get experienced help. Do not put a winch handle on the problem and hope more force will fix it.
Basic Headsail Changes
Sailors change headsails because wind strength, expected conditions, sail size, sail condition, or the boat’s configuration calls for a different sail.
On a hank-on system, the broad sequence is straightforward: prepare the replacement sail, prepare the crew, reduce the load on the working sail, lower it under control, keep it aboard, disconnect its halyard and sheets as appropriate, attach the replacement, check every connection, and hoist again.
A foil-fed change uses the same logic, but the old sail must leave the foil as it is lowered and the replacement must feed correctly into the groove. Therefore, good coordination between the halyard operator and the person at the feeder matters.
A roller-furling headsail is different again. Furling the sail does not remove it. To change a sail fitted to a furling foil, the sail normally must be fully unfurled and then lowered according to that particular system’s procedure.
For a beginner, removing or installing a roller-furling headsail is best learned at the dock or in very light, controlled conditions. Changing a large furling headsail underway can create substantial loose sailcloth and foredeck workload, so it should not be treated as the same routine manoeuvre as simply furling the sail.
The goal is not speed. It is to keep the old sail, new sail, halyard, and sheets organized throughout the change.
Sail Handling in Increasing Wind
As wind increases, almost every sail-handling job becomes harder. Sailcloth flogs more violently, sheets load up, the foredeck moves more, and small mistakes become harder to correct.
Therefore, timing matters.
A hank-on headsail change that feels routine in moderate wind can become physically demanding after the boat is badly overpowered. Likewise, partially furling a roller-furling headsail is easier when the crew reduces load and acts before the boat becomes difficult to control.
This does not mean every increase in wind requires an immediate sail change. Instead, developing skippers watch the trend and think ahead.
The dedicated How to Reef a Sailboat lesson explains mainsail reefing, while How to Sail in Strong Winds deals with the larger problem of keeping the boat balanced and manageable as conditions build.
A useful principle connects all three lessons:
The easiest time to reduce sail is usually before you desperately need less sail.
Preventing Jams and Accidental Releases
Most sail-handling problems give clues before they become serious.
A halyard that suddenly becomes heavy may be crossed, caught, or leading badly. A sail that will not feed may have twisted luff tape or a jammed slide. A furling line that stops moving may be trapped on the drum. A sheet may be around a stanchion or under another line.
Other problems are created by the crew: opening the wrong clutch, uncleating the wrong halyard, loading the wrong line on a winch, or releasing a control before another person is ready.
Therefore, when something unexpected happens, use a repeatable decision process:
STOP → KEEP CONTROL → IDENTIFY WHAT IS LOADED → FIND THE CAUSE → CORRECT IT ONLY WHEN SAFE
“Stop” prevents the problem from growing.
“Keep control” means do not casually release the loaded line.
“Identify what is loaded” tells you where stored energy may be waiting.
“Find the cause” shifts the crew from force to diagnosis.
Finally, “correct it only when safe” recognizes that some problems require reducing sail load, changing course, returning to the dock, or getting experienced help.
Crew Coordination During Sail Handling
Good crews sound almost boring.
“Ready to hoist?”
“Ready.”
“Hoisting.”
“Hold.”
“Holding.”
That simplicity is a strength. The person giving the instruction knows it was heard, and the person carrying it out knows exactly what is expected.
This is called closed-loop communication. An instruction is given, acknowledged, and then acted upon.
The exact words vary among boats. For example, one crew may say “Lower,” another may say “Ease the halyard,” and another may use a more formal command. What matters is that the crew agrees on the language before the operation starts.
During a mainsail hoist, the helm may control the boat, one crew member may handle the halyard, and another may watch the sail. During furling, one person may handle the furling line while another controls the sheet. On a small boat, one sailor may perform several roles.
However the jobs are divided, nobody should make a major release without warning the others.
After the Sail Comes Down
A sail is not finished with you simply because it is no longer flying.
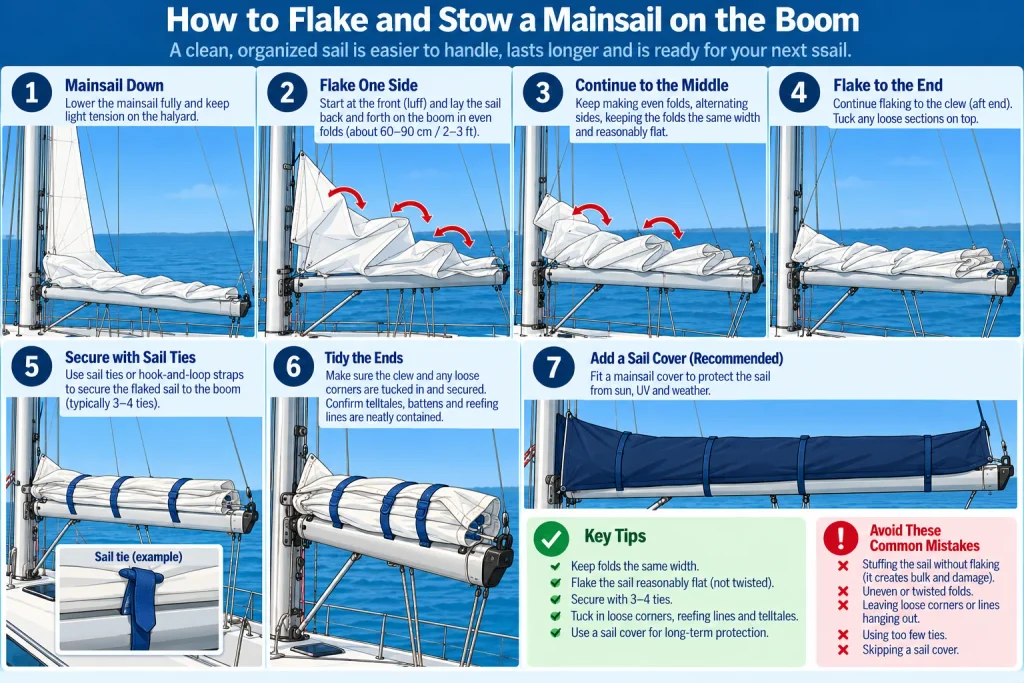
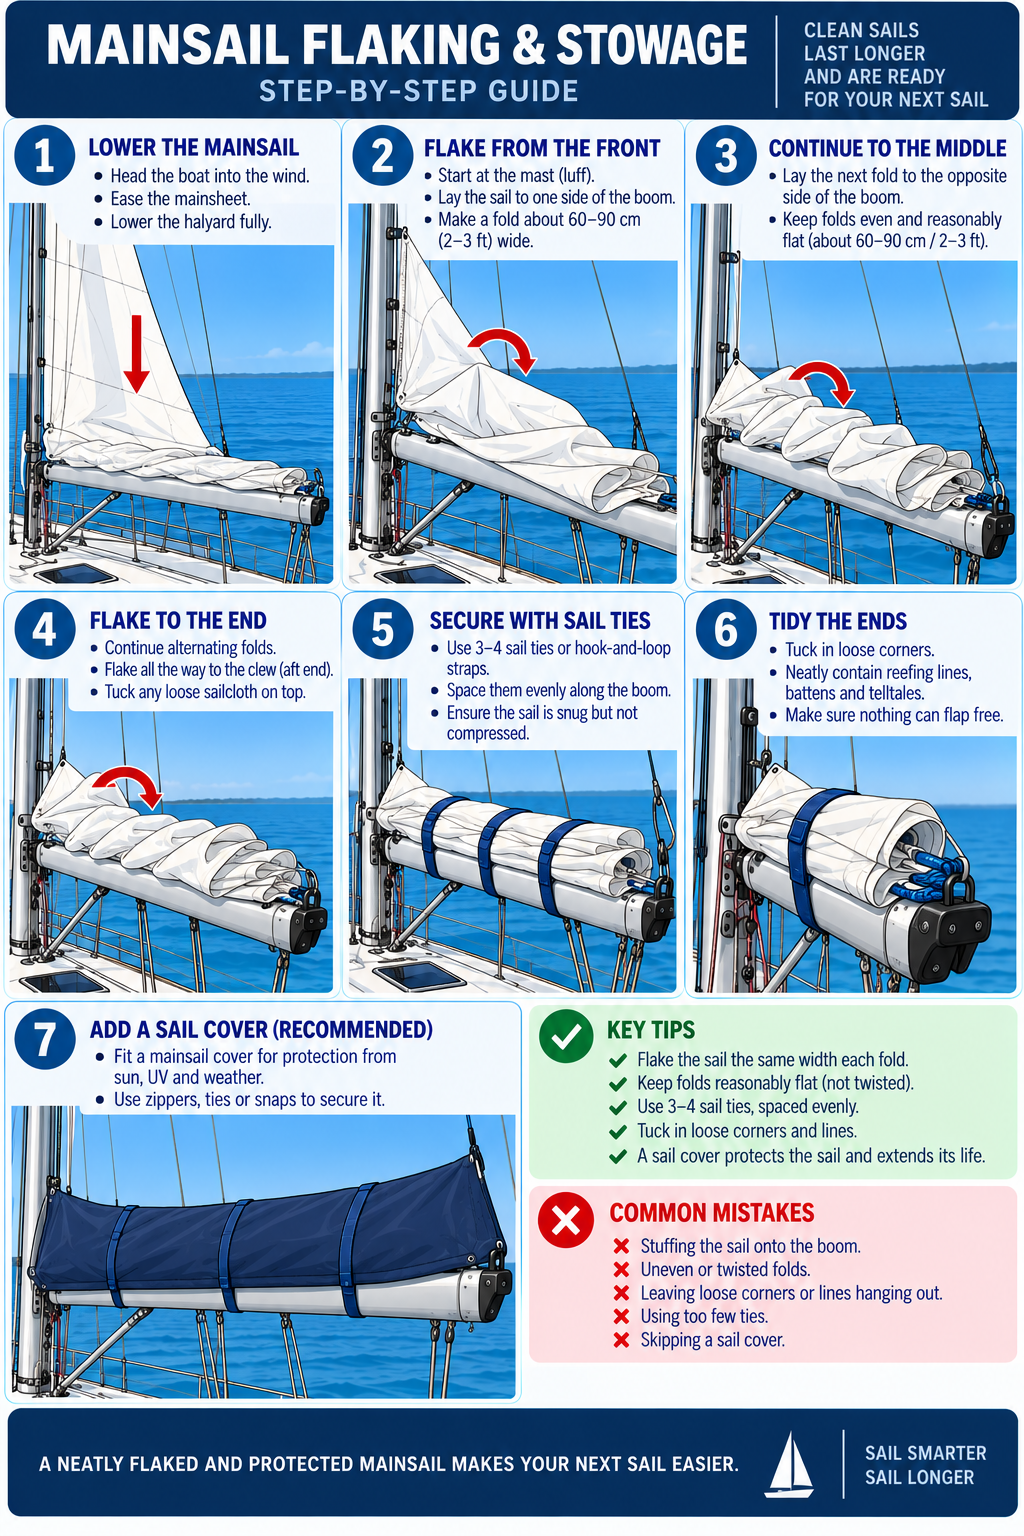
Keep the sail out of the water. Remove twists and organize the cloth before stepping around it. Depending on the sail and boat, it may be flaked along the boom, folded, rolled, or placed in a sail bag.
Avoid tightly compressing sailcloth or repeatedly creating hard creases in exactly the same places. Loose flaking is generally kinder to sail fibres, although the best storage method depends on the sail’s construction. North Sails discusses how flexing and compression contribute to sail fatigue, so follow your sailmaker’s recommendations for the particular sail.
Meanwhile, organize the rest of the system. Secure halyards where they will not disappear aloft or hammer against the mast. Coil or stow sheets. Check that shackles and fittings cannot damage sailcloth. If the sail remains on the boom, secure it so wind cannot catch it.
Beginner Mistakes to Avoid
Several mistakes appear again and again because they are tempting shortcuts.
Do not hoist before checking line routing. Do not pull harder simply because something stopped moving. Do not assume the blue halyard is the correct halyard. Do not dump a loaded halyard and hope somebody catches the sail.
Likewise, do not let sheets or furling lines run completely uncontrolled. Keep sailcloth aboard and out from under feet. Keep hands away from winches, blocks, clutches, and other pinch points when lines are loaded.
Finally, do not wait until the boat is badly overpowered before beginning a sail reduction or headsail change. Early action gives the crew time, balance, and options. Late action removes all three.
Skipper Thinking: Two Boats, One Increasing Wind
Imagine the wind is steadily increasing and the headsail is becoming too powerful.
Boat A carries a hank-on headsail. To reduce sail area, the crew plans to change to a smaller jib.
Boat B carries a roller-furling headsail designed to be partially furled.
Before deciding what each crew should do, ask the skipper questions.
What controls must be prepared? On Boat A, that includes the working headsail’s halyard and sheets plus the replacement sail and its attachments. On Boat B, the crew needs the furling line and working sheet ready and correctly routed.
What must remain controlled? On both boats, the answer includes the sail and every loaded line associated with it.
Where should the crew be? Put people where they can do their jobs without standing in coils, reaching through loaded lines, or being surprised by flogging sailcloth.
What happens if the wind continues building? The loads increase and the boat may become harder to steer and balance. As a result, the same operation becomes more difficult.
That leads to the most important question: When should you act?
A developing skipper does not wait for the boat to become unmanageable. The skipper sees the trend, anticipates the workload, prepares the crew, and reduces sail while the job is still routine.
The Beginner Sail-Handling Workflow
You do not need to memorize a separate mental script for every sail on every boat. Instead, use this framework:
IDENTIFY → PREPARE → TRACE → COMMUNICATE → CONTROL → OPERATE → VERIFY → SECURE
Identify the sail, attachment system, and controls.
Prepare the boat, sail, lines, and crew.
Trace every important line before loading it.
Communicate what is about to happen.
Control the loaded and moving lines.
Operate the system deliberately.
Verify that the sail and hardware are behaving normally.
Secure the sail and controls when the operation is complete.
Key Takeaways
Good sail handling begins before anybody pulls a line.
Identify the sail and the attachment system fitted to the boat you are actually sailing.
Trace halyards, sheets, and furling lines before loading them.
Reduce unnecessary sail load and keep the boat controlled during hoisting and lowering.
Lower sails by easing the halyard under control, not by simply releasing it.
With roller furling, the sheet and furling line work as a controlled pair.
Unexpected resistance is a warning to stop and diagnose, not an invitation to pull harder.
Keep hands and feet clear of loaded lines, winches, blocks, clutches, and sailcloth.
Clear crew communication prevents accidental releases and conflicting actions.
As wind increases, earlier sail-reduction decisions are usually easier and safer.
Knowledge Check
1. Why should you trace a halyard before hoisting?
2. What should you do if a mainsail suddenly becomes much harder to hoist?
3. Why should the halyard remain controlled while lowering a sail?
4. What is the main difference between lowering a headsail and furling it?
5. Why is some sheet tension useful while furling a roller-furling headsail?
6. What should happen before a crew member releases a loaded control?
7. Why can a headsail change become harder as the wind increases?
8. What does the STOP sail-handling framework tell you to do before correcting a jam?
Summary
Hoisting, lowering, furling, and changing sails are different operations, but they rely on the same seamanship habits.
First, identify the system. Next, prepare the sail, lines, boat, and crew. Trace the controls before they carry load. During the operation, keep the halyard, sheet, or furling line under control and watch what the sail is actually doing.
If something stops moving normally, stop applying force and diagnose the cause. Meanwhile, keep people clear of loaded lines and pinch points.
The exact hardware will vary from one sailboat to another. However, the beginner workflow travels well from boat to boat:
IDENTIFY → PREPARE → TRACE → COMMUNICATE → CONTROL → OPERATE → VERIFY → SECURE
Once that sequence becomes a habit, sail handling stops feeling like a collection of ropes and starts becoming a controlled operation you can understand, predict, and manage.
Quiz
1. Before hoisting a sail, what is the best first habit?
A. Put the halyard on a winch immediately
B. Trace the sail’s controls and confirm their routing
C. Pull every line tight
D. Release all clutches
2. A mainsail becomes unexpectedly difficult to hoist. What should you do?
A. Add more winch wraps and grind harder
B. Have two people pull the halyard
C. Stop and identify the cause of the resistance
D. Release the mainsheet completely regardless of conditions
3. When lowering a sail, the halyard should normally be:
A. Released completely
B. Eased under control
C. Removed from the mast first
D. Left unattended
4. What do hanks do on a hank-on headsail?
A. Attach the luff to the forestay
B. Attach the clew to the sheet
C. Tension the furling drum
D. Hold the boom up
5. When unfurling a roller-furling headsail, what should happen to the furling line?
A. It should be removed from the drum
B. It should run out under control
C. It should remain fully cleated
D. It should be wrapped around a winch and locked
6. Why maintain some sheet control while furling?
A. To make the boat heel more
B. To help the sail roll in a controlled, reasonably neat way
C. To stop the foil from rotating
D. To increase halyard tension
7. What is a good response to unexplained resistance in a furling system?
A. Pull harder before the wind increases
B. Use a larger winch
C. Stop, maintain control, and investigate
D. Release both sheet and furling line
8. Furling a roller-furling headsail is the same as changing the sail.
A. True
B. False
9. Why is an early headsail-change decision usually easier than waiting?
A. Sailcloth becomes lighter early in the day
B. Lower wind loads generally make the operation easier to control
C. Halyards shorten as wind increases
D. Winches stop working in strong wind
10. Which sequence best describes the beginner sail-handling workflow?
A. Pull → force → release → check
B. Hoist → trim → steer → stop
C. Identify → prepare → trace → communicate → control → operate → verify → secure
D. Steer → release → pull → coil
Quiz Answer Key
1. B — Tracing the controls helps reveal crossed, fouled, or incorrectly led lines before they are loaded.
2. C — Unexpected resistance is a clue. Stop and find the cause rather than multiplying force with a winch.
3. B — Controlled easing prevents the sail from dropping suddenly and gives the crew time to gather it safely.
4. A — Hanks connect the headsail’s luff to the forestay and travel along the stay as the sail is hoisted or lowered.
5. B — The furling line should normally remain controlled as the sheet pulls the sail open.
6. B — Useful opposing sheet tension helps control the sail as it rolls around the foil.
7. C — Keep control, identify what is loaded, and investigate before attempting a correction.
8. B — False. Furling rolls the sail around the foil; changing it means removing one sail and fitting another.
9. B — As wind increases, sail and line loads generally increase too, making the same task more demanding.
10. C — The workflow is: identify, prepare, trace, communicate, control, operate, verify, and secure.
Scoring Guide
9-10 correct: Excellent. You understand the sail-handling workflow and the control principles behind it.
7-8 correct: Strong foundation. Review the questions you missed, especially any involving loaded lines or roller furling.
5-6 correct: Developing. Revisit the sections on halyard control, furling, jams, and crew coordination before moving on.
0-4 correct: Review before continuing. Focus on preparation, line tracing, controlled releases, and the STOP decision framework.