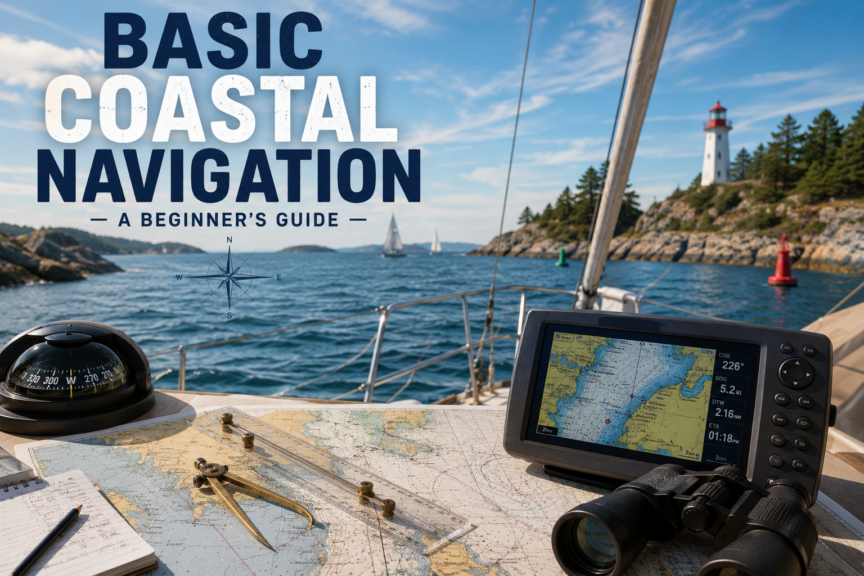
There is a wonderful moment in learning to sail when the coastline begins to look different.
At first, a new sailor sees islands, bays, rocks, lighthouses and distant headlands simply as scenery. You know roughly where you are because the marina is behind you and your destination is somewhere ahead.
Then you begin learning navigation.
Suddenly, that lighthouse is a charted object you can use to confirm your position. The buoy ahead tells you something about the water around it. The depth sounder helps confirm what you are seeing on the chart. The headland provides a bearing. The tidal current explains why the boat seems to be moving sideways even though the bow is pointing exactly where you intended.
The coastline stops being scenery and starts becoming information.
That is the beginning of coastal navigation.
Fortunately, you do not need to become an expert navigator before taking a sailboat on a simple coastal trip. Modern GPS and chartplotters have made knowing your approximate position remarkably easy. What they have not done is remove the need to understand what that position means.
A GPS position sitting on top of a shoal is still a position on top of a shoal.
Good coastal navigation is therefore not about choosing between traditional navigation and electronics. It is about combining charts, GPS, compass, depth, visual observations, tides, currents and common sense so that several pieces of information tell you the same story.
This guide will introduce those skills in the order a beginner can actually use them.
By the end, you should understand how to plan and follow a straightforward daytime coastal passage, monitor your progress and recognize when the boat is not where you expected it to be.
Beginner Principle: Good navigation is not knowing exactly where you are once. It is repeatedly confirming where you are as the voyage progresses.
About this Guide
Written by Kelly Hiebert, a recreational sailor since 2002 and a middle-school teacher. Kelly created Sailboat Zone to provide beginners with clear, structured sailing education.
Last reviewed: September 2026
Jurisdiction: This guide explains general coastal-navigation principles using Canadian Hydrographic Service and Canadian Coast Guard conventions as its primary references. Chart requirements, buoyage systems, datums, equipment requirements and local navigation rules vary by country, vessel and voyage. In Canadian waters, use current official charts and publications appropriate to your route, corrected with applicable Notices to Mariners and navigational warnings.
Primary sources:
- Canadian Hydrographic Service — Canadian Chart 1: Symbols, Abbreviations and Terms
- Canadian Coast Guard — The Canadian Aids to Navigation System
- Canadian Hydrographic Service — Canadian Sailing Directions
Safety note: Coastal navigation requires current official charts and publications, appropriate training and continuous situational awareness. GPS and chartplotters can fail, contain outdated information or be configured incorrectly, so never rely on a single device or position source. Maintain a proper lookout and repeatedly cross-check your position using charts, depth, compass, navigation aids, tides, currents and visual observations. If the information does not agree, slow down and remain in or move toward known safe water when appropriate while you reassess.
What Is Coastal Navigation?
Coastal navigation is the process of safely navigating a vessel through waters where the coastline, charted features, navigation aids and water depths can help you determine your position and plan your route.
It differs somewhat from offshore navigation.
Far offshore, a navigator may have few or no visible landmarks. Near the coast, you may have an enormous amount of useful information around you: islands, headlands, lighthouses, towers, buoys, depth contours, harbour entrances and other identifiable features.
That sounds easier—and often it is.
But coastal waters introduce another problem.
They contain things you can hit.
Rocks, reefs, shoals, islands, breakwaters, wrecks and shallow water may all be nearby. Traffic may also be heavier, currents stronger and navigable areas narrower.
For that reason, coastal navigation is not simply finding your destination.
It is answering three questions continuously:
Where am I?
Where am I going?
Is the water between here and there safe?
A fourth question belongs beside them:
Is the situation changing?
Wind changes. Current changes. Visibility changes. Your speed changes. Other vessels move. A route that looked sensible at the kitchen table may need to be adjusted once you are actually on the water.
Navigation is therefore a process rather than a single calculation.
The Basic Coastal Navigation Toolkit
You can navigate a modern sailboat with surprisingly little equipment, but several tools complement one another.
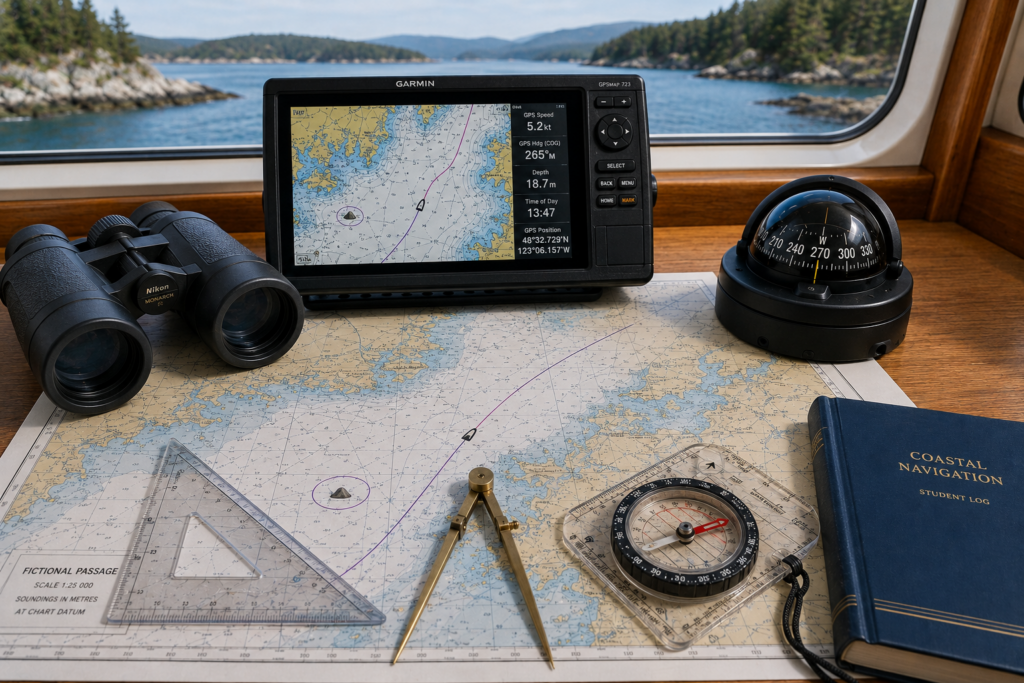
A useful beginner navigation kit includes:
- An appropriate, current nautical chart
- Electronic chart or chartplotter
- GPS/GNSS receiver
- Magnetic steering compass
- Hand-bearing compass
- Dividers
- Parallel rules or a navigation plotter
- Pencil and eraser
- Depth sounder
- Tide and current information
- Binoculars
- Reliable time source
You will not necessarily use every tool on every trip.
The important principle is redundancy.
If your chartplotter suddenly goes blank, you should still have some way of understanding where you are and where the safe water lies. Likewise, if your compass and GPS appear to disagree, you should know enough to investigate rather than simply choosing whichever answer you prefer.
Start With the Nautical Chart
A nautical chart is one of the navigator’s primary sources of information.
Unlike a road map, its main purpose is not merely to show you how to get somewhere. It describes the marine environment through which you intend to travel.
A chart can show:
- Water depths
- Depth contours
- Drying areas
- Rocks
- Shoals
- Wrecks
- Obstructions
- Channels
- Navigation aids
- Lighthouses
- Shoreline features
- Traffic routes
- Restricted areas
- Submarine cables and pipelines
- Anchorage information
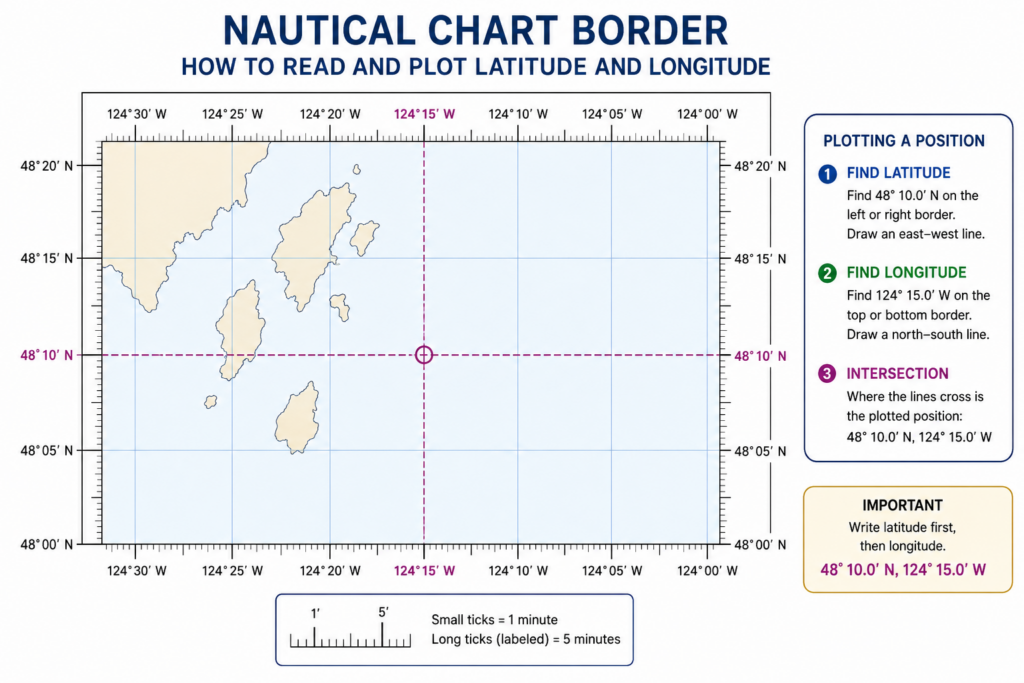
- Latitude and longitude
- Compass information
Before planning a route, check the chart’s title and information rather than immediately drawing a line between your departure and destination.
Confirm its scale, depth units, datum and other important notes.
The Canadian Hydrographic Service’s Chart 1 is the reference for symbols, abbreviations and terms appearing on Canadian nautical charts. Bearings shown on Canadian charts are referenced to true north, while chart datum provides the reference plane for charted soundings.
A chart deserves an entire lesson of its own, please see ‘How to Read a Nautical Chart‘ material for fuller detail. What matters for coastal navigation is learning to extract the information needed to answer one fundamental question:
Can I safely take my boat through this water?
Latitude and Longitude Without the Intimidation
Every position on Earth can be described using latitude and longitude.
The terminology can initially sound more complicated than the idea.
Latitude describes how far north or south you are.
Longitude describes how far east or west you are.
Latitude lines run horizontally across a conventional chart, while longitude lines run vertically.
Positions are traditionally expressed in degrees and minutes.
For example:
49° 18.5′ N
123° 12.7′ W
There are 60 minutes in one degree.
Modern electronic equipment may also display coordinates in decimal degrees or another format. That creates an important beginner trap.
A position written as:
49° 18.500′ N
is not the same coordinate format as:
49.30833° N
Both can describe the same position, but the numbers are expressed differently.
Before manually entering coordinates into a GPS or chartplotter, make certain you know which format the equipment expects.
A small coordinate-format error can move a waypoint significantly from where you intended it to be.
Nautical Miles, Knots and Measuring Distance
Marine navigation uses nautical miles rather than ordinary land miles.
One nautical mile is 1,852 meters, or approximately 1.15 statute miles.
The nautical mile also has a convenient relationship with latitude:
One minute of latitude equals one nautical mile.
That relationship makes measuring distance on a nautical chart straightforward.
Use dividers to span the distance between two points. Then move the dividers to the latitude scale along the side of the chart and read the distance.
Do not normally measure distance from the longitude scale.
Longitude lines converge as they approach the poles, so one minute of longitude does not represent a constant distance everywhere.
This produces one of the simplest rules in traditional chart work:
Measure distance using the latitude scale.
A knot means one nautical mile per hour.
Therefore, a boat traveling at 5 knots covers approximately 5 nautical miles in one hour.
Once that connection clicks, many navigation calculations become much easier.
Speed, Distance and Time
Three quantities appear repeatedly in navigation:
Speed
Distance
Time
Their basic relationship is:
Distance = Speed × Time
From that:
Time = Distance ÷ Speed
and:
Speed = Distance ÷ Time
Suppose your next waypoint is 6 nautical miles away and your boat is averaging 4 knots.
6 ÷ 4 = 1.5 hours.
So the trip should take approximately 1 hour 30 minutes.
Notice the word approximately.
Sailboats rarely maintain perfectly constant speed. Wind changes, waves slow the boat, current helps or hinders you, and course changes add distance.
The calculation gives you an expectation.
That expectation then becomes useful navigation information.
If a waypoint should take 45 minutes to reach and you have been sailing for 90 minutes without seeing it, something deserves your attention.
True North, Magnetic North and Your Compass
Direction aboard a boat needs a reference.
Unfortunately, there is more than one north.
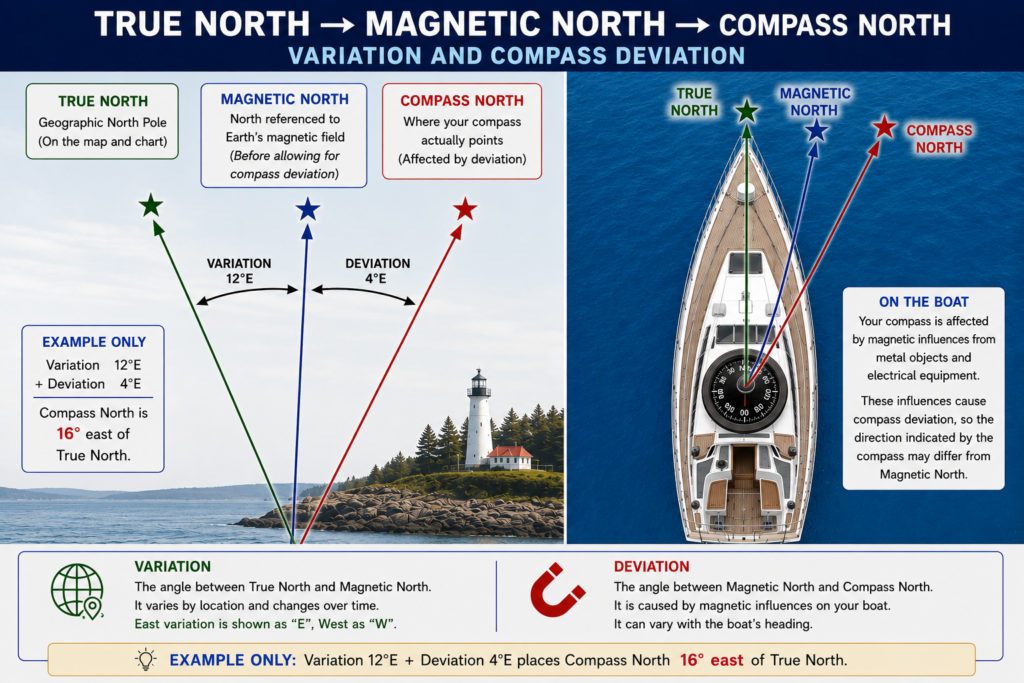
True north points toward the geographic North Pole.
Magnetic north is the direction toward which a magnetic compass responds.
The angle between true north and magnetic north at a particular location is called variation.
Variation changes geographically and slowly changes over time.
Your boat’s compass can also be affected by magnetic influences aboard the vessel. That error is called deviation.
Electrical equipment, wiring, speakers, tools and metal objects can all influence a magnetic compass.
For basic coastal sailing, you do not need to turn every trip into a navigation examination. You do, however, need to understand whether the directions you are comparing are true or magnetic.
Your chartplotter, handheld GPS and navigation app may be configured to display either.
Your chart may provide true bearings.
Your steering compass responds to magnetic north.
If two instruments appear to disagree by several degrees, do not immediately assume one is broken.
First ask:
Are they using the same north reference?
Course, Heading, Bearing and Track Are Not the Same Thing
These terms are often used casually as though they mean the same thing.
They do not.
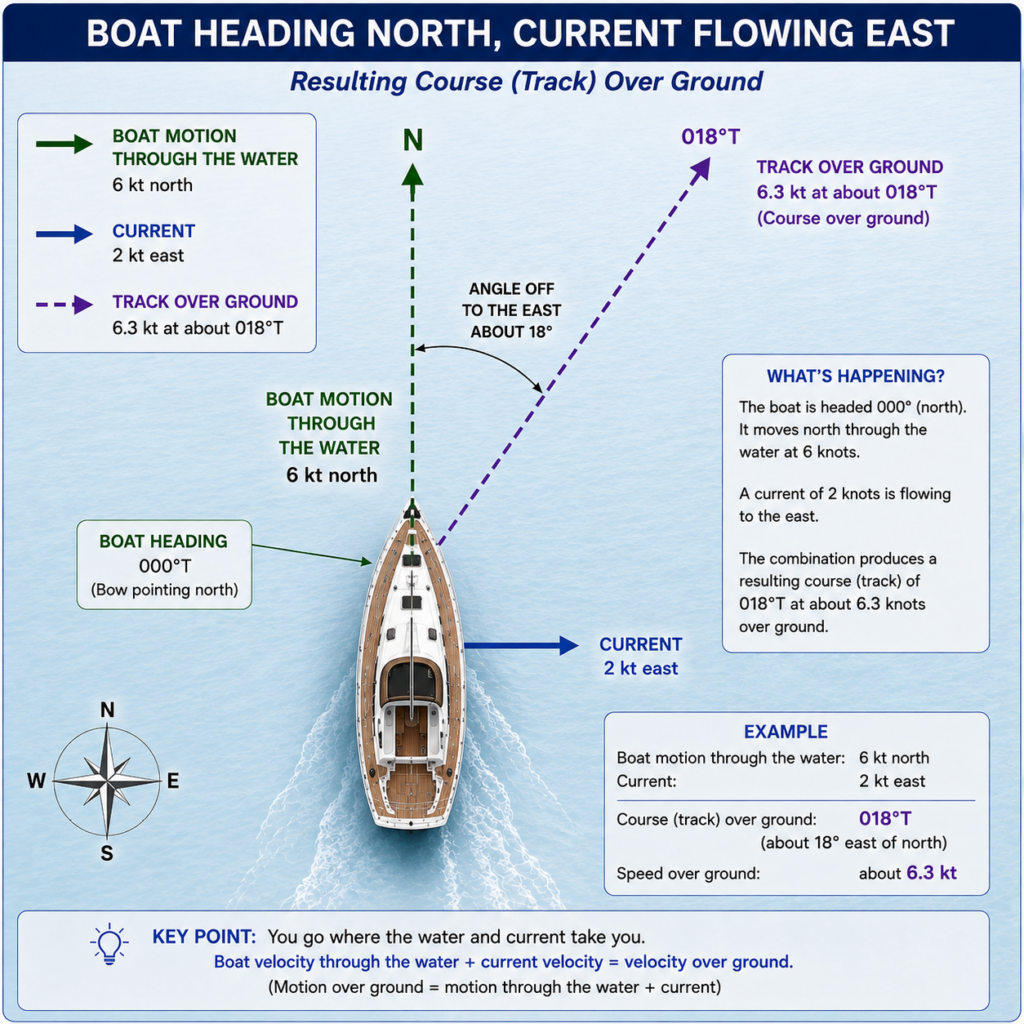
Heading is the direction the bow of the boat is pointing.
Course generally describes the intended direction of travel.
Track is the path the boat actually makes across the Earth’s surface.
Bearing is the direction from one position toward another object or position.
Imagine pointing your sailboat due north.
Your heading is north.
Now imagine a strong tidal current flowing east.
Although the bow remains pointed north, the entire boat is gradually carried eastward.
Your heading may remain 000°, while your actual track over ground angles northeast.
That distinction is fundamental to coastal navigation.
A compass tells you where the bow is pointing.
GPS can tell you how the boat is actually moving across the Earth.
Those are not always the same thing.
Measuring a Course on the Chart
Suppose you want to sail from one waypoint to another.
Draw or visualize a line connecting the two positions.
Using parallel rules, a navigation plotter or another appropriate chart-navigation tool, transfer that direction to the compass rose or measure its angle relative to true north.
Perhaps the resulting course is:
245° True
You now know the direction of the line connecting the two charted positions.
But this does not necessarily mean you should simply steer 245° on the boat’s compass.
Why?
Because several things may affect the boat:
- Magnetic variation
- Compass deviation
- Tidal current
- Wind-induced leeway
- Waves
- Steering error
This is where navigation begins to move from drawing lines to understanding motion.
What Is a Position Fix?
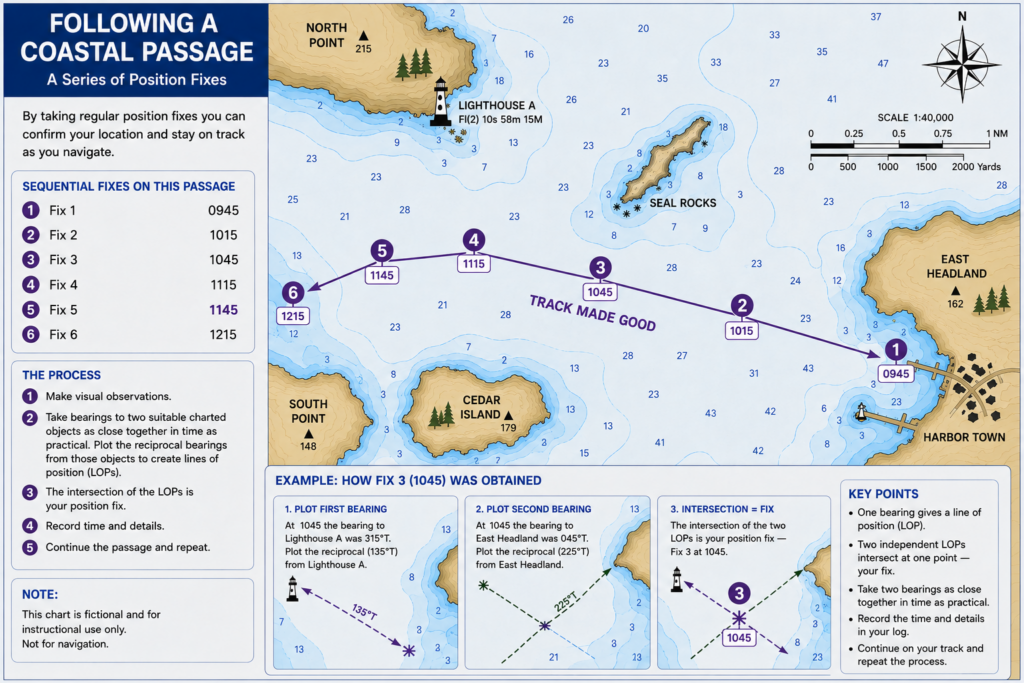
A fix is a determination of your vessel’s position at a particular time.
Today, the most familiar example is a GPS fix.
Your chartplotter displays a boat symbol and tells you where the receiver calculates that you are.
Traditional navigation provides other ways to establish a position.
You might obtain a fix from bearings to two or more known objects. Radar can provide position information. Depth, ranges and other observations can also help confirm where you are.
The crucial point is that a fix represents a position at a particular time.
Your sailboat continues moving.
So a position established at 10:15 does not necessarily describe your position at 10:45.
This is why navigators record both position and time.
Visual Navigation: Look Outside the Boat
One of the unfortunate side effects of excellent modern electronics is that sailors can become mesmerized by screens.
The safest piece of navigation equipment aboard remains remarkably sophisticated:
your eyes.
Coastal sailing provides an abundance of visual information.
Look for identifiable:
- Lighthouses
- Headlands
- Islands
- Towers
- Bridges
- Buoys
- Beacons
- Harbour entrances
- Distinctive shoreline features
Then compare what you see with what the chart predicts you should see.
Develop a repeating habit:
Chart → outside → instruments → outside → chart.
Do not spend prolonged periods staring at the chartplotter while the boat travels through real water containing real traffic and real hazards.
Navigation supports lookout.
It does not replace it.
Taking a Bearing
A bearing describes the direction from your position toward another object.
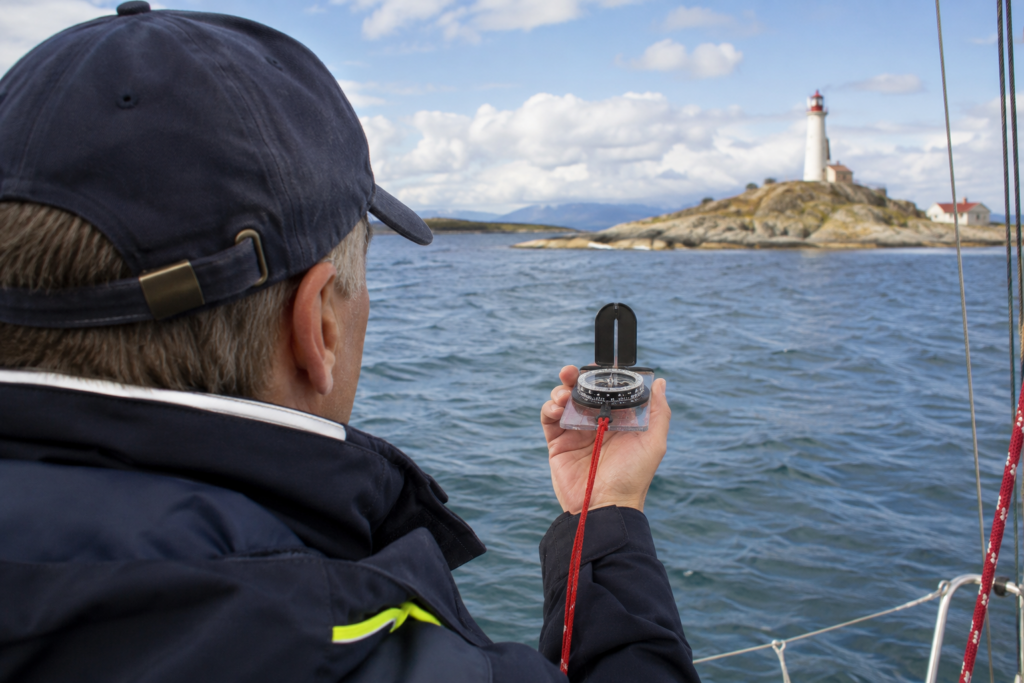
A hand-bearing compass is especially useful for coastal navigation because it allows you to sight an identifiable object and measure its magnetic bearing.
Suppose you identify a lighthouse shown clearly on your chart.
You sight it with the compass and obtain a bearing.
That information helps establish the direction from your boat toward the lighthouse.
Take another bearing to a different identifiable charted object and you have considerably more information about your position.
Finding Your Position With Multiple Bearings
Imagine you can see three clearly identifiable objects:
- A lighthouse
- A prominent headland
- A charted tower
Take bearings to them as close together in time as practical.
After applying any required compass corrections, plot the corresponding lines of position from the known charted objects.
Where the lines intersect is approximately where your boat was when the observations were taken.
With three observations, the lines may form a small triangle rather than intersect at one perfect point.
That does not mean the exercise failed.
Real observations contain error.
Your boat moved between bearings. Your compass reading may have been slightly imperfect. The charted feature may have been difficult to sight precisely.
The small triangle reminds you of something GPS sometimes encourages us to forget:
Navigation always contains uncertainty.
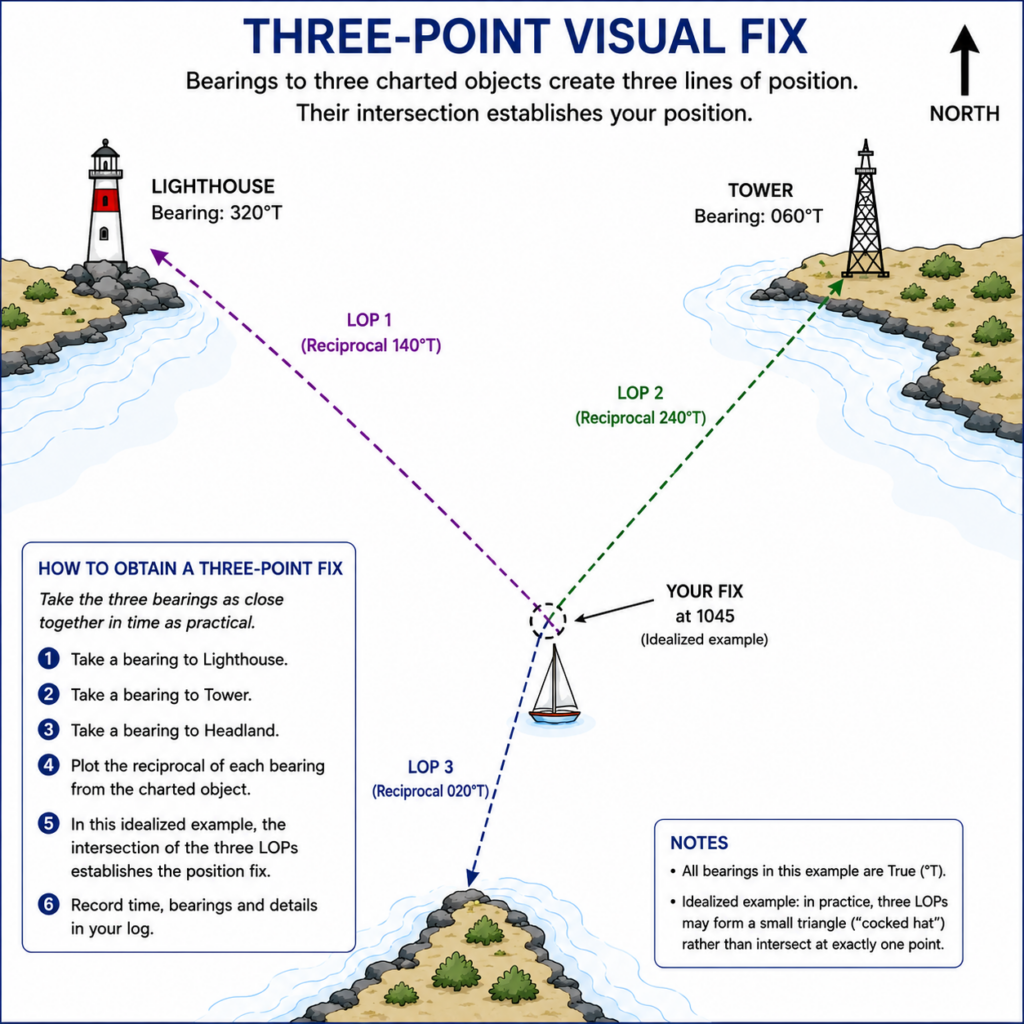
Choose objects that provide useful angular separation. Bearings to objects almost directly behind one another provide a much weaker fix than bearings that intersect at healthy angles.
Dead Reckoning
What happens when you cannot obtain another fix immediately?
You estimate where the boat should be based on where it was previously.
This is the basis of dead reckoning, usually abbreviated DR.
Begin with a known position.
Then use:
- Course steered
- Speed
- Elapsed time
to calculate a new position.
Suppose you know your position at 1200.
You steer east at 090° and maintain approximately 5 knots for one hour.
Ignoring other influences, your DR position at 1300 would be approximately 5 nautical miles east of your starting position.
Simple.
But the ocean rarely cooperates with simple.
Current may have pushed you north. Wind may have caused leeway south. Your actual speed may have varied.
A DR position is therefore not a claim that the boat is there.
It is a calculation of where the boat should be based on course, speed and time.
That distinction matters.
Estimated Position
An estimated position, or EP, takes the idea further.
Instead of considering only course, speed and time, you can make allowances for known or estimated effects such as current and leeway.
Suppose your dead-reckoned position places you 5 miles east of your previous fix.
However, you know a tidal current has been carrying the boat south.
Your estimated position should reflect that additional movement.
An EP may therefore be more realistic than a simple DR position—but it remains an estimate.
The best response is not to become increasingly confident in increasingly complicated estimates.
It is to obtain another reliable fix when practical.
Wind Can Move the Boat Sideways
A sailboat does not always move exactly in the direction its bow points.
Wind acting on the hull, rig and sails can produce sideways movement called leeway.
Leeway becomes especially noticeable when sailing close to the wind.
Imagine steering toward a headland while sailing upwind.
Your compass heading may remain remarkably steady, but the boat may gradually slip sideways toward a nearby shoal.
That is why a safe navigation plan does not merely ask:
What heading am I steering?
It also asks:
What track am I actually making?
Modern GPS makes that comparison relatively easy.
Tidal Current Can Change Your Track Dramatically
Current moves the water in which your sailboat is floating.
That means the entire boat can be transported sideways, forward or backward relative to the land even while it moves normally through the surrounding water.
Imagine again that your boat points north.
You sail through the water at 5 knots.
Meanwhile, a 2-knot current flows east.
The result is a track over the ground that angles northeast.
This distinction explains why:
Speed through water and speed over ground can differ.
It also explains why heading directly at your destination is not always enough.
Sometimes you must deliberately point the boat somewhat up-current so that the combined motion of the boat and current produces the desired track.
Current can also dramatically affect travel time.
A 5-knot boat traveling against a 2-knot current may make only about 3 knots over the ground. With that same current behind it, the speed over ground could be around 7 knots, assuming the vectors are directly aligned.
That difference can transform the timing of a passage.
Tides Matter to Navigation Too
Current describes horizontal movement of water.
Tide describes the periodic rise and fall of water level.
Both matter.
Suppose your chart shows 2 meters over a shoal at chart datum.
That does not automatically mean you will have exactly 2 meters of water when you cross it.
The actual water level may be higher because of the state of tide, subject to local conditions and prediction limitations.
For navigation, what ultimately matters is whether sufficient water exists beneath your boat. For a fuller explanation of chart datum, tide height and under-keel clearance, see How to Read Tide Tables.
Consider:
- Charted depth
- Predicted tide height
- Your boat’s draft
- Appropriate safety margin
- Local conditions
- Depth-sounder reference/offset
Do not plan to scrape through an area simply because the arithmetic suggests you might have a few centimeters to spare.
Predictions, charts, measurements and your calculations all contain uncertainty.
The Canadian Hydrographic Service publishes Canadian Tide and Current Tables as well as regional tidal-current atlases. These resources provide predicted tidal information and, where available, information about current direction and velocity.
Navigation Aids: The Road Signs of the Water
Buoys, beacons, lights and other aids to navigation help mariners identify channels, hazards and safe routes.
But they are not floating traffic cones that can be interpreted by color alone.
The International Association of Marine Aids to Navigation and Lighthouse Authorities, or IALA, maintains the Maritime Buoyage System used internationally.
Importantly, the world uses two lateral buoyage regions: IALA Region A and Region B.
Canada and the United States use Region B.
Much of Europe, Australia, New Zealand and other parts of the world use Region A.
The familiar North American phrase “red, right, returning” therefore must not be treated as a universal rule everywhere in the world.
That is exactly the sort of shortcut that becomes dangerous when a sailor travels.
Beyond lateral marks, sailors should learn to recognize:
- Cardinal marks
- Isolated-danger marks
- Safe-water marks
- Special marks
- Emergency wreck marking buoys where applicable
Never assume that a buoy is exactly where you expect simply because it appears on the chart. Floating aids can move, be damaged or be temporarily removed.
Use them as part of your navigation picture—not as your only source of truth.
Understanding Charted Lights
Many navigation aids and shore structures display lights at night.
The chart tells you much more than simply whether a light exists.
It may describe:
- Colour
- Flashing characteristic
- Period
- Height
- Nominal range
These characteristics allow you to distinguish one light from another.
Imagine seeing two flashing white lights along an unfamiliar coastline.
Without knowing their characteristics, either could be the lighthouse you want.
If one flashes every five seconds and the other has a completely different characteristic, the chart helps you determine which is which.
You do not need to memorize every light abbreviation before your first coastal sail.
You should, however, learn how to look them up.
Depth Is More Than an Anti-Grounding Alarm
Beginners sometimes treat the depth sounder as an alarm that answers one question:
Am I about to hit the bottom?
It can do considerably more.
Depth is another source of navigation information.
Suppose your chart suggests you should be crossing water approximately 35 meters deep, but your sounder shows 8 meters.
That discrepancy deserves attention.
Perhaps:
- You are somewhere other than where you think
- You have misread the chart
- The tide affects the comparison
- The sounder has an offset or setting you have overlooked
- The bottom rises more rapidly than expected
- Your electronic chart is displayed at an inappropriate scale
- There is another explanation that needs to be resolved
Whatever the reason, the numbers disagree.
That is useful information.
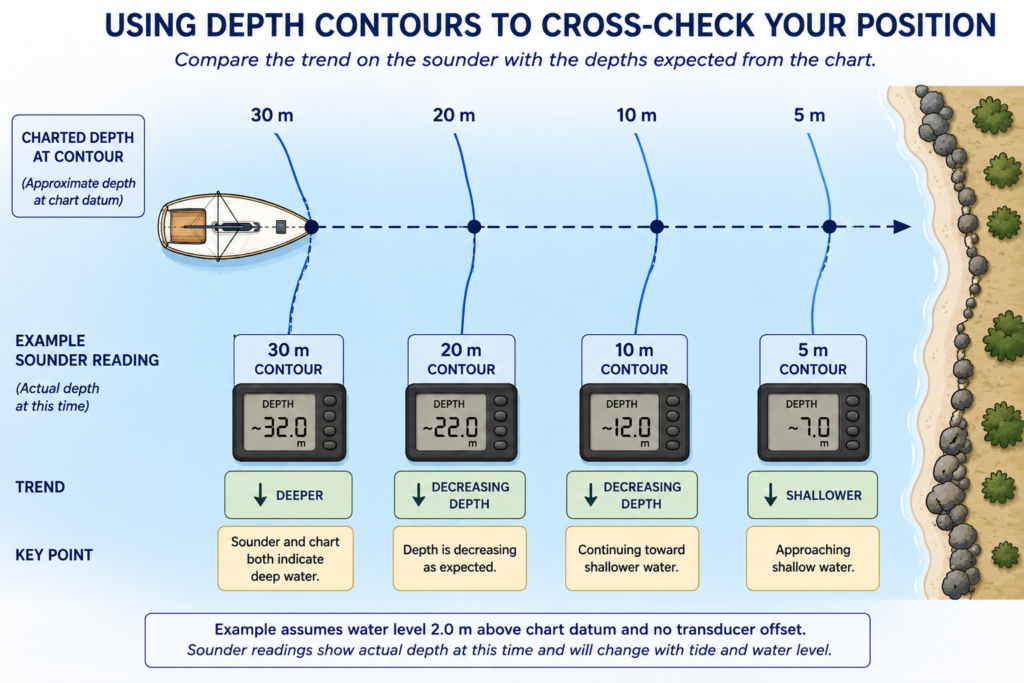
Depth contours can also provide clues about your position.
If the chart predicts steadily shoaling water as you approach a coastline and your depth sounder behaves accordingly, that agreement adds confidence to your navigation picture.
GPS and Chartplotters
GPS has transformed recreational navigation.
A modern chartplotter can provide:
- Position
- Course over ground
- Speed over ground
- Bearing to waypoint
- Distance to waypoint
- Cross-track error
- Estimated arrival time
- Electronic chart information
- Route guidance
That is extraordinary capability.
Use it.
There is no prize for deliberately making navigation harder.
But understand what the equipment is actually doing.
The little boat icon on the screen does not mean the chartplotter understands the situation around your sailboat.
It does not know whether you have maintained a proper lookout.
It does not necessarily know that the buoy ahead has moved.
It does not decide whether conditions are appropriate for your boat or crew.
And a route appearing on the screen does not automatically make that route safe.
Electronics are excellent navigational tools.
They are not substitutes for judgment.
Never Blindly Follow the Magenta Line
Most chartplotters and navigation applications can draw a route between waypoints.
That line can create a dangerous psychological effect.
It looks authoritative.
It is straight. Precise. Brightly colored. Confident.
The rocks do not care.
A route can be wrong because:
- A waypoint was entered incorrectly
- The coordinate format was wrong
- The route crosses shallow water
- The chart is outdated
- The electronic chart lacks sufficient detail
- The display is zoomed too far out
- A hazard was overlooked
- The navigator selected the wrong destination
- The equipment contains incorrect settings
- Conditions have changed
Before activating a route, inspect every leg at an appropriate chart scale.
Do not merely check the beginning and destination.
Zoom in and examine what lies along the route.
A useful rule is:
The route line is something you created. It is not evidence that the water beneath it is safe.
Cross-Check Your Position
Suppose your GPS says you are in the middle of a channel.
Good.
Now look outside.
Does the coastline appear where it should?
Are the navigation marks positioned as expected?
Does the compass heading make sense?
Does the depth agree reasonably with the chart and tide?
Is your speed and elapsed travel time consistent with being there?
When independent information agrees, your confidence increases.
When it disagrees, investigate.
This is one of the most important habits a beginner navigator can develop.
Do not ask only:
What does the GPS say?
Ask:
What evidence supports what the GPS says?
Choosing a Safe Coastal Route
Now we can put the pieces together.
Imagine planning a daytime trip from one harbour to another.
Do not begin by drawing the shortest possible line between them.
Begin by examining the entire area.
Identify:
- Departure harbour
- Destination
- Rocks and shoals
- Islands and headlands
- Minimum safe depths
- Traffic routes
- Narrow passages
- Restricted areas
- Navigation aids
- Expected tide
- Expected current
- Weather
- Suitable landmarks
- Alternate harbors or anchorages
Then construct a route through comfortably safe water.
For a beginner, margin is your friend.
If one route passes 50 meters from a rocky shoal and another adds half a mile but keeps you well clear, the longer route may be far more sensible.
Navigation is not a competition to see how closely you can pass hazards.
Place Waypoints in Safe Water
Waypoint placement deserves particular attention.
Beginners sometimes place a waypoint directly on the thing they intend to avoid.
For example, they may place a waypoint on a buoy marking a rock.
Then the navigation system directs them straight toward the buoy—and therefore toward the hazard.
Instead, place waypoints in safe water that guides the boat around hazards with an appropriate margin.
Also provide enough room to turn.
A sailboat does not arrive at a waypoint, rotate instantly and continue along the next leg.
It follows a curved path through the turn.
Wind and current continue affecting the boat throughout that maneuver.
Clearing Bearings and Danger Bearings
Traditional navigation offers some wonderfully simple tools that remain useful even when GPS is aboard.
A clearing bearing can help you remain on the safe side of a hazard.
Suppose a charted lighthouse and a dangerous reef have a useful geometric relationship.
You may determine that as long as the lighthouse remains on a particular side of a specified bearing, your boat remains clear of the reef.
Instead of repeatedly calculating your exact position, you now have a simple boundary:
Do not cross this bearing.
This can provide an immediate visual or compass-based warning that the boat is approaching danger.
These techniques are worth learning not because GPS is unreliable every minute, but because independent navigation methods make you less dependent on any single system.
Planning a Simple Coastal Passage
Let’s put everything together.
Imagine a fictional trip from Harbour A to Harbour B.
Between them lie a lighthouse, a rocky headland and a shallow shoal.
Step 1: Study the Entire Route
Look at the chart at an appropriate scale.
Do not immediately draw lines.
First understand the geography.
Where is the safe water?
Where are the hazards?
Where could you go if conditions deteriorate?
Step 2: Check the Weather
Determine the expected:
- Wind direction
- Wind strength
- Gusts
- Visibility
- Sea state
- Weather changes
A navigation plan that is comfortable in 10 knots of wind may be inappropriate in 30.
Step 3: Check Tide and Current
Determine whether water depth will change significantly during the trip and whether tidal currents will affect any part of the route.
Pay particular attention to narrow passages and headlands where currents can accelerate.
Step 4: Identify Hazards
Mark or mentally identify:
- Shoals
- Rocks
- Reefs
- Restricted areas
- Traffic
- Shallow entrances
Do not plan your route until you understand what you are trying to avoid.
Step 5: Select Safe Waypoints
Place waypoints in clear water.
Give hazards comfortable clearance.
Avoid unnecessary complexity.
A simple route with four well-chosen waypoints is often preferable to twenty tiny legs.
Step 6: Measure Courses and Distances
Determine the approximate course and distance for each leg.
Step 7: Estimate Travel Time
Use your realistic expected speed rather than your boat’s best-ever speed.
If your boat sometimes reaches 7 knots but normally averages closer to 4.5 knots on this type of trip, plan realistically.
Step 8: Identify Position Checks
Before departure, decide what you should see.
For example:
- Lighthouse abeam near Waypoint 1
- Headland bearing approximately northwest after Waypoint 2
- Depth increasing after clearing the shoal
- Harbour entrance becoming visible near Waypoint 3
Now the voyage contains built-in opportunities to confirm your position.
Step 9: Identify Alternatives
What if the wind increases?
What if visibility deteriorates?
What if the engine fails approaching the destination?
What if you arrive later than planned?
A good passage plan includes options.
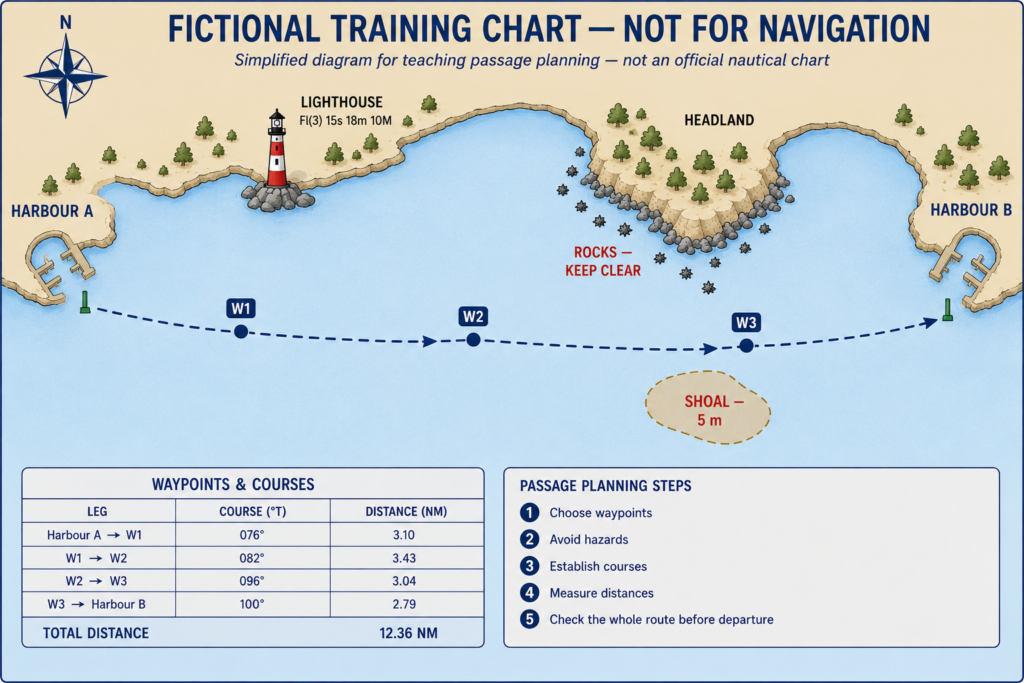
Make a Simple Passage-Planning Table
Your plan does not need to resemble the bridge paperwork of a commercial ship.
A simple table can be enough.
| Leg | Course | Distance | Expected Speed | Approx. Time | Notes |
|---|---|---|---|---|---|
| Harbour A–WP1 | 215° | 2.5 NM | 5 kt | 30 min | Shoal to east |
| WP1–WP2 | 245° | 4.0 NM | 5 kt | 48 min | Watch cross-current |
| WP2–Harbour B | 280° | 3.0 NM | 5 kt | 36 min | Ferry traffic |
The exact numbers matter less than the thinking behind them.
The table forces you to consider each leg individually.
Navigation Continues After You Leave
A passage plan is a prediction.
Once underway, reality gets a vote.
Perhaps your planned speed was 5 knots but you are making only 3.8.
Perhaps the forecast 10-knot breeze becomes 18.
Perhaps the current begins earlier than expected.
Perhaps visibility decreases.
Do not stubbornly follow the original plan simply because you spent time creating it.
Monitor what is actually happening.
A useful cycle is:
LOOK → CHECK → COMPARE → CONFIRM → CORRECT
Look outside.
Check your position and instruments.
Compare reality with the plan.
Confirm that the information makes sense.
Correct the plan or course when necessary.
Then repeat.
Good navigators are not people whose original plans are always perfect.
They are people who notice early when reality begins departing from the plan.
Keep a Proper Lookout
Navigation is only one responsibility aboard a sailboat.
You must also watch for:
- Other sailboats
- Powerboats
- Commercial traffic
- Ferries
- Fishing vessels
- Paddlers
- Floating debris
- Navigation hazards
- Changing weather
Never allow chart work or a screen to absorb so much attention that you stop watching the water.
Remember that collision avoidance takes priority over proving that your navigation calculations were correct.
When Your Position Does Not Make Sense
Sooner or later, every navigator experiences an uncomfortable moment:
Something doesn’t fit.
Perhaps the chartplotter says the boat is somewhere that doesn’t match the view outside.
Perhaps the water is much shallower than expected.
Perhaps the buoy you expected to see isn’t there.
Perhaps a headland appears on the wrong side of the boat.
Do not solve uncertainty by continuing at full speed and hoping the situation becomes clearer.
Reduce the rate at which the problem is developing.
Depending on circumstances:
- Slow down
- Maintain or move toward known safe water when that can be done safely
- Check your GPS position
- Check chart scale and settings
- Confirm coordinate format
- Check the compass
- Compare depth with the chart and tide
- Obtain visual bearings
- Re-identify landmarks
- Recheck your last reliable position
- Consider wind and current
- Reassess the entire situation
If necessary, stop your progress toward the uncertain area.
There is no shame in taking ten minutes to figure out where you are.
There can be serious consequences for confidently sailing ten more minutes in the wrong direction.
Common Beginner Coastal Navigation Mistakes
Several mistakes appear repeatedly when people first begin navigating.
Following the GPS blindly
Use electronic navigation, but verify what it tells you.
Confusing heading with track
The direction the bow points is not necessarily the direction the boat travels over the ground.
Ignoring current
Even modest current acting for an hour can create substantial cross-track error.
Forgetting tide
Charted depth and actual water depth are not necessarily identical.
Measuring distance from the wrong chart scale
Use the latitude scale for nautical-mile distance.
Misreading depth units
Never assume whether charted depths are meters, feet or fathoms.
Check.
Entering coordinates in the wrong format
Confirm degrees/minutes versus decimal degrees before entering waypoints.
Placing waypoints too close to hazards
Give yourself room.
Using too many waypoints
Complexity does not automatically produce safety.
Staring at the chartplotter
The screen represents the environment.
It is not the environment.
Failing to update the plan
A passage plan should adapt when conditions change.
Depending on one source of information
Whenever practical, cross-check.
A Beginner Coastal Navigation Routine
Before leaving, ask:
Where am I starting?
Where am I going?
What lies between the two?
Then check:
- Chart
- Weather
- Tide
- Current
- Route
- Hazards
- Distances
- Estimated travel time
- Safe depths
- Waypoints
- Alternative destinations
Once underway, continue asking:
Where am I?
Does that position make sense?
Am I following the expected track?
What will happen next?
That final question may be the most important.
Beginners tend to react to what is happening now.
Experienced sailors increasingly think about what will happen five, ten or thirty minutes from now.
Navigation gives you that ability.
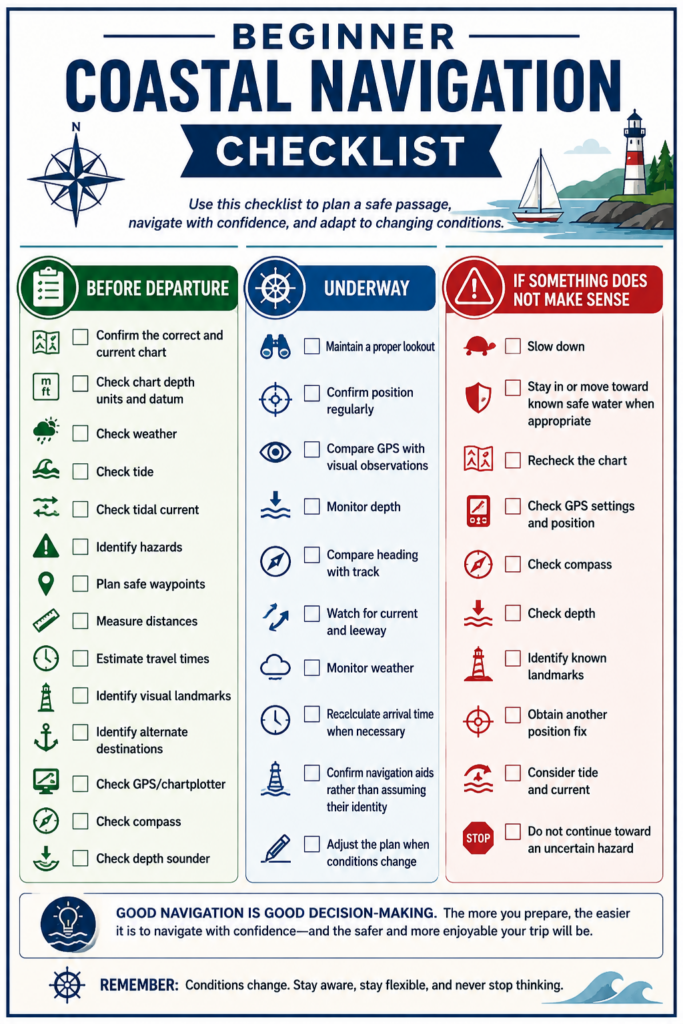
Beginner Coastal Navigation Checklist
Before Departure
- Confirm the correct and current chart
- Check chart depth units and datum
- Check weather
- Check tide
- Check tidal current
- Identify hazards
- Plan safe waypoints
- Measure distances
- Estimate travel times
- Identify visual landmarks
- Identify alternate destinations
- Check GPS/chartplotter
- Check compass
- Check depth sounder
Underway
- Maintain a proper lookout
- Confirm position regularly
- Compare GPS with visual observations
- Monitor depth
- Compare heading with track
- Watch for current and leeway
- Monitor weather
- Recalculate arrival time when necessary
- Confirm navigation aids rather than assuming their identity
- Adjust the plan when conditions change
If Something Does Not Make Sense
- Slow down
- Stay in or move toward known safe water when appropriate
- Recheck the chart
- Check GPS settings and position
- Check compass
- Check depth
- Identify known landmarks
- Obtain another position fix
- Consider tide and current
- Do not continue toward an uncertain hazard
A Simple Navigation Exercise
Imagine you are planning a trip between two small coastal harbors.
The destination is 9 nautical miles away.
Your expected average speed is 4.5 knots.
A rocky shoal lies directly between the two harbors.
A safe waypoint placed offshore adds another 1 nautical mile to the trip.
A cross-current of approximately 1 knot is expected during part of the passage.
What should you do?
First, do not choose the 9-mile straight-line route merely because it is shorter.
The shoal makes that route inappropriate.
The safer route is approximately 10 nautical miles.
At 4.5 knots:
10 ÷ 4.5 ≈ 2.22 hours
That is approximately 2 hours 13 minutes before allowing for maneuvering, changing wind and current.
Next, consider the cross-current.
Your heading may need to differ from the desired track to compensate for the water moving sideways.
While underway, compare:
- Compass heading
- GPS course over ground
- Depth
- Visual landmarks
- Progress toward the waypoint
Now imagine your GPS suddenly fails halfway through the trip.
Are you helpless?
You should not be.
You still have:
- Your last known position
- Compass
- Chart
- Time
- Estimated speed
- Visible landmarks
- Navigation aids
- Depth sounder
You can construct a DR position, obtain visual bearings and compare depth with the chart.
That is the real purpose of learning coastal navigation.
Not to reject technology.
To remain a navigator when one piece of technology disappears.
Coastal Navigation Quiz
1. What are the three basic questions coastal navigation should continually answer?
A. How fast am I sailing, how much fuel do I have, and what time is sunset?
B. Where am I, where am I going, and is the water between here and there safe?
C. What tack am I on, what sail should I use, and where is the wind coming from?
2. What is one nautical mile equal to on the latitude scale of a nautical chart?
A. One degree
B. One minute
C. Ten minutes
D. One second
3. What does one knot mean?
A. One kilometre per hour
B. One statute mile per hour
C. One nautical mile per hour
D. One degree of latitude per hour
4. Your destination is 12 NM away and you are traveling at 6 knots. Approximately how long will the trip take if your speed remains constant?
A. 1 hour
B. 2 hours
C. 3 hours
D. 6 hours
5. What is the difference between heading and track?
A. There is no difference.
B. Heading is where the bow points; track is the path the boat actually follows over the ground.
C. Heading is measured by GPS and track only by compass.
D. Track applies only to powerboats.
6. What is magnetic variation?
A. Error caused by steering badly
B. The angle between true north and magnetic north
C. Sideways movement caused by current
D. Error caused by GPS satellites
7. Why should distance normally be measured using the latitude scale on a chart?
A. Longitude is not shown accurately.
B. One minute of latitude corresponds to one nautical mile.
C. Latitude automatically accounts for current.
D. Latitude is always magnetic.
8. What is a dead-reckoned position based primarily on?
A. Course, speed and elapsed time from a known position
B. GPS alone
C. Water depth alone
D. Three lighthouse bearings only
9. If the bow points north while a strong current carries the boat east, what happens?
A. The heading automatically changes east.
B. The boat stops.
C. The track over ground may angle northeast even though the heading remains north.
D. The compass compensates automatically.
10. Why is a waypoint directly beside a dangerous rock often a poor choice?
A. GPS cannot navigate toward rocks.
B. It may guide the boat unnecessarily close to the hazard.
C. Waypoints cannot be used near land.
D. Rocks interfere with GPS signals.
11. What should you do if the depth sounder shows much shallower water than expected?
A. Ignore it if GPS looks correct.
B. Immediately increase speed.
C. Treat the disagreement as important information and verify your position and situation.
D. Turn off the sounder.
12. Why should GPS be cross-checked with other information?
A. GPS never works near coastlines.
B. Independent information can help reveal navigation errors or incorrect assumptions.
C. GPS cannot calculate latitude.
D. Paper charts are always more precise.
13. Canada uses which IALA lateral buoyage region?
A. Region A
B. Region B
C. Region C
D. Canada does not use IALA buoyage.
14. What is one of the best responses when you become uncertain of your position near hazards?
A. Continue at the same speed until something becomes recognizable.
B. Follow the nearest boat.
C. Slow down, remain in or move toward known safe water when appropriate, and re-establish your position.
D. Immediately sail toward the closest buoy.
15. What is the central purpose of learning basic coastal navigation in the age of GPS?
A. To avoid using electronics
B. To navigate entirely by compass
C. To understand and cross-check your position, route and surroundings rather than depending blindly on one system
D. To memorize every symbol on a nautical chart
Quiz Answer Key
1. B — Coastal navigation continually asks where you are, where you are going and whether the route between those positions is safe.
2. B — One minute of latitude represents one nautical mile.
3. C — One knot equals one nautical mile per hour.
4. B — 12 NM ÷ 6 knots = 2 hours.
5. B — Heading describes where the bow points; track describes the boat’s actual path over the ground.
6. B — Variation is the angle between true north and magnetic north at a particular location.
7. B — The latitude scale provides the direct nautical-mile relationship used for chart distance measurement.
8. A — Dead reckoning advances a known position using course, speed and elapsed time.
9. C — Current can move the boat sideways, causing the actual track to differ from the heading.
10. B — Waypoints should generally guide the boat through safe water rather than directly toward hazards.
11. C — Unexpected depth is a reason to verify your navigation immediately.
12. B — Independent information provides valuable cross-checks and can expose mistakes.
13. B — Canada is in IALA Region B.
14. C — Reducing speed and re-establishing your position prevents uncertainty from developing rapidly into danger.
15. C — Modern coastal navigation combines electronic navigation with charts, observation, compass, depth and good judgment.
The Bigger Lesson
Learning coastal navigation changes the way you sail.
You stop seeing the chartplotter as a moving map and begin understanding what the information means.
You stop seeing a buoy merely as something to pass and begin asking what it tells you about the water.
You notice that your compass says one thing while your GPS track says another—and understand that current or leeway may explain the difference.
You begin estimating where the boat should be before looking at the screen.
Most importantly, you begin thinking ahead.
That is the transition from simply operating a sailboat to navigating one.
You do not need to master celestial navigation, memorize hundreds of chart symbols or perform complicated calculations before making a simple coastal passage.
Start smaller.
Plan a short trip in familiar waters during good weather. Plot the route. Measure the distance. Predict your travel time. Identify a few landmarks. Take some bearings. Compare your compass with the GPS. Watch the depth sounder. Notice what current does to your track.
Then do it again.
Eventually, the coastline that once looked like scenery begins telling you exactly where you are.
And that is when coastal navigation starts becoming seamanship.