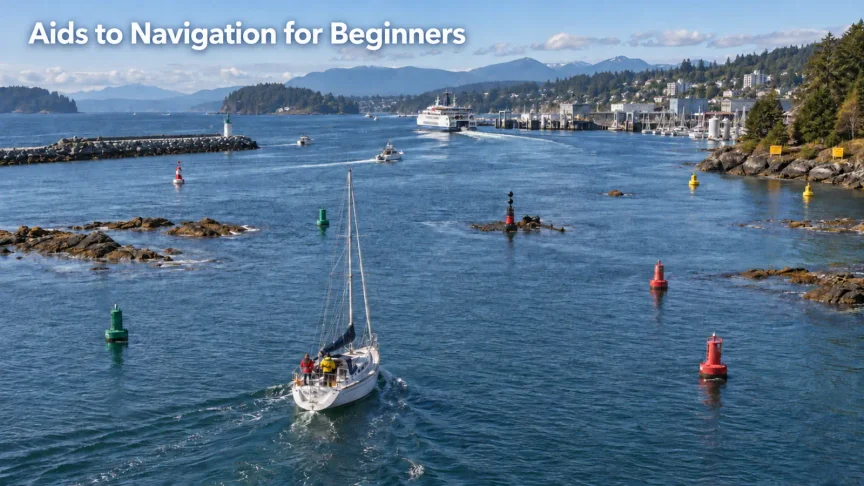
A buoy appears ahead of your sailboat.
It may be red, green, yellow, black and yellow, or striped red and white. It may carry a number, a distinctive topmark or a light that flashes in a repeating pattern. On the chart, it may be represented by a small symbol and a compact group of letters.
What should you do with that information?
Many beginners try to solve the problem by memorizing rules such as “red, right, returning.” That phrase can be useful in Canadian waters, but it is not enough. Before it helps, you must know whether you are travelling in the conventional direction of buoyage. More importantly, not every aid marks the side of a channel. Some identify a danger, some indicate the best water relative to a danger, and others draw attention to a special area or feature.
Aids to navigation are therefore better understood as part of a language. They help you recognize channels, dangers, routes and reference points, but they do not steer the boat for you. You must identify the aid, match it with the chart and surroundings, interpret what it means, and decide whether your intended course still makes sense.
By the end of this guide, you should be able to recognize the principal aids used in Canadian waters, understand the kind of information each provides, and use that information as one part of a safe navigation decision.
Beginner principle: An aid to navigation gives you information. It does not replace the chart, a proper lookout or your judgment.
What Is an Aid to Navigation?
An aid to navigation, often shortened to AtoN, is a device or system intended to help mariners determine position or course, identify dangers or obstructions, or identify a preferred or safe route. In Canada, the official system includes visual, audible and electronic aids.
For a beginner, the most important visual aids include:
- buoys floating on the water
- fixed beacons attached to the seabed or shore
- daymarks designed to be recognized in daylight
- lights with identifiable colours and rhythms
- lighthouses and other prominent fixed structures
- ranges or leading marks that line up to indicate a track
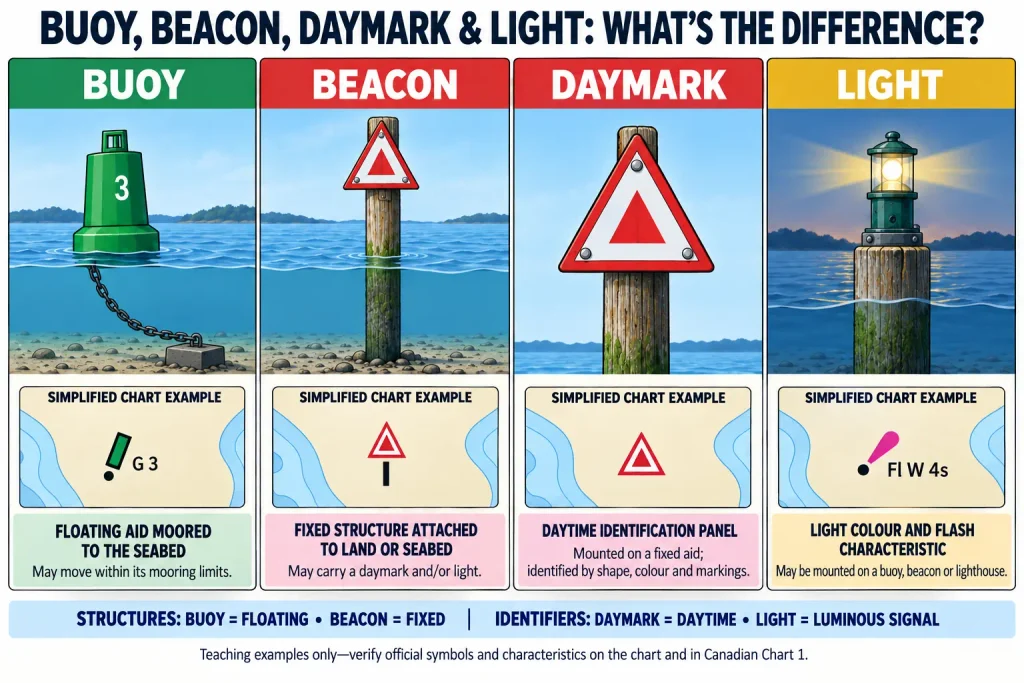
A buoy is floating and can move around its mooring. A beacon is fixed. A daymark is the coloured and shaped panel used to identify an aid during daylight. A light may be mounted on a buoy, beacon, lighthouse or other structure.
That distinction matters. Beginners sometimes use the word buoy for every navigation marker they see. However, a triangular daymark on a fixed pile and a floating red buoy are physically different aids, even if both communicate information about the same side of a channel.
The thing you see from the cockpit and the symbol you see on the chart are two representations of the same navigation system. Before trying to identify every mark on the water, learn how those features are represented in How to Read a Nautical Chart: A Beginner’s Guide.
The Canadian Coast Guard’s Canadian Aids to Navigation System is the authoritative Canadian reference for the characteristics and use of these aids.
Canada Uses IALA Region B
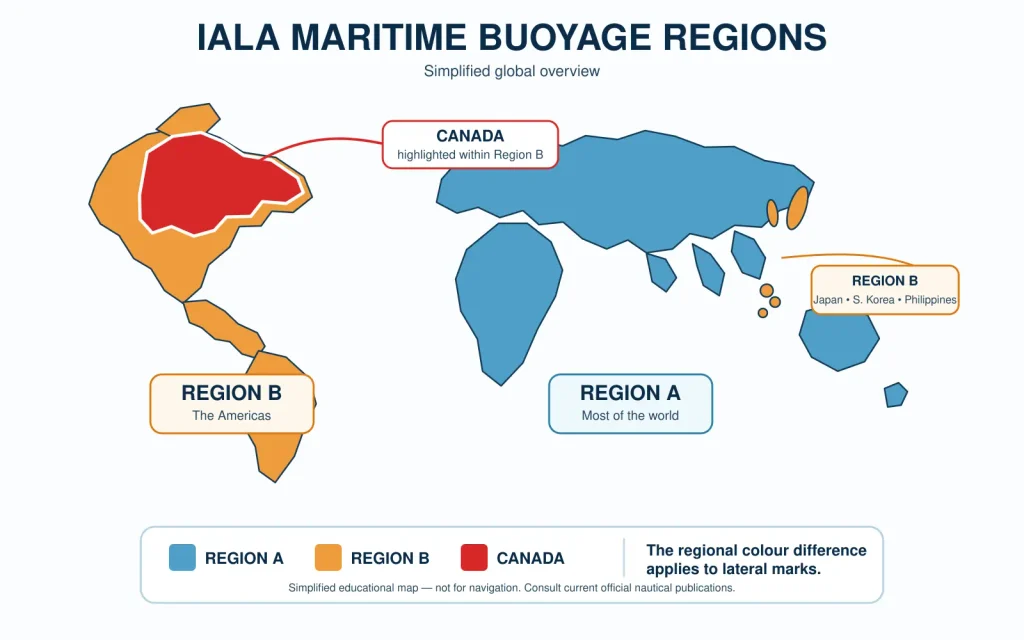
Canada’s system is based on the international maritime buoyage framework maintained by IALA. The major categories of marks—lateral, cardinal, isolated danger, safe water, special and emergency wreck—provide a common structure, but lateral colours differ between two regions of the world.
Canada, the United States and much of the Americas use IALA Region B. Much of Europe, Africa, Asia and Australia use Region A.
The difference matters mainly for lateral marks:
- In Region B, red identifies the starboard-hand side of a channel when travelling in the conventional direction of buoyage, while green identifies the port-hand side.
- In Region A, those red and green roles are reversed.
The IALA Maritime Buoyage System explains the international framework and why a sailor travelling outside familiar waters must confirm which region applies.
The other major mark categories use the same fundamental system in both regions. A North Cardinal mark, for example, does not change meaning merely because you cross from Region B into Region A.
Lateral Marks Show the Sides of a Channel
Lateral marks are usually the first aids beginners learn because they identify the port and starboard sides of a well-defined channel. The essential question, however, is not simply, “What colour is the buoy?” It is:
In which direction is the buoyage system being read?
The conventional direction of buoyage
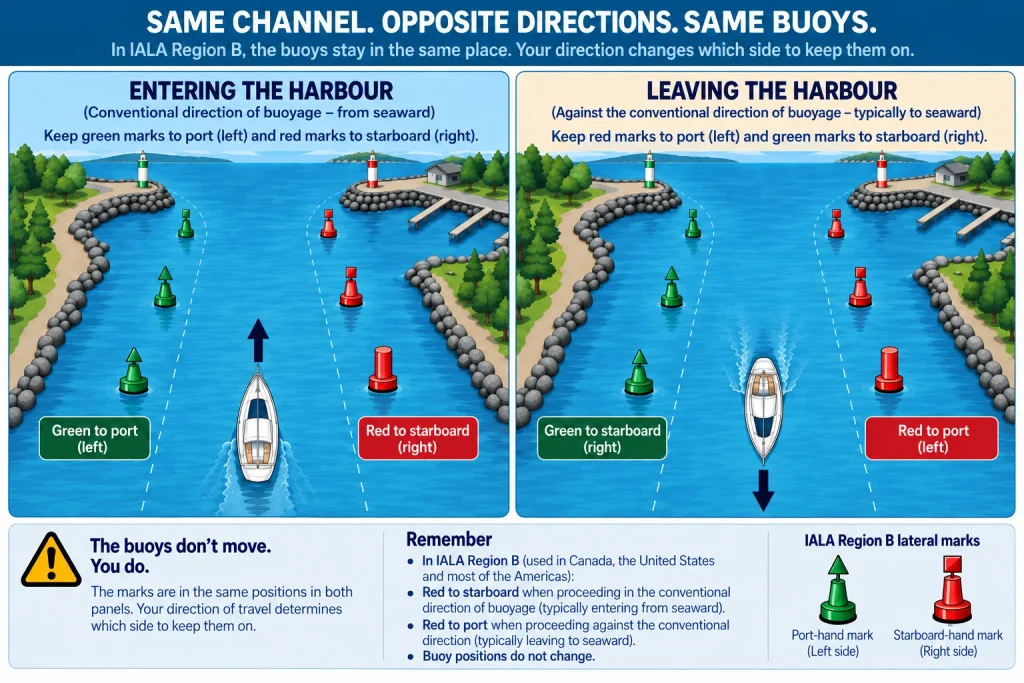
In Canadian waters, the conventional direction of buoyage is generally the direction taken when approaching a harbour, river, estuary or other waterway from seaward, or travelling upstream. On charts, the direction may also be indicated by an arrow where it might otherwise be unclear.
When you travel in that conventional direction in Region B:
- keep red starboard-hand marks on your starboard side
- keep green port-hand marks on your port side
This is the idea behind “red, right, returning.” It is a memory aid, not the complete rule. You must still identify the conventional direction and confirm that the marks correspond with the channel shown on your chart.
When travelling out of the harbour in the opposite direction, the same marks do not move. Your relationship to them reverses: red will normally be on your port side and green on your starboard side.
Shape, colour, numbers and lights
In the Canadian system, a starboard-hand buoy is red, normally even-numbered, and has a pointed or conical top if it is not a spar. If lighted, it displays a red light. A port-hand buoy is green, normally odd-numbered, and has a flat top if it is not a spar. If lighted, it displays a green light.
Numbers commonly increase in the conventional direction of buoyage. They can help you confirm where you are, but never force a number to fit your assumption. If the number is different from the one expected, slow down and investigate.
A useful five-question check is:
- Where am I?
- Which way am I travelling?
- What is the conventional direction of buoyage here?
- Which side of the channel does this mark identify?
- Do the chart, depths, shoreline and nearby aids support that interpretation?
Bifurcation Marks Show a Preferred Channel
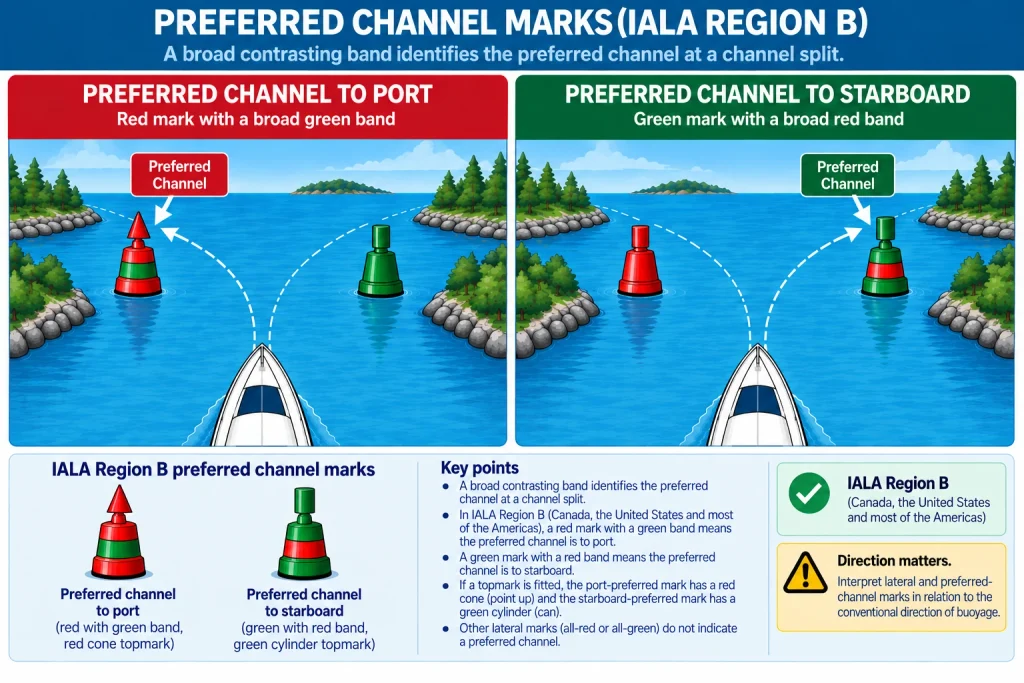
Where a channel divides, a preferred-channel mark may indicate which branch is designated as the preferred channel. In IALA Region B, it resembles a lateral mark but carries one broad horizontal band of the contrasting colour.
A red mark with one broad green band indicates that the preferred channel is to port. A green mark with one broad red band indicates that the preferred channel is to starboard. Interpret these directions in relation to the conventional direction of buoyage.
“Preferred” does not mean that the other channel is automatically closed or unsafe. The alternative branch may still be navigable. Its suitability depends on charted depth, hazards, restrictions, your boat and current conditions.
This is a good example of why aids to navigation should be interpreted together with the chart rather than in isolation.
Cardinal Marks Use the Compass
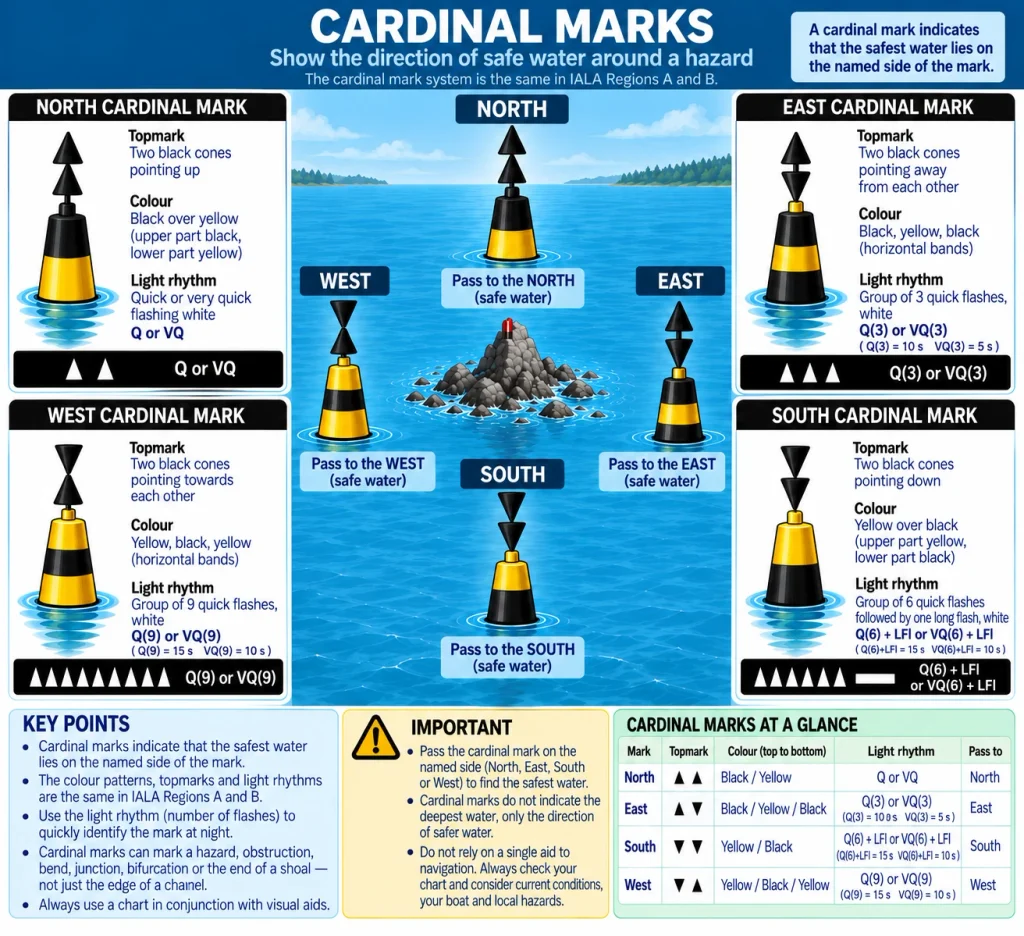
A cardinal mark tells you where the best navigable water lies in relation to a danger or feature. Its name—North, East, South or West—indicates the named side on which the danger should be passed, or where the deepest water in that immediate area may be found.
That wording is important. A North Cardinal mark does not prove that every point south of the mark is dangerous or that every point north is safe for your boat. It identifies the recommended side relative to the marked feature. You still need the chart, depths and an appropriate margin.
Cardinal marks are black and yellow. When fitted, their two black cone topmarks and white-light rhythms help identify the direction.
North Cardinal
- black above yellow
- both cone points upward
- continuous quick or very quick white flashes
- pass north of the mark after confirming the charted situation
East Cardinal
- black, yellow, black
- cone points face away from each other
- three quick or very quick white flashes in a group
- pass east of the mark after confirming the charted situation
South Cardinal
- yellow above black
- both cone points downward
- six quick or very quick white flashes followed by one long flash
- pass south of the mark after confirming the charted situation
West Cardinal
- yellow, black, yellow
- cone points face toward each other
- nine quick or very quick white flashes in a group
- pass west of the mark after confirming the charted situation
The flash groups follow the positions of 3, 6 and 9 on a clock face. North uses continuous quick flashing, while South adds a long flash after six to make it easier to distinguish from West in poor conditions.
Skipper Thinking: You identify an East Cardinal mark close to your planned track. What do you actually know? You know that the recommended passing side relative to the marked danger is east. You do not yet know whether your present route, depth and clearance are suitable. Locate the mark and danger on the chart, confirm your position, then decide whether to alter course.
Isolated Danger Marks Identify a Localized Hazard
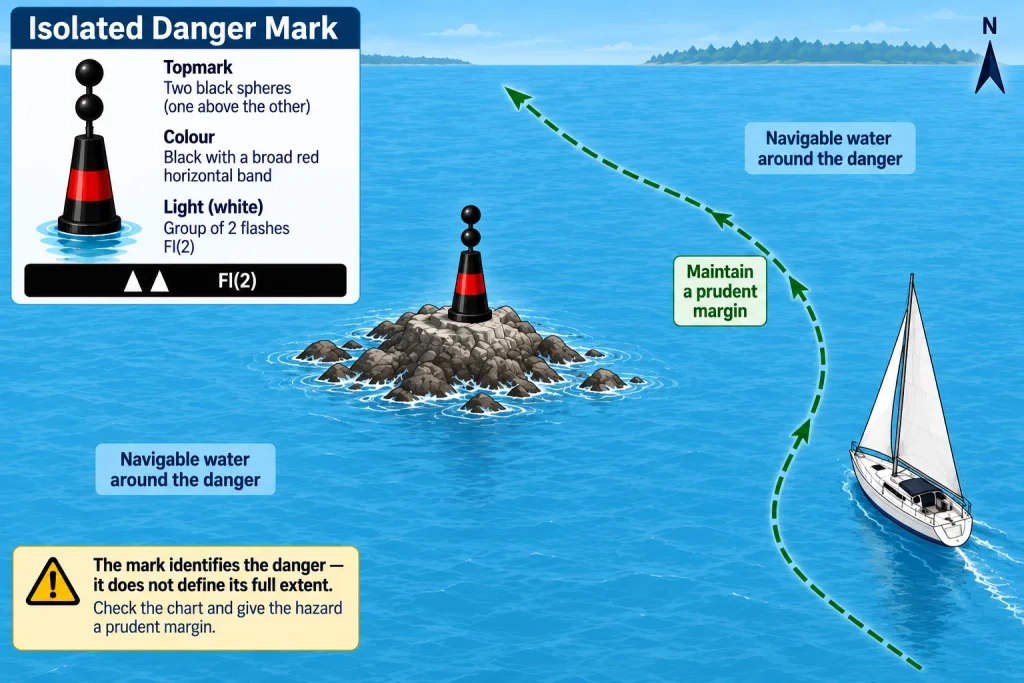
An isolated danger mark is placed on, over or near a danger that has navigable water around it. In Canadian waters, it is black with one or more broad red horizontal bands. Its top mark is two black spheres. If lighted, it displays a white group-flashing light with two flashes.
The mark warns you about the danger; it does not promise that every route around it is appropriate for your sailboat. Water that is technically navigable may still be too shallow for your draft, too narrow for the conditions, or too close to the danger for a prudent margin.
Identify the hazard on the chart and give it clearance appropriate to your boat, position uncertainty, wind, sea state and current. Passing unnecessarily close to the mark gains nothing.
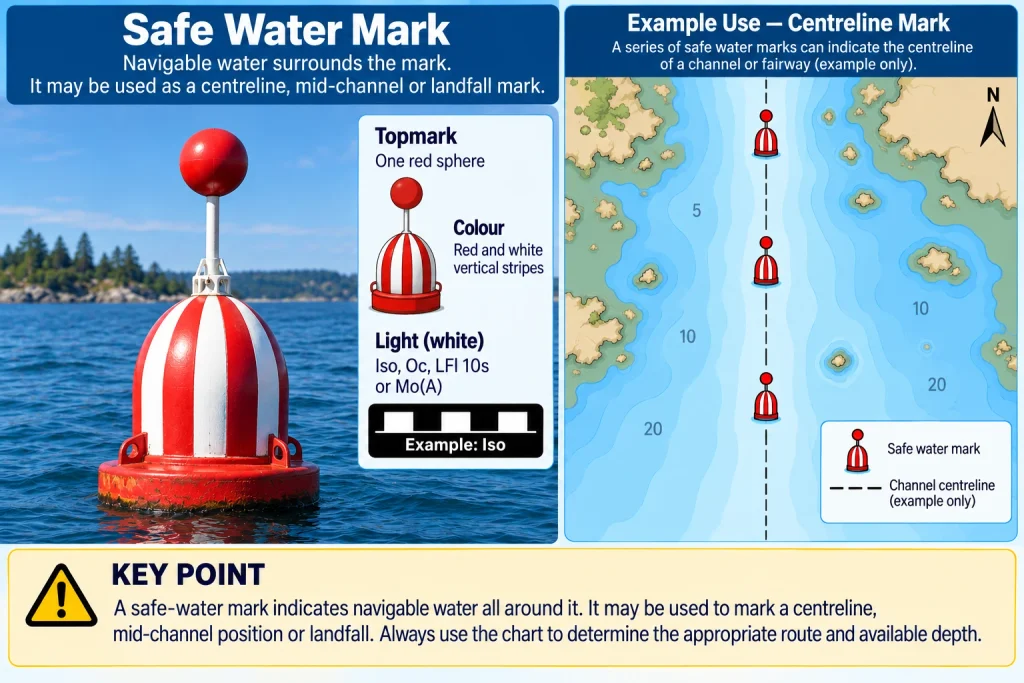
Safe Water Marks Indicate Navigable Water Around the Mark
A safe water mark has red and white vertical stripes and, when fitted, a single red spherical top mark. Its light is white and may use several specified rhythms. These marks may be used as mid-channel, centreline or landfall marks.
“Safe water” is a description of the mark’s navigational purpose, not a blanket guarantee. It does not cancel traffic, current, weather, shoaling, your boat’s draft or hazards elsewhere along your route.
Use the mark to support the navigation picture, then keep looking ahead. Once you pass it, the next decision point still matters.
Special Marks Tell You to Look for More Information
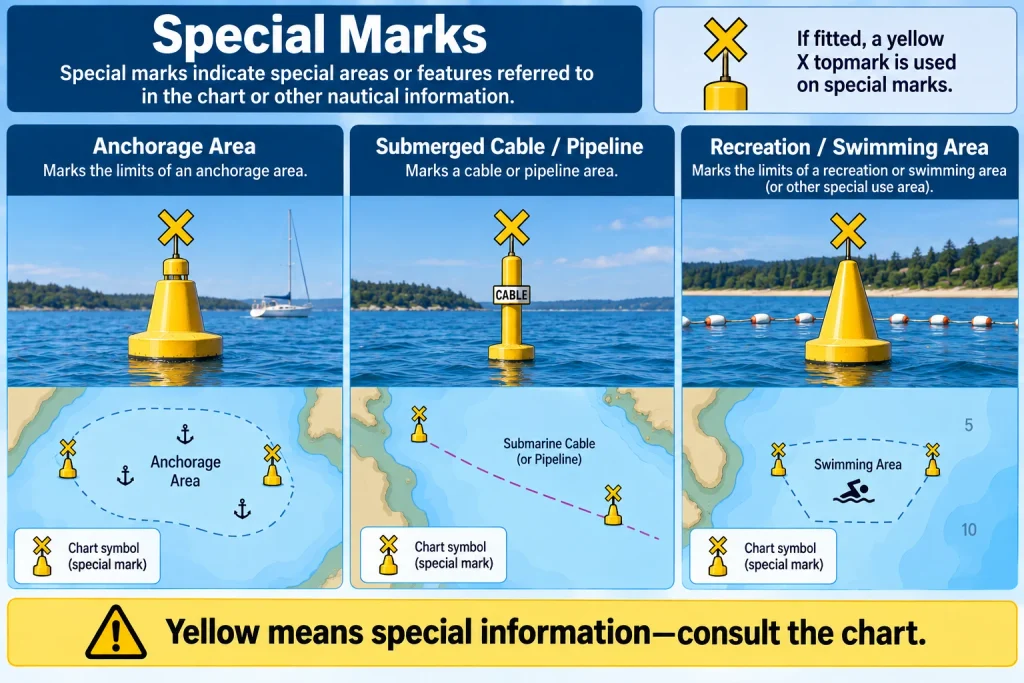
Special marks are yellow. They may identify recreation zones, cables and pipelines, spoil grounds, traffic-separation features, aquaculture sites, scientific equipment or other special areas and features shown on the chart or described in official publications.
The yellow colour tells you that something deserves attention. It does not tell you exactly what that something is.
When you see a special mark, find it on the chart and determine its specific purpose. Do not invent a universal passing side. Depending on the marked feature, you may need to avoid an area, reduce speed, keep clear of equipment or comply with a local restriction.
The Canadian Hydrographic Service’s Canadian Chart 1 is the official reference for symbols, abbreviations and terms used on Canadian nautical charts, including the charted representation of lights, buoys and beacons.
Other Aids a Beginner May Encounter
You do not need to memorize every specialized aid before beginning coastal sailing. You should, however, recognize when an unfamiliar feature requires you to slow down and look it up.
An emergency wreck-marking buoy has alternating blue and yellow vertical stripes and a distinctive alternating blue-and-yellow light. It may be deployed to mark a new wreck before the danger is fully represented in ordinary navigation information.
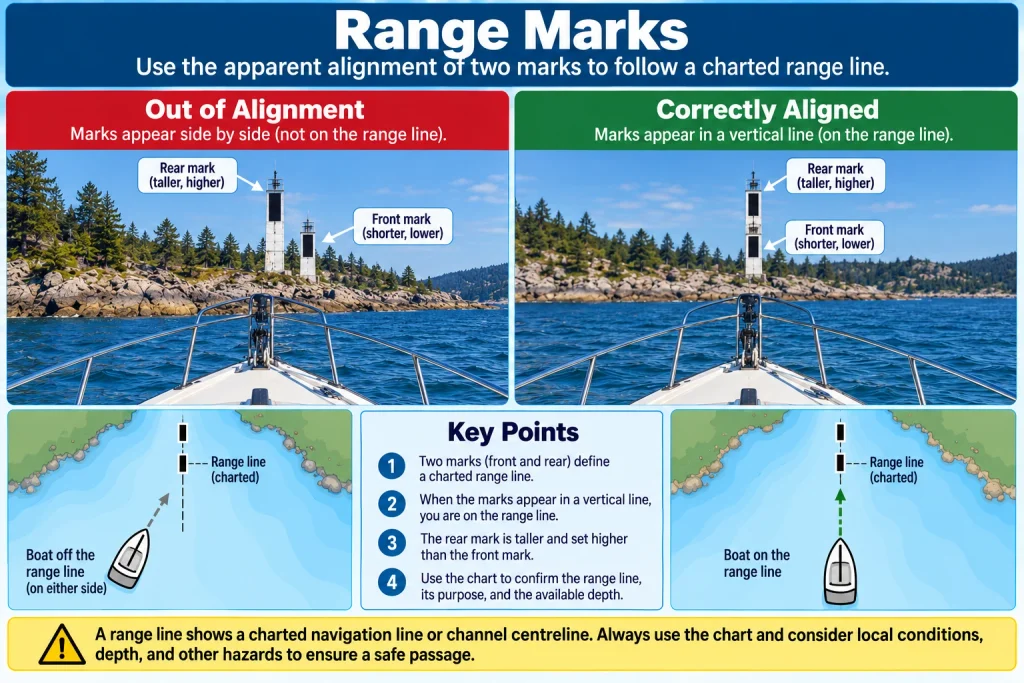
Ranges or leading marks work in pairs. When the front and rear marks appear vertically aligned, your boat is on the indicated line. They can help define a channel centreline or another important track, but you must confirm which direction and limits apply.
You may also encounter sector lights, sound signals, RACONs, AIS aids to navigation and local control or information marks. At beginner level, the right habit is not to guess. Consult the chart, Chart 1, sailing directions and current local information.
Lights Help Identify Aids After Dark
At night, the body colour of a distant buoy may disappear. The light becomes one of your main identifying clues.
A charted light description may communicate:
- colour
- rhythm, such as flashing, quick flashing or occulting
- number of flashes in a group
- period, meaning the time required for the full pattern to repeat
- height and nominal range where applicable
For example, a group of three flashes is different from one flash repeated three times while you happen to be watching. Observe long enough to identify the complete pattern and period.
Do not rely on a single glimpse. Shore lights, vehicle lights, background buildings, rain and the boat’s movement can make a marine light difficult to identify. Compare its bearing, colour, rhythm and expected charted position.
The abbreviation beside a light becomes much more useful once you understand how the chart describes its characteristics, which is why this skill builds directly on How to Read a Nautical Chart: A Beginner’s Guide.
Identify a Mark From More Than One Clue
Colour attracts attention, but colour alone is weak evidence. Distance, glare, faded paint and poor visibility can all mislead you.
Build an identification from several clues:
- expected charted position
- colour or colour pattern
- shape
- topmark
- number or letter
- light colour and rhythm
- nearby land, depths and other aids
If four clues agree and one is unclear, you may have a reasonable identification. If the colour seems right but the number, position and surrounding geography do not, the mark is probably not the one you expected.
From Chart to Cockpit
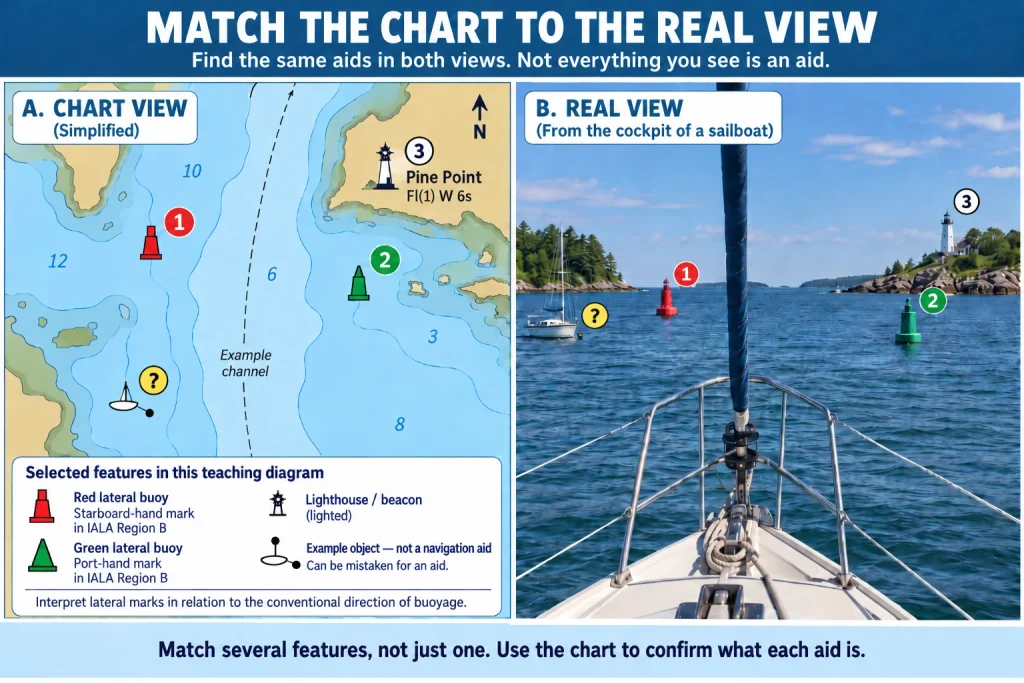
The practical skill is not naming a buoy from a picture. It is connecting the real object to the chart while the boat is moving.
Use this sequence:
See
Maintain a broad scan and notice the aid early. Use binoculars when appropriate, but do not let them narrow your attention for too long.
Locate
Estimate the aid’s bearing and relationship to your boat. Where should it be if your assumed position is correct?
Compare
Find the expected aid on the chart. Compare its colour, shape, number, topmark, light and nearby features.
Identify
Decide whether the evidence is strong enough to identify it. If not, keep the identification tentative.
Interpret
Ask what type of information it provides. Does it identify a channel side, the recommended side of a danger, a localized hazard, safe water or a special feature?
Decide
Use that information with depth, traffic, wind, current, charted hazards and your boat’s capabilities. Choose a course and speed that preserve room for correction.
This process belongs inside the larger position-checking routine taught in Basic Coastal Navigation: A Beginner’s Guide, where visual observations, charts, depth and electronics are used to tell the same navigational story.
Never Navigate From One Buoy Alone
A buoy may be off station. It can drag its mooring, be damaged, lose its topmark or light, or be removed temporarily. Visibility can hide an expected aid. You can also misread the chart or confidently identify the wrong object.
That is why good navigation depends on agreement among several sources:
- charted position
- GPS or chartplotter position
- visual bearings and landmarks
- water depth and depth trend
- nearby aids and their sequence
- compass heading and actual track
- current navigation warnings and notices
- traffic and local conditions
Your lookout matters here. A technically correct interpretation of a buoy does not make a course safe if it carries you toward another vessel, debris or a developing weather problem. The same principle appears in Sailing Right of Way Rules: The Essential Beginner Guide: knowing a rule never removes the need to observe the whole situation and avoid danger.
Natural link sentence: “This cross-checking habit works only when someone is actively collecting information, which is why the scanning and prioritizing routine in How to Keep a Proper Lookout: Situational Awareness for Beginners belongs beside every navigation skill.”
What If the Buoy and Chart Do Not Agree?
Do not make the buoy fit your assumption.
Possible explanations include:
- you are looking at a different buoy
- your estimated position is wrong
- the number or colour has been misread
- the chart scale or display settings are hiding useful detail
- the electronic chart or paper chart is not current
- the buoy is off station or temporarily changed
- poor visibility is distorting what you see
- the GPS position, datum or chart display is being misinterpreted
Use a conservative response:
SLOW DOWN → CREATE SPACE → CHECK POSITION → CHECK CHART → CHECK OTHER CLUES → REASSESS
Move toward known safe water when that can be done safely. Avoid turning uncertainty into urgency by continuing at full speed toward a narrow channel or possible hazard. If the picture still does not make sense, do not proceed merely because the original plan said you would.
Electronic Navigation Still Requires Interpretation
A chartplotter can display your position and the charted locations of aids. It cannot guarantee that the physical aid is exactly on station, that the chart is current, or that you have understood what the symbol means.
Zoom level also matters. On vector charts, some detail may appear or disappear as the display scale changes. A highly magnified screen can suggest more precision than the underlying survey or chart supports.
Look up from the screen. Compare the electronic position with what you see outside, the depth under the boat and the expected sequence of features. As explained in Basic Coastal Navigation: A Beginner’s Guide, the strongest navigation picture comes from combining electronics with charts, depth, visual observations and judgment.
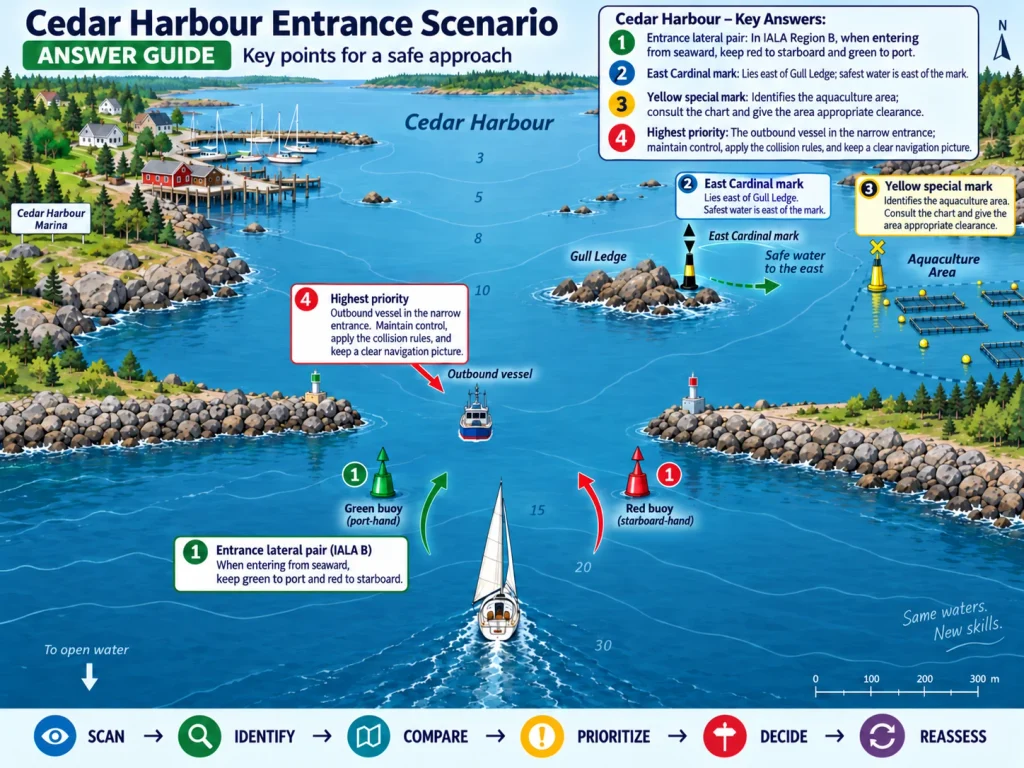
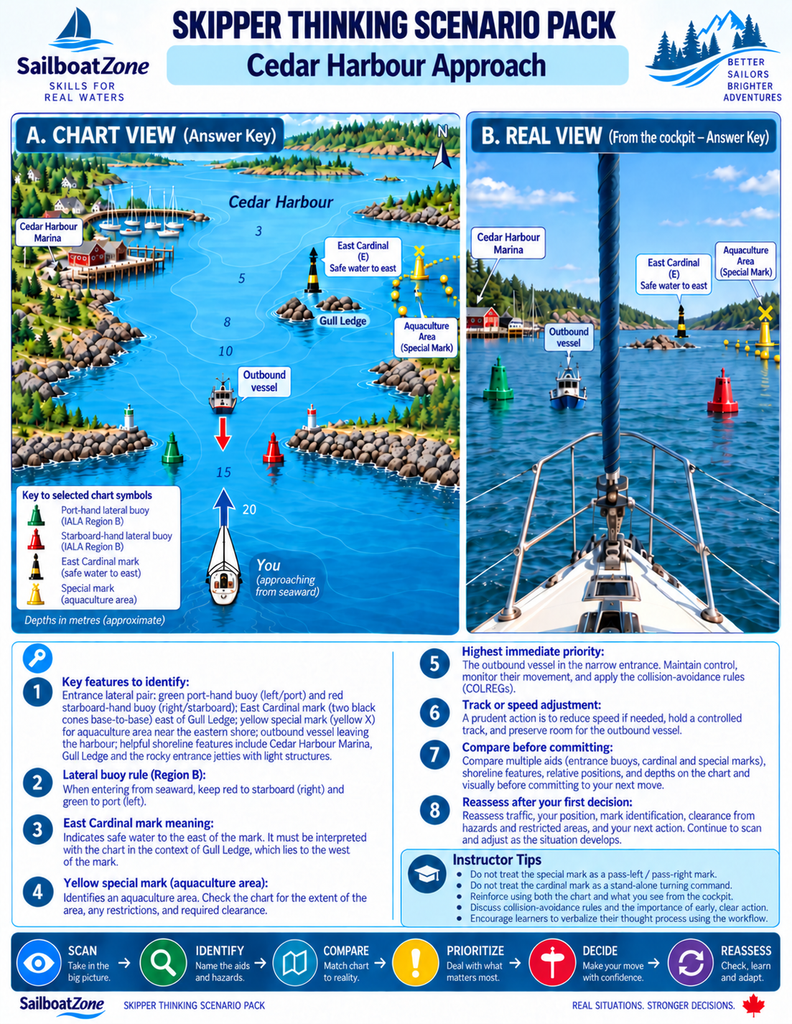
Worked Scenario: Entering Cedar Harbour
Imagine approaching fictional Cedar Harbour in daylight. Your chart shows a green port-hand buoy and a red starboard-hand buoy at the entrance. Farther in, an East Cardinal mark lies west of Gull Ledge. A yellow special mark identifies an aquaculture area near the eastern shore. Depth decreases gradually toward the harbour, and another vessel is leaving through the entrance.
You first see the red buoy. That is useful, but insufficient. You scan again and find the green buoy. Their positions form the expected entrance on the chart. Because you are approaching from seaward in Region B, red should remain to starboard and green to port when you enter.
Next, you identify the East Cardinal mark. It indicates the recommended passing side relative to Gull Ledge: east of the mark. You verify the ledge and surrounding depths on the chart rather than treating the mark as a stand-alone turning instruction.
The yellow buoy does not tell you which side to pass. You check the chart, identify the aquaculture area and plan a track that gives its equipment appropriate clearance.
Meanwhile, the departing vessel is approaching the same narrow entrance. That moving hazard now deserves more immediate attention than memorizing the next buoy number. You reduce speed if necessary, maintain control, follow the applicable collision rules and preserve a clear navigation picture.
Work through the scenario using:
SCAN → IDENTIFY → COMPARE → PRIORITIZE → DECIDE → REASSESS
- Which mark matters first?
- Does each identification agree with the chart and surroundings?
- Which side of Gull Ledge is indicated?
- What does the yellow mark require you to look up?
- Does the other vessel change the safest time or place to enter?
- What new information would make you alter or abandon the approach?
Common Beginner Mistakes
Treating every buoy as a passing instruction
Why it happens: Lateral marks are taught first, so beginners assume every buoy identifies a channel side.
Why it matters: Cardinal, isolated danger, safe water and special marks communicate different information.
Better habit: Identify the category before deciding what the aid means.
Applying “red, right, returning” without knowing the direction
Why it happens: The mnemonic is easier to remember than conventional direction of buoyage.
Why it matters: The relationship reverses when leaving, and lateral colours reverse in Region A.
Better habit: Establish region, location and direction first.
Identifying a mark from colour alone
Why it happens: Colour is the most obvious clue.
Why it matters: Distance, light and weather can distort colour, and several aid types use multiple colours.
Better habit: Confirm position, shape, topmark, number and light.
Assuming a buoy is exactly on its charted position
Why it happens: Electronic displays can make chart symbols appear precise.
Why it matters: Floating aids can move, and every source has limitations.
Better habit: Use the buoy to support a position, not define it alone.
Passing unnecessarily close
Why it happens: The buoy is mistaken for the edge of all danger.
Why it matters: The mooring, current, sea state, position error and the hazard itself may create risk.
Better habit: Give aids and hazards a prudent margin while remaining in appropriate water.
Following the chartplotter without looking outside
Why it happens: The screen provides a clear, confident-looking boat icon.
Why it matters: The real environment includes traffic, debris, weather and changes the display may not show.
Better habit: Continually compare the screen, chart, water and surroundings.
Continuing when the picture stops making sense
Why it happens: People become attached to the original plan.
Why it matters: Each minute at speed reduces the time and space available to diagnose the problem.
Better habit: Slow down, create space and re-establish the navigation picture.
Skipper Thinking Practice
Scenario 1: Red while outbound
You are leaving a Canadian harbour and see a red lateral mark ahead.
- What do you know? You are in Region B, but travelling opposite the conventional direction.
- What should you check? Confirm the channel, mark number, charted position and surrounding aids.
- What matters most? Do not put red to starboard automatically; outbound, it will normally be on your port side.
Scenario 2: Cardinal mark near your track
An East Cardinal mark appears close to your planned route.
- What do you know? The recommended passing side relative to the marked danger is east.
- What do you not know? Your exact clearance and whether the water suits your boat.
- What should you do? Identify the danger and depths on the chart, confirm position and adjust early if required.
Scenario 3: Expected buoy not visible
The chartplotter shows a buoy ahead, but no one can see it.
- Possible explanations: Poor visibility, wrong position, hidden buoy, display issue or an aid that is missing/off station.
- Better response: Reduce uncertainty before closing the suspected location. Check depth, bearings, chart scale and other aids.
Scenario 4: Unknown yellow mark
You see a yellow mark but do not know its purpose.
- What do you know? It is likely a special mark.
- What do you not know? The feature or rule it identifies.
- Better response: Consult the chart and relevant publication; do not invent a passing rule.
Scenario 5: The number is wrong
The buoy’s colour matches the one expected, but its number does not.
- What does that conflict tell you? Your identification or position may be wrong, or the aid information may have changed.
- Better response: Keep the identification tentative, slow down and cross-check before proceeding.
A Beginner’s Aid-to-Navigation Routine
Use this compact routine whenever an aid becomes relevant:
See it
What am I looking at, and what else is happening around the boat?
Identify it
What do its colour, shape, topmark, number and light suggest?
Match it
Does it correspond with the charted position, nearby land, depths and other aids?
Interpret it
What type of information does it provide about a channel, danger, route or special feature?
Decide
Does my intended course and speed still make sense?
Reassess
What is the next aid, hazard, vessel or decision point?
Knowledge Check
- Why is “red, right, returning” an incomplete navigation rule?
- What is the practical difference between a buoy and a beacon?
- When entering a Canadian harbour in the conventional direction, which lateral mark is normally kept to starboard?
- What does an East Cardinal mark tell you—and what does it not guarantee?
- Why should an isolated danger mark usually be given a prudent margin?
- What should you do when you encounter a yellow special mark whose purpose is unknown?
- Name four clues you can use to identify an aid besides colour.
- Why might a charted buoy not appear exactly where expected?
- What is the first useful response when the buoy, chart and surroundings do not agree?
- Why is a correctly identified aid still only one part of a navigation decision?
Key Takeaways
- Canada uses IALA Region B lateral buoyage.
- Lateral marks identify the sides of a defined channel; their meaning depends on conventional direction.
- Cardinal marks use compass directions to indicate the recommended side relative to a danger or where the best navigable water lies locally.
- Isolated danger marks identify localized hazards with navigable water around them.
- Safe water marks can identify mid-channel, centreline or landfall positions, but they do not guarantee a risk-free route.
- Yellow special marks require you to consult the chart for their specific purpose.
- Identify an aid using several clues, not colour alone.
- Match what you see with the chart, depth, position, surroundings and other aids.
- If the navigation picture stops making sense, slow down, create space and re-establish it.
Aids to Navigation Quiz
- Canada uses which lateral buoyage region?
- A. Region A
- B. Region B
- C. Both at the same time
- When entering a Canadian harbour from seaward in the conventional direction, a red lateral mark normally identifies:
- A. The port-hand side of the channel
- B. The starboard-hand side of the channel
- C. An isolated danger
- When leaving that harbour, the red lateral marks will normally be kept:
- A. To port
- B. To starboard
- C. Directly ahead
- Which feature best distinguishes a fixed beacon from a buoy?
- A. A beacon cannot carry a light
- B. A beacon is fixed rather than floating on a mooring
- C. A beacon is always on shore
- A North Cardinal mark primarily indicates:
- A. Every direction except north is unsafe
- B. The danger is exactly one metre south
- C. The recommended passing side or best navigable water relative to the feature is north
- What is the topmark of an isolated danger mark?
- A. Two black spheres
- B. One red sphere
- C. Two cones pointing upward
- What should a yellow special mark make you do first?
- A. Always pass it to starboard
- B. Find its specific purpose on the chart or in the relevant publication
- C. Assume it marks safe water
- Which is the strongest identification?
- A. The buoy looks approximately red
- B. The colour, shape, number, expected position and nearby features agree
- C. The chartplotter shows a symbol somewhere nearby
- A charted buoy cannot be seen. What is the best beginner response?
- A. Continue at full speed because the chart proves it is there
- B. Turn immediately toward its charted position
- C. Reduce uncertainty by checking position, chart scale, depth, visibility and other clues
- A safe water mark means:
- A. Navigable water lies around the mark for its intended use, but normal navigation checks still apply
- B. The entire route ahead is hazard-free
- C. No lookout is required
- Which light rhythm identifies an East Cardinal mark?
- A. A group of three quick or very quick flashes
- B. A group of six plus one long flash
- C. A group of nine flashes
- Your buoy identification conflicts with the chart and depth trend. What should you do?
- A. Trust the colour and continue
- B. Slow down, create space, cross-check and reassess
- C. Ignore the depth sounder
Answer Key and Scoring Guide
- B — Region B. Canada uses IALA Region B for lateral marks.
- B — Starboard-hand side. This applies when travelling in the conventional direction.
- A — To port. When outbound, you are travelling opposite the conventional direction, so the relationship reverses.
- B — It is fixed. A buoy floats on a mooring; a beacon is secured to a fixed position.
- C — North is the named passing side. The mark does not prove that every other direction is unsafe or that all water north is suitable for your boat.
- A — Two black spheres. These accompany the black-and-red colour pattern.
- B — Look up its purpose. Yellow identifies a special mark, not a universal passing instruction.
- B — Several agreeing clues. Identification becomes stronger when independent features fit the same conclusion.
- C — Reduce uncertainty. A missing or unseen aid is a reason to cross-check, not to accelerate toward an assumption.
- A — Navigable water, not guaranteed safety. Traffic, weather, depth, current and subsequent hazards still matter.
- A — Three quick or very quick flashes. The number corresponds to three o’clock on a clock face.
- B — Slow down and reassess. Conflicting information is a warning that the navigation picture has not been established.
10–12 correct: Strong understanding. You are ready to practise identifying aids in straightforward waters with appropriate supervision and local information.
7–9 correct: Developing understanding. Review conventional direction, cardinal marks and the chart-to-water identification process.
0–6 correct: Needs review. Revisit the lesson before relying on aids during practical navigation.
The Bigger Lesson
Learning aids to navigation is not mainly about collecting buoy facts.
It is about learning to read the water around you.
You see a mark. You notice its position, shape, colour, number and light. You compare it with the chart. You decide what kind of information it provides. Then you combine that information with depth, traffic, wind, current and the behaviour of your boat.
If everything agrees, you proceed while looking for the next decision point.
If something does not agree, you slow down and investigate.
That is how a beginner stops seeing buoys as isolated objects and starts using them as part of a complete navigation picture.
Before using this skill on an unfamiliar passage, work through the chart, hazards, aids and decision points in How to Plan a Sailing Trip: A Beginner’s Guide.
Natural future-link sentence: “You will use this same skill in the Independent Skipper Capstone, where the aids, chart, traffic, depths and changing conditions must all support your decision to continue, alter the route or turn back.”