
Quick Summary
Rigging a sailboat is the process of preparing it for sailing. It involves inspecting the boat, preparing the sails, organizing the running rigging, and making sure every line and fitting is ready before leaving the dock. Although the number of ropes and fittings can seem overwhelming at first, every piece has a purpose. Once you understand the sequence, rigging becomes a repeatable routine rather than a confusing puzzle.
This guide is written for complete beginners. You do not need previous sailing experience, and you do not need to memorize every line on your first day. Instead, you’ll learn a logical step-by-step process that builds confidence while helping you avoid common mistakes. Throughout the article you’ll find natural opportunities to revisit related topics such as Parts of a Sailboat, Basic Sailing Terminology, Sail Controls Explained, and How to Read the Wind.
Table of Contents
What Does It Mean to Rig a Sailboat?
Before You Begin: Safety Checks
Understanding the Order of Rigging
Step 1: Preparing the Boat
Step 2: Hoisting the Mainsail
Step 3: Preparing the Headsail
Step 4: Preparing the Running Rigging
Step 5: Final Rigging Check
Common Beginner Rigging Mistakes
Rigging Checklist
Frequently Asked Questions
Key Takeaways
What’s Next?
What Does It Mean to Rig a Sailboat?
What “rigging” actually means
If you’ve ever watched a sailboat leave the marina, you’ve probably noticed that the crew doesn’t simply untie the dock lines and sail away. There is always a period of preparation. Sail covers come off, lines are organized, sails are connected, and equipment is checked. Collectively, this preparation is called rigging the sailboat.
Rigging is much more than raising the sails. It is the process of getting the entire sailing system ready to work safely and efficiently. First, the boat is inspected. Next, the sails are prepared and attached correctly. Then the control lines are checked so they run freely without twists or tangles. Finally, the skipper performs a last inspection before departing.
Because every step builds on the previous one, learning the correct order is far more important than trying to memorize dozens of individual ropes. Fortunately, once you develop a routine, the process becomes surprisingly quick.
Standing rigging vs. running rigging
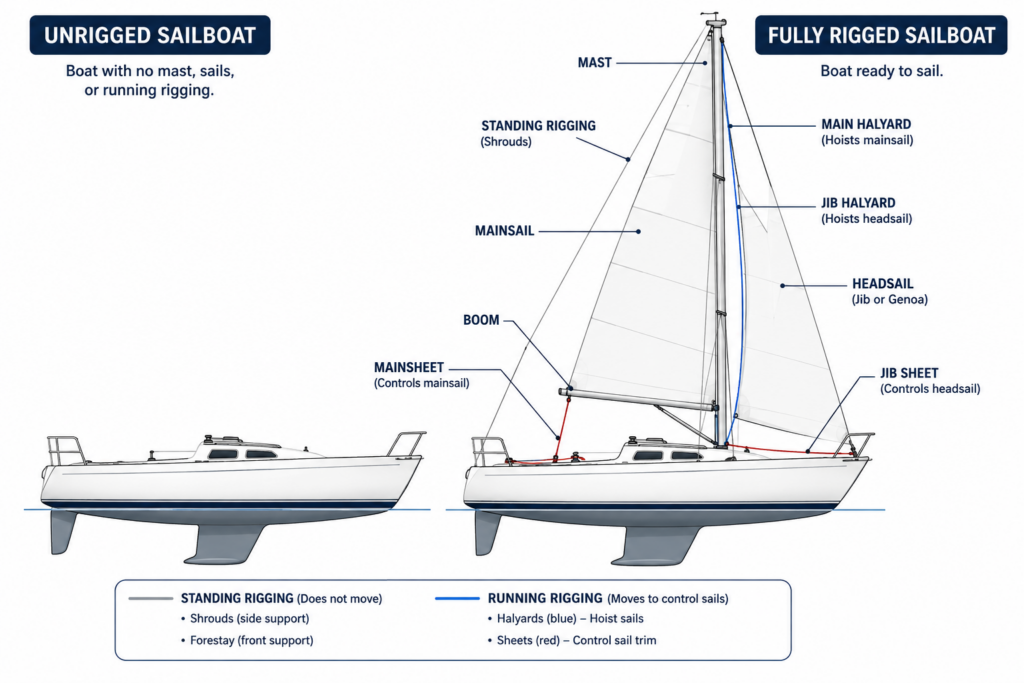
One of the first distinctions every sailor should understand is the difference between standing rigging and running rigging. Standing rigging consists of the fixed wires that support the mast, including the shrouds and stays. These normally remain in place while the boat is in use.
Running rigging refers to the movable lines used to raise, lower, trim, and control the sails. Halyards, sheets, and control lines all belong to the running rigging. If you have already read Parts of a Sailboat and Sail Controls Explained, many of these terms will already be familiar. If not, don’t worry—this guide introduces them again as they become important.
When rigging begins and ends
Rigging begins the moment you start preparing the boat for departure and ends when the boat is completely ready to leave the dock. Likewise, after returning from your sail, you’ll reverse many of these steps as you lower the sails, secure the lines, and protect the boat for its next outing.
Before You Begin: Safety Checks
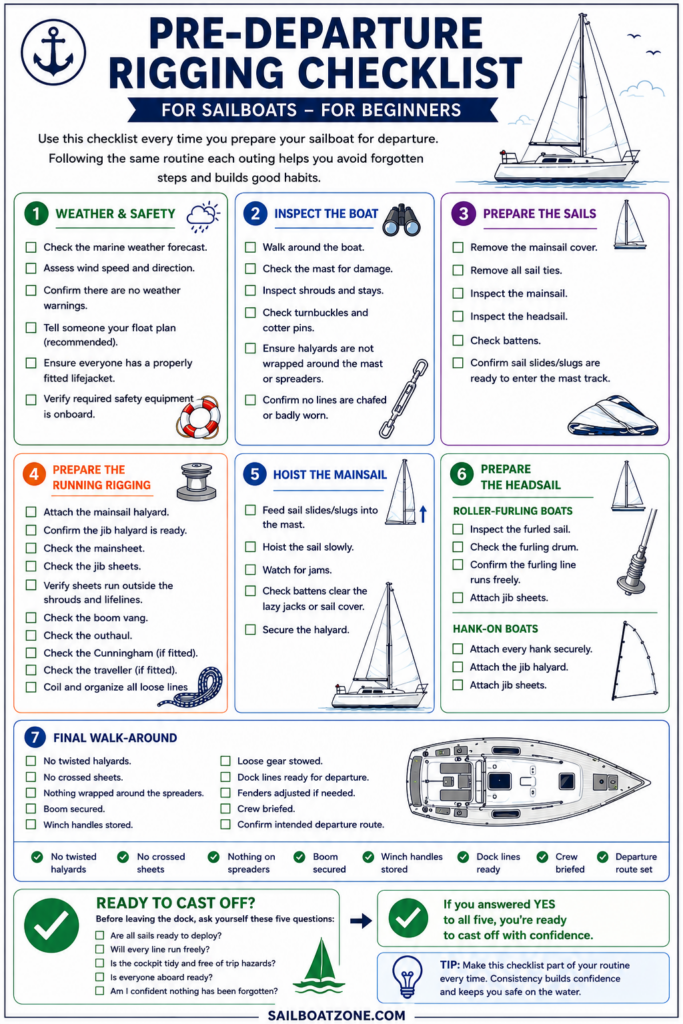
Before touching a single line, take a few minutes to evaluate the weather. Wind strength, gusts, visibility, tide, and approaching storms all influence how safely you can rig and sail. Although rigging usually takes place at the dock, strong winds can cause sails to flog violently as they are hoisted. Therefore, planning ahead makes the entire process calmer and safer.
Check a reliable marine forecast rather than a general weather app. Marine forecasts include information that matters specifically to sailors, such as wind direction, wave height, and small craft advisories.
Inspect the rig
Next, walk slowly around the boat and inspect the mast, standing rigging, halyards, and fittings. Look for broken cotter pins, loose turnbuckles, worn shackles, chafed lines, or anything that appears damaged.
Fortunately, most problems are easy to spot if you make inspections part of your routine. Catching a worn halyard at the dock is much better than discovering it while raising a sail offshore.
Confirm all required safety equipment
Rigging isn’t only about sails. Confirm that lifejackets are aboard, the throwable flotation device is accessible, fire extinguishers are in place, and required signalling equipment is present. Likewise, make sure your VHF radio, if carried, is functioning.
Organize lines before beginning
One of the biggest frustrations for beginners is tangled running rigging. Instead of immediately pulling on halyards, spend a few moments organizing every line into neat coils. Make sure sheets are not wrapped around stanchions, lifelines, or winches.
Because every control line will soon be under load, taking two minutes to organize the cockpit can easily save twenty minutes of frustration later.
Beginner Tip
Never rush rigging. A deliberate five-minute inspection is far safer than fixing mistakes once you’ve left the dock.
Understanding the Order of Rigging
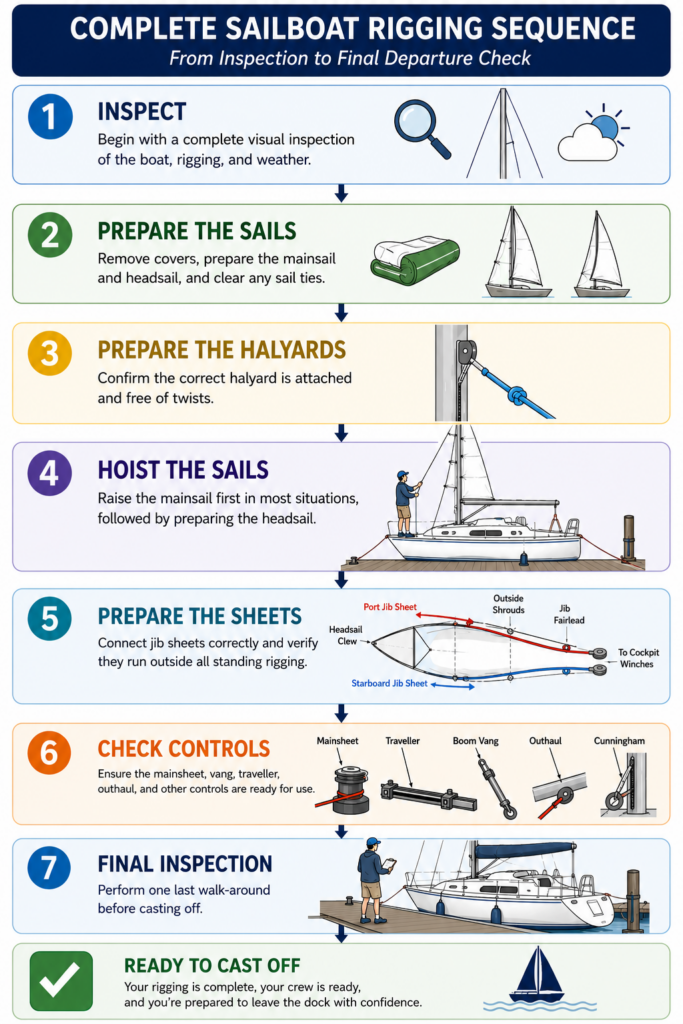
Many beginners feel overwhelmed because they try to remember dozens of individual tasks. However, experienced sailors rarely think that way. Instead, they follow the same simple sequence every time they prepare the boat.
Learning the overall workflow gives every individual task a purpose. Rather than memorizing isolated steps, you’ll understand why each one comes next.
1. Inspect: Begin with a complete visual inspection of the boat, rigging, and weather.
2. Prepare the sails: Remove covers, prepare the mainsail and headsail, and clear any sail ties.
3. Attach halyards: Confirm the correct halyard is attached and free of twists.
4. Hoist the sails: Raise the mainsail first in most situations, followed by preparing the headsail.
5. Attach sheets: Connect jib sheets correctly and verify they run outside all standing rigging.
6. Check controls: Ensure the mainsheet, vang, traveller, outhaul, and other controls are ready for use.
7. Final inspection: Perform one last walk-around before casting off.
Notice that this sequence flows naturally from preparation to departure. First you confirm the boat is safe. Next you prepare the sails. Finally you verify that every control line is ready before leaving the dock. Following the same routine every outing builds confidence and reduces forgotten steps.
Step 1: Preparing the Boat
With the safety checks complete and the overall rigging sequence in mind, you’re ready to begin preparing the boat itself. This stage often looks simple, but it sets the foundation for everything that follows. A few extra minutes spent organizing the boat now can prevent frustrating tangles, unnecessary delays, and avoidable mistakes once you start hoisting sails.
Rather than rushing straight to the halyards, work methodically from bow to stern or stern to bow. Following the same routine every time helps you develop good habits and makes it much less likely that you’ll overlook something important.
Removing sail covers
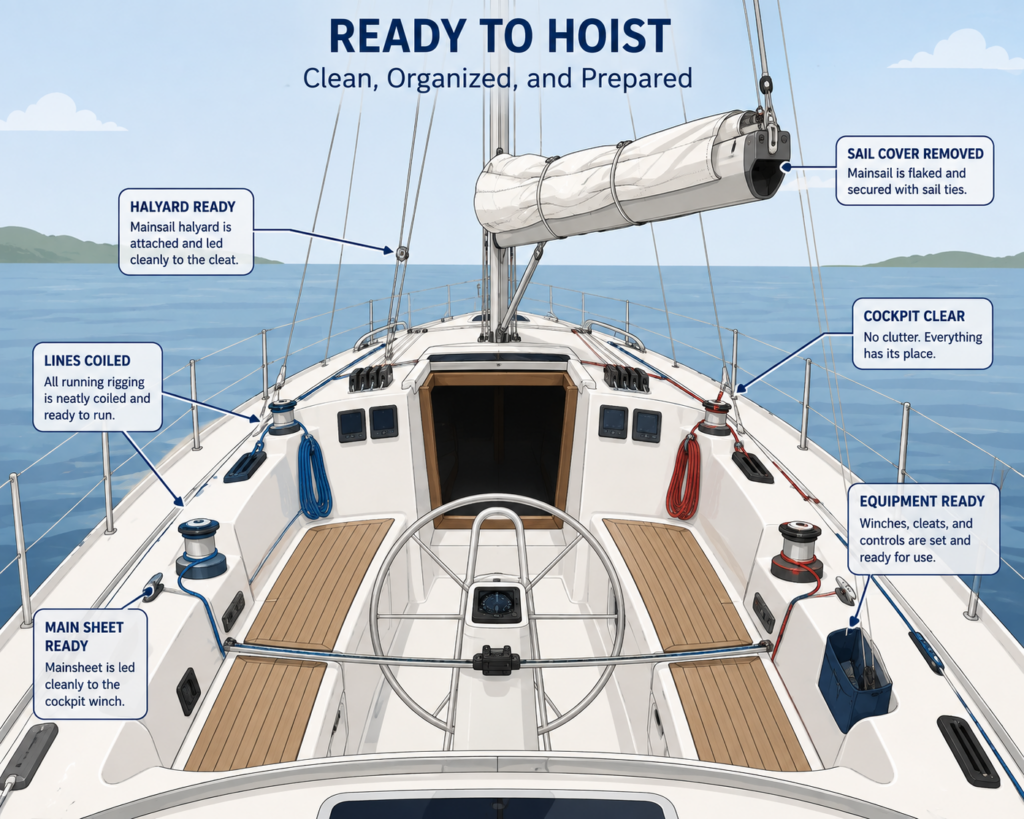
First remove the mainsail cover, any headsail covers, and any protective covers over deck hardware that might interfere with sailing. Fold or roll each cover neatly and stow it where it will stay dry and out of the way. Because you’ll need these covers again when you return, avoid stuffing them into a locker where they may become tangled or damaged.
As you uncover the sails, take a quick look for obvious signs of wear such as torn stitching, damaged battens, or excessive chafe. You don’t need to perform a detailed inspection every outing, but becoming familiar with the normal appearance of your sails makes it much easier to notice when something changes.
Preparing the mainsail
Next, prepare the mainsail for hoisting. Remove sail ties, ensure the sail flakes unfold freely, and verify that the head of the sail is connected to the correct halyard. Likewise, check that the slides or slugs are lined up with the mast track if your boat uses them.
Many beginners accidentally leave one sail tie attached. As a result, the sail begins to rise before suddenly stopping, leading them to believe something is broken. Before pulling on the halyard, simply walk the length of the boom and confirm every tie has been removed.
Preparing the headsail
If your boat has a roller-furling headsail, inspect the sail while it is still furled. Make sure the furling line is neatly wound and that the sail is not partially unfurled.
On boats with a hank-on jib, lay the sail out carefully so the hanks, luff, and sheets remain organized. Although you’ll attach the sail fully in the next step of the article, preparing it now prevents twists and tangles later.
Untangling lines
Finally, organize every line in the cockpit. Halyards should hang freely without wrapping around spreaders or other rigging. Sheets should run outside the lifelines and standing rigging unless your particular boat requires otherwise. Coil excess line neatly so it will run smoothly when placed under load.
Experienced sailors often say that a tidy cockpit is a safe cockpit. Therefore, if something looks messy before departure, it’s worth taking a moment to fix it now rather than while the boat is moving.
Common Beginner Mistakes
Some of the most common preparation mistakes include leaving sail ties attached, rigging with tangled sheets, failing to check that the correct halyard is attached, and dropping loose lines into the water. Fortunately, these are all easy to avoid by slowing down and following the same preparation routine every time.
Remember that preparing the boat is not wasted time. Instead, it is one of the simplest ways to make the rest of the rigging process faster, safer, and more enjoyable.
Step 2: Hoisting the Mainsail
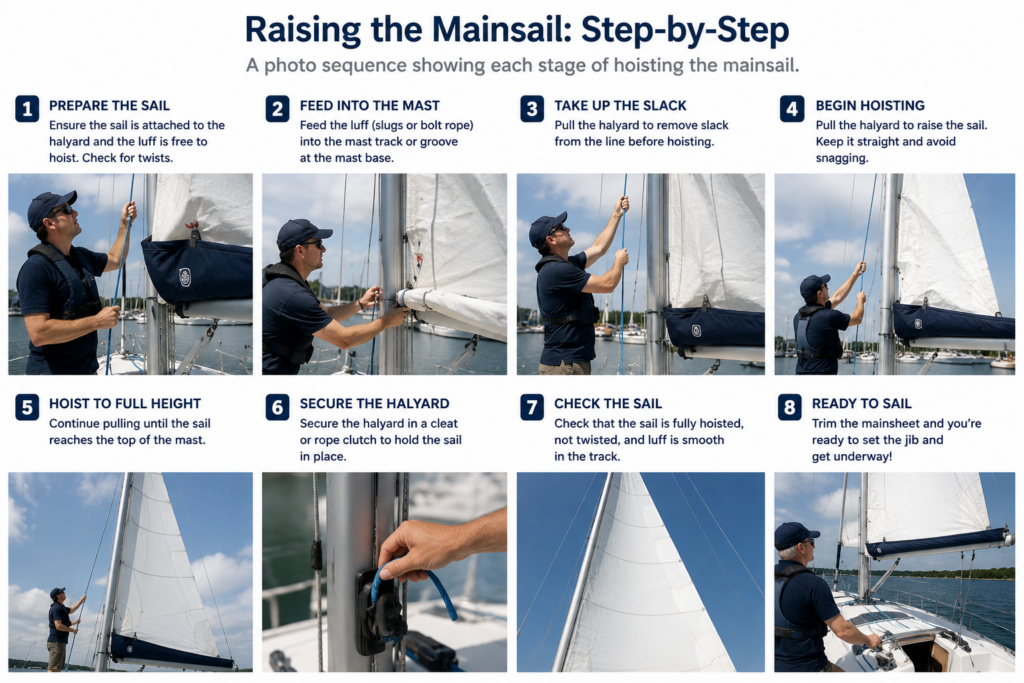
With the boat prepared, you’re ready to hoist the mainsail. For many beginners, this is the moment when sailing starts to feel real. However, it is also the stage where small mistakes can quickly become frustrating. A twisted halyard, a forgotten sail tie, or a slug that jumps out of the mast track can stop the sail from rising smoothly.
Fortunately, hoisting the mainsail follows the same simple sequence every time. Work slowly, watch the sail as it rises, and stop immediately if something doesn’t look right. Pulling harder rarely fixes the problem. Instead, lower the sail slightly, identify the cause, and then continue.
Connecting the halyard
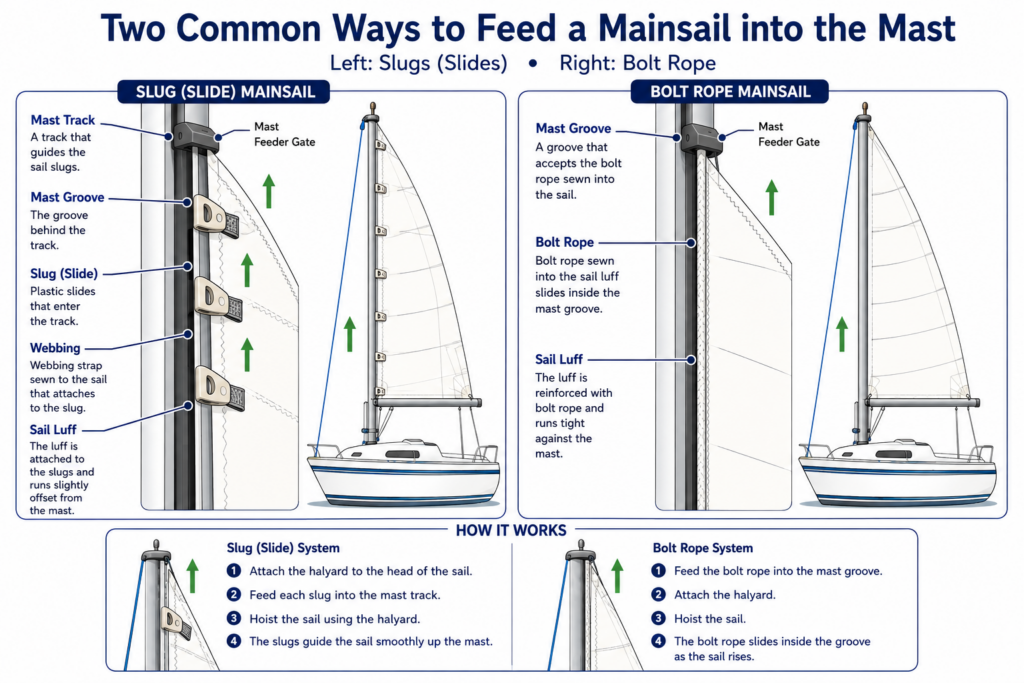
First, confirm that the mainsail halyard is attached securely to the head of the sail using the appropriate shackle or attachment point. Before raising anything, look up the mast to ensure the halyard is not wrapped around a spreader, another halyard, or the forestay.
Because halyards often look similar, beginners sometimes grab the wrong one. Taking a few seconds to trace the line from the masthead to the sail can prevent confusion later.
Feeding slides or slugs
Many cruising sailboats use slides or slugs that fit into the mast track. Feed them into the opening one at a time while supporting the sail. Keep gentle tension on the halyard so the sail remains upright as the next slug is inserted.
If your boat has a bolt-rope mainsail, follow the manufacturer’s procedure for feeding the luff into the mast groove. Although the hardware differs, the goal is the same: allow the sail to move freely without binding.
Raising the sail
Next, begin pulling the halyard steadily. Watch the sail rather than the rope. As the sail climbs, confirm that every slug stays inside the mast track and that battens pass the lazy jacks or sail cover hardware without catching.
Meanwhile, another crew member can guide the sail if needed. On smaller boats, you can alternate between pulling the halyard and checking the sail’s progress. Continue until the head of the sail reaches the top of the mast or the proper hoisting mark specified for your boat.
Securing the halyard
Once the sail is fully hoisted, secure the halyard according to your boat’s arrangement. This may involve a rope clutch, jammer, or cleat. Make the line neat and secure so it cannot slip while sailing.
At this stage the mainsail may still luff because it has not yet been trimmed. That is perfectly normal. Sail trim will be adjusted after leaving the dock using the mainsheet and other sail controls.
Common Beginner Problems
Sail jams: If the sail stops unexpectedly, don’t continue pulling harder. Lower it slightly and inspect the mast track for a twisted slug, trapped batten, or forgotten sail tie.
Twisted halyard: A halyard wrapped around another line creates friction and can damage equipment. Untwist it before continuing.
Battens catching: Battens sometimes snag on lazy jacks or sail cover hardware. Guide the sail by hand as it rises if necessary.
Slugs leaving the mast track: If a slug slips out of the feeder gate, lower the sail and reinstall it correctly before trying again.
Beginner Tip
Watch the sail while hoisting, not just the halyard in your hands. Most problems become obvious long before they become serious if you keep your eyes on the sail. The RYA Knowledge Hub on youtube shows a lot of very helpful sequences related to this topic.
Step 3: Preparing the Headsail
With the mainsail ready, the next step is preparing the headsail. On most modern cruising sailboats this will be a roller-furling jib or genoa, while older boats and many smaller trailer sailers may use a hank-on sail. Although the hardware is different, the goal is exactly the same: prepare the sail so it can be deployed smoothly and controlled safely once you leave the dock.
Rather than thinking of the headsail as a separate system, think of it as working together with the mainsail. Later, when you begin trimming sails and sailing on different points of sail, you’ll see how both sails work as a team to drive the boat forward.
Roller-furling systems
Most beginner-friendly cruising boats use a roller-furling system because it keeps the headsail attached to the forestay and allows it to be rolled in or out from the cockpit. First, inspect the furled sail from top to bottom. The sail should be wrapped neatly around the forestay without loose sections or twisted fabric.
Next, check that the furling line is wound neatly on the drum and runs freely through its fairleads. Because the furling system depends on smooth operation, a line wrapped incorrectly on the drum can make the sail difficult to deploy or retrieve later.
Fortunately, roller-furling systems require very little preparation before sailing. Most of your attention should be spent confirming that everything is free to move and that the jib sheets have been attached correctly.
Hank-on sails
If your boat uses a hank-on jib, you’ll need to attach the sail to the forestay before leaving the dock. Begin at the tack and work upward, clipping each hank securely around the stay. Keep the sail gathered as you work so it does not blow around in the wind.
After every hank is attached, connect the jib halyard to the head of the sail and confirm that the halyard is not twisted around the forestay or another line. Although this process takes longer than using roller furling, many sailors appreciate its simplicity and reliability.
Attaching jib sheets
Whether your sail is roller-furling or hank-on, the jib sheets must be attached correctly. Normally two sheets are secured to the clew of the sail using a bowline or another appropriate knot. From there, each sheet should run outside the shrouds and lifelines before passing through its fairlead and back to the cockpit winch.
Take a moment to trace each sheet with your eyes. If one crosses over the other or passes inside a shroud, correct it now. As a result, the sail will trim properly once it is deployed.
If you are unfamiliar with sheet routing, this is a good opportunity to revisit your articles on Sail Controls Explained and Parts of a Sailboat before continuing.
Checking the furling line
Finally, inspect the furling line one last time. Pull gently on the line to confirm it moves smoothly and that the sail remains securely furled. Likewise, make sure there are several wraps remaining on the drum when the sail is fully rolled in, as recommended by the manufacturer.
Remember that the headsail does not need to be unfurled while you’re still at the dock. Instead, leave it safely rolled until you’re clear of nearby boats and ready to begin sailing. This reduces unnecessary wear on the sail and makes maneuvering away from the dock much easier.
Beginner Tips
• Trace every sheet from the sail to the cockpit before departing.
• Never force a roller-furling system that feels jammed.
• Keep the headsail furled until you’re ready to sail.
• If something doesn’t look right, stop and investigate before continuing.
Step 4: Preparing the Running Rigging
By this point the sails are ready, but the boat still isn’t quite prepared to leave the dock. The final setup involves checking the running rigging—the control lines you’ll use once the sails are drawing. Fortunately, this step is usually quick because most cruising sailboats leave these controls rigged between outings. Your job is simply to confirm that everything is connected correctly, runs freely, and is ready for use.
Mainsheet
The mainsheet controls the boom and is one of the most frequently used control lines while sailing. Confirm it is led correctly through its blocks, free of twists, and not wrapped around cockpit hardware. Leave enough slack that the boom can move naturally once you depart.
Traveller (if equipped)
If your boat has a traveller, verify that the car moves freely and that the control lines are not crossed. Beginners do not need to master traveller trim yet, but it should be ready to use when conditions require it.
Boom vang
Inspect the boom vang to ensure it is attached securely at both ends and that the purchase system is not tangled. In light winds it may not need adjustment immediately, but it should be ready before you leave the dock.
Outhaul
Check that the outhaul is attached and holding the foot of the mainsail correctly. A quick visual inspection is usually sufficient before departure.
Cunningham
If your sail is equipped with a Cunningham, confirm the line is attached and runs freely. Most beginners won’t adjust it often, but it should still be rigged correctly.
Rather than trying to adjust every sail control before leaving the dock, simply confirm each one is ready. You’ll learn how and when to use these controls in greater detail in Sail Controls Explained and How to Trim a Sail.
Step 5: Final Rigging Check
Before casting off, perform one final walk-around. This simple habit takes less than a minute and catches many of the mistakes that can spoil an otherwise enjoyable day on the water. Experienced sailors rarely skip this step because they know it is easier to solve problems while tied securely to the dock.
Nothing wrapped around spreaders
Look up the mast and verify that halyards are hanging cleanly without looping around spreaders, stays, or other lines.
No twisted halyards
Each halyard should run directly from the masthead to its sail without unnecessary twists or chafe.
No crossed sheets
Trace the jib sheets from the clew to the cockpit. They should run outside the standing rigging and lifelines unless your boat is designed otherwise.
Everything secured
Confirm sail covers, dock equipment, loose gear, and unused lines have been stowed safely. Make sure halyards, sheets, and control lines are secured but ready for use.
Crew ready
Finally, ensure everyone aboard knows the departure plan, is wearing appropriate safety equipment when required, and understands their role during departure.
As a final habit, check the latest marine forecast immediately before departure, especially if conditions appear to be changing. Weather on the water can evolve quickly, and a last-minute review may influence your departure time or sailing plan.
Common Beginner Rigging Mistakes
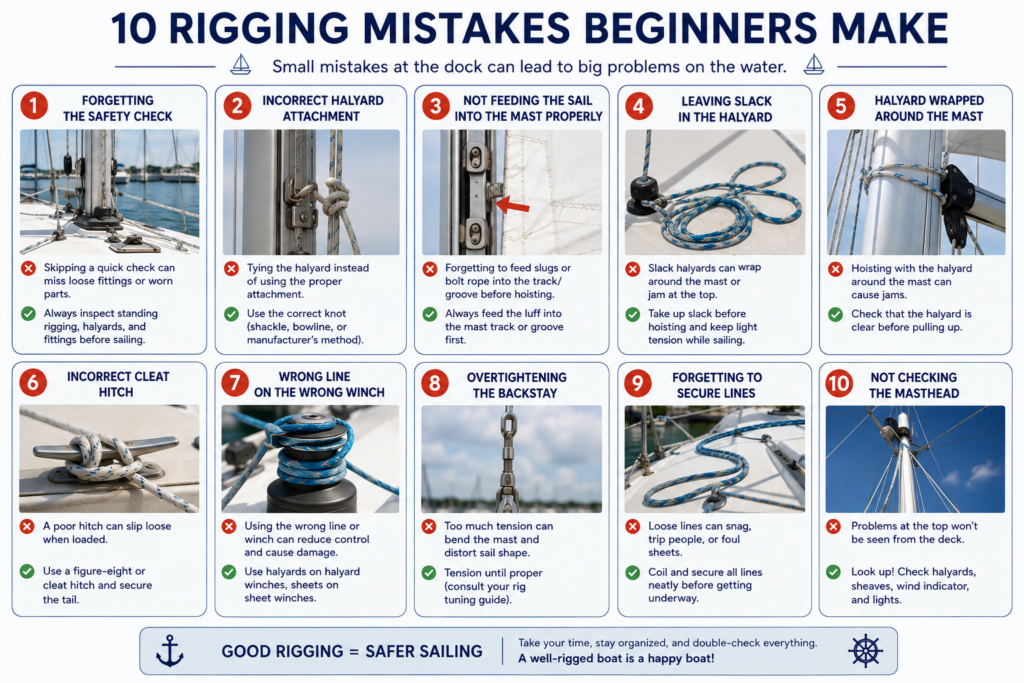
Every sailor makes mistakes while learning to rig a sailboat. Fortunately, most are minor and become less common as you develop a consistent routine. The key is to recognize them before they affect your day on the water.
The most common mistakes include:
• Crossing the jib sheets so they cannot trim properly.
• Hoisting the mainsail with one or more sail ties still attached.
• Twisting the halyard around another line or a spreader.
• Forgetting to tighten or properly secure the halyard.
• Leaving battens loose or improperly installed.
• Wrapping the furling line incorrectly on the drum.
• Failing to secure the boom before departure.
• Leaving loose gear in the cockpit where it becomes a tripping hazard.
• Skipping the final walk-around inspection.
• Rushing because other boats are waiting.
Instead of trying to work faster, aim to work consistently. A repeatable routine is the best defence against forgotten steps.
Rigging Checklist
Use this checklist before every sail.
□ Check the marine weather forecast.
□ Inspect the standing rigging.
□ Remove sail covers and sail ties.
□ Prepare the mainsail.
□ Prepare the headsail.
□ Confirm the correct halyards are attached.
□ Organize all running rigging.
□ Hoist and secure the mainsail.
□ Check jib sheets and furling system.
□ Inspect mainsheet, vang, traveller, outhaul, and Cunningham.
□ Verify no twisted halyards or crossed sheets.
□ Secure loose equipment.
□ Complete the final walk-around.
□ Brief the crew before departure.
This checklist could later become a printable PDF or laminated cockpit reference.
Frequently Asked Questions
How long does it take to rig a sailboat?
Most beginners need 20–40 minutes. With experience, many sailors can prepare a typical cruising sailboat in 10–20 minutes.
Do all sailboats rig the same way?
No. The basic sequence is similar, but the exact hardware varies between boats.
Can one person rig a sailboat?
Yes. Many trailer sailers and cruising sailboats are routinely rigged by one person.
Should I rig before leaving the dock?
Yes. Whenever practical, complete your rigging while securely tied alongside the dock.
Can I hoist sails under power?
Yes. Many sailors motor into open water before hoisting sails, especially when leaving a crowded marina.
Do I always raise the mainsail first?
Usually, yes. On most cruising boats the mainsail is hoisted before deploying the headsail.
Key Takeaways
Rigging means preparing the entire sailboat for safe sailing.
Follow the same sequence every outing.
Inspect the boat before touching the sails.
Organize lines before hoisting.
Watch the sail while raising it.
Complete a final inspection before leaving the dock.
A calm, methodical routine is safer than rushing.
What’s Next?
Now that you know how to rig a sailboat, you’re ready for the next stage of the beginner sailing journey.
Recommended next articles:
• How to Leave the Dock (future)
• How to Steer a Sailboat
• How to Trim a Sail
• Points of Sail Explained
• The Difference Between Tacking and Gybing
• How to Anchor a Sailboat
You may also wish to review:
• Parts of a Sailboat
• Basic Sailing Terminology
• Sail Controls Explained
• How to Read the Wind
• How to Sail a Sailboat
Rigging is one of the first practical skills every sailor learns. At first it may seem like a long list of individual tasks. However, after a handful of outings you’ll discover that the process becomes a familiar routine. Before long, you’ll spend less time wondering what to do next and more time looking forward to casting off and enjoying a day under sail.